

Close-range anti-air
< BBCF
(Undo revision 276537 by Ikonono (talk) Don't touch the overview. Lack of invulnerability backdash is valid when he is the ONLY character in the game such a feature. I may rewrite the "Slow Normals" con later to highlight how one-dimensional his tools are..) Tag: Undo |
|||
| (242 intermediate revisions by 23 users not shown) | |||
| Line 1: | Line 1: | ||
{{ | ==Overview== | ||
{{BBCF/CharacterLinks}} | |||
<div id="home-content" class="home-grid"> | |||
{{card|width=4 | |||
|header=Overview | |||
|content=Hakumen is a '''high damage defensive character'''. His Drive is a '''parry''' which forces the cast into RPS situations where they have to guess, even when they're on the offensive. Hakumen also has a very diverse array of specials, with a unique catch: He needs to spend Heat to perform them. | |||
=== | To offset this catch, Hakumen passively generates Heat at all times and can generate more with his drive. Hakumen is also one of the few characters who can cancel his specials into each other and most of them have high damage and/or proration. The net result is that, with enough resources, Hakumen has an extremely high damage potential. His normals are no slouch either. Hakumen possesses some excellent normals, such as {{clr|C|4C}} and {{clr|C|j.C}} for neutral and {{clr|A|j.2A}} to deal with projectiles. Hakumen also has a solid defense with his drive described below, meaning overall Hakumen is a fairly well-rounded '''high-risk high-reward character'''. | ||
{{ | }} | ||
| | {{BBCF/Infobox|height=2 | ||
| fastestAttack = [[#5A|5A]] (5F whiffs crouchers)<br/>[[#2A|2A]] (7F) | |||
| reversal = [[#2D|2D]] (Catch 1~8F)<br/>[[#6D|6D]] (Catch 1~9F)<br/>[[#Kokūjin: Yukikaze|236236D]] (Catch 1~27F)<br/>[[#Kokūjin Oūgi: Akumetsu|[2]8D]] (Catch 1~16F) (Astral) | |||
| fatalStarter = [[#6C|6C]]<br/>[[#Tsubaki|j.214C]]<br/>[[#Kokūjin: Yukikaze|236236D]] | |||
}} | |||
{{card|width=4 | |||
|header=Drive: Zanshin (God Slash) | |||
|content=Hakumen's Drive projects an energy barrier with a guard point that parries attacks. When triggered with a strike, Hakumen will follow up with an invincible, but blockable, counterattack. This gives Hakumen an effective counter to use against many of his opponent's options. In addition, many of Hakumen's normals cancel into his Drive. This makes Zanshin not only a great defensive tool, but an offensive one as well, countering attacks that may exploit holes in Hakumen's blockstrings. Hakumen's drives share many traits: | |||
*The guard point protects and triggers on either side of Hakumen, and the counterattack will autocorrect to face the opponent. | |||
*If the opponent makes contact with a strike, they experience a long hitstop while Hakumen receives none, making the follow-up much easier to land. | |||
| | *On hit, the counterattack generates 1 Magatama and can be special cancelled for a combo. | ||
| | *If a projectile is guarded, normal drives will not activate their counterattack, but will still remain completely invulnerable throughout recovery. | ||
*Hakumen can also special cancel the guard point trigger itself; doing so will carry over invincibility into the next move for 10 frames. This can be used as a pseudo reversal option even against projectile attacks. | |||
*All drives are in a counterhit state from start to finish. Poor timing or using the incorrect drive for a certain attack can lead to a heavy punish. | |||
|header2=Overdrive: Kishin (Demon God) | |||
* | |content2=During Overdrive, Hakumen's gains the following buffs: | ||
* | *Greatly increases passive Heat gain (see below). | ||
* | *Hakumen becomes immune to Heat Gauge cooldown, vastly improving the Heat generated. Many special moves will leave Hakumen with more Heat than he started with. | ||
* | *Drives generate two Magatama on hit rather than one. | ||
*Drives on hit have more frame advantage, leading to stronger follow ups. | |||
Hakumen's overdrive is straightforward but extremely powerful. It gives Hakumen the ability to use his specials much more freely, and combo routes involving Overdrive deal extremely high damage. The extra Magatama generated alone can turn the tides of a match, even if not used while in Overdrive. The benefits of his overdrive end the instant overdrive does, including the moment an Exceed Accel hits, even if an Overdrive version of a Distortion Drive is still playing out. | |||
}} | }} | ||
</div> | |||
{{ | <div id="home-content" class="home-grid"> | ||
{{card|width=6 | |||
|header=Unique System: Magatama | |||
|content= | |content= | ||
Hakumen has a unique meter system. His | [[File:BBCF_Hakumen_Magatama.png|float|right|thumb|caption|Player 1 Magatama gauge, with 3 3/4 stocks]] | ||
Hakumen has a unique meter system. His Heat Gauge is visually divided up into 8 "Magatama" stocks, which represent 12.5% heat gauge each. These Magatama are used for his special moves in addition to the usual uses for heat. Whilst this mostly just functions as a stylized heat meter, (Rapid cancels still cost half of a full meter, or 4 Magatama, for example) the way Hakumen's heat is generated is quite different: | |||
Hakumen will | *Hakumen starts a round with 1 Magatama. | ||
*Hakumen will gain Heat passively: | |||
**Normally, Hakumen gains 4 Heat points per frame (15 during Overdrive). One Magatama is worth 1250 Heat points, so normally it takes 312.5 frames to gain one Magatama (83.3 frames under OD). This increment takes place in real time and will not be stopped by any type of superflashes, hitstop, blockstop or timer stops (Overdrive). | |||
**This rate is 2 per frame while Hakumen is in hitstun (10 during Overdrive). | |||
**The gain increases by a flat 1 Heat per frame while below 35% health, regardless of state. <!--but auto heat regen is 11 heat per 10f, need more checking?--> | |||
**The final amount is divided by 4 during [[BBCF/Mechanics#Heat_Cooldown|Heat Cooldown]] unless in overdrive. Fractions are truncated, so Hakumen will generate 1 Heat point per frame and zero while in hitstun (even while below 35% health in both cases). | |||
*Successfully hitting with his normal Drives or cutting a projectile will generate one Magatama instead of basing the gain on the damage dealt. | |||
*Hakumen generates Heat from hitting his opponent, blocking and being hit at only 20% of the rate as anyone else. Even though they spend meter to do so and usually incur a cooldown, Special Moves still generate Heat on hit. <!--Based on rough calculations, mostly happy with it--> | |||
Due to this, Hakumen gains much more Heat through his passive gain than by attacking. Players are incentivised to play defensively, keeping their opponent away, calling their attacks and then going all in with a flurry of powerful attacks of their own when the time is right. | |||
}} | }} | ||
</div> | |||
==Normal Moves== | ==Normal Moves== | ||
===<big>{{clr| | ===<big>{{clr|A|5A}}</big>=== | ||
{{BBCF Move Card | |||
|input=5A | |||
|description= | |||
{{ | |||
| | |||
| | |||
*Must be barriered when in the air | *Must be barriered when in the air | ||
On paper this is one of the best jabs in the game; It's one of the rare 5f normals, quick recovery and +3 on block. In reality, however, its hitboxes render it terrible in pressure as it whiffs on everyone crouching except Hakumen and Tager. {{clr|A|2A}} > {{clr|A|5A}} also works in pressure on Relius and Kagura due to their blocking hitboxes. These problems don't apply when using it as an anti-air move, where its hitbox and Barrier-only property make it excellent for this purpose. | |||
<br/>''[[{{PAGENAME}}/Frame_Data# | <br/>''[[{{PAGENAME}}/Frame_Data#Revolver_Action_Table|Gatling Options]] (Can cancel into other normals after 10 frames): {{clr|B|5B}}, {{clr|A|6A}}, {{clr|B|6B}}, {{clr|C|3C}}, {{clr|D|Drives}}, Special, Throw, Jump'' | ||
}} | |||
===<big>{{clr|B|5B}}</big>=== | |||
{{BBCF Move Card | |||
|input=5B | |||
===<big>{{clr| | |description= | ||
{{ | |||
| | |||
| | |||
*Does not hit everyone crouching from far away | *Does not hit everyone crouching from far away | ||
*Must be barriered when in the air | *Must be barriered when in the air | ||
*Hakumen's hurtbox moves far back during start up | *Hakumen's hurtbox moves far back during start up | ||
Fairly situational {{clr| | Fairly situational {{clr|B|5B}}. While it's 0 on block and jump cancellable, it suffers from a poor horizontal hitbox which hinders its usefulness in pressure. At close range, it can gatling into {{clr|B|2B}} for a 2-frame gap frame trap or {{clr|B|6B}} for a 50/50. | ||
In neutral, it isn't that good either due to its poor hitbox and fairly high recovery. Thanks to its awkward hurtbox, it has some niche punishing purposes like making the first hit of Kokonoe's 214214x whiff and preventing her from using RC. | In neutral, it isn't that good either due to its poor hitbox and fairly high recovery. Thanks to its awkward hurtbox, it has some niche punishing purposes like making the first hit of Kokonoe's 214214x whiff and preventing her from using RC. | ||
<br/>''[[{{PAGENAME}}/Frame_Data# | <br/>''[[{{PAGENAME}}/Frame_Data#Revolver_Action_Table|Gatling Options]] (Can cancel into other normals after 21 frames): {{clr|A|5A}}, {{clr|A|2A}}, {{clr|B|2B}}, {{clr|A|6A}}, {{clr|B|6B}}, {{clr|D|Drives}}, Special, Jump'' | ||
}} | |||
===<big>{{clr| | ===<big>{{clr|C|5C}}</big>=== | ||
{{BBCF Move Card | |||
|input=5C | |||
|description= | |||
{{ | |||
| | |||
| | |||
*13F-15F can cut projectiles | *13F-15F can cut projectiles | ||
*Must be barriered when in the air | *Must be barriered when in the air | ||
*Hard Knockdown on | *Hard Knockdown on airborne opponents | ||
*Forces crouching on hit | *Forces crouching on hit | ||
Haku's standard punish move. It forces crouching on hit, which can lead to high damage combos with only one | Haku's standard punish move. It forces crouching on hit, which can lead to high damage combos with only one Magatama with {{clr|A|214A}} > {{clr|C|2C}}. Can be cancelled into overdrive. On a {{clr|C|5C}} CH > OD if the opponent bursts immediately, there is enough time to block the burst and punish with another {{clr|C|5C}}. | ||
In neutral, it can act as a pseudo high-risk high-reward anti-air if spaced correctly. | In neutral, it can act as a pseudo high-risk high-reward anti-air if spaced correctly. | ||
<br/>''[[{{PAGENAME}}/Frame_Data#Revolver_Action_Table|Gatling Options]]: Special'' | |||
}} | |||
< | ===<big>{{clr|A|2A}}</big>=== | ||
{{BBCF Move Card | |||
|input=2A | |||
|description= | |||
One of the furthest-reaching {{clr|A|2A}} of the cast and amazing in neutral. In pressure, it can be linked into itself (gapless), {{clr|B|2B}} (can be DP'ed on IB), {{clr|A|6A}} (frame trap) or any special. Additionally, while {{clr|A|2A}} > {{clr|B|6B}} isn't a gatling it but can be used as a mix-up option. Beware, that {{clr|A|2A}} > {{clr|B|6B}}/{{clr|B|2B}} may whiff if done from too far. | |||
</ | <br/>''[[{{PAGENAME}}/Frame_Data#Revolver_Action_Table|Gatling Options]] (Can cancel into other normals after 11 frames): {{clr|A|5A}}, {{clr|B|5B}}, {{clr|A|2A}}, {{clr|B|2B}}, {{clr|A|6A}}, {{clr|B|6B}}, {{clr|C|3C}}, {{clr|D|Drives}}, Special, Throw'' | ||
| | |||
{| | |||
{{ | |||
{{ | |||
| | |||
| | |||
}} | }} | ||
< | ===<big>{{clr|B|2B}}</big>=== | ||
{{BBCF Move Card | |||
|input=2B | |||
|description= | |||
*Air tight blockstring when late chaining into {{clr|A|5A}} | |||
*Good active frames make it good for checking approaches, catching rolls, and as a meaty. | |||
With its great range and quick start-up, this is one of Hakumen's best moves for footsies. Being a 8-frame low, it enables 50/50 mix-up when combined with {{clr|B|6B}}. In pressure, it can be followed up with {{clr|A|623A}} > Throw or {{clr|A|214A}} (can be DP'ed on IB). | |||
<br/>''[[{{PAGENAME}}/Frame_Data#Revolver_Action_Table|Gatling Options]] (Can cancel into other normals after 18 frames): {{clr|A|5A}}, {{clr|A|2A}}, {{clr|D|Drives}}, Special'' | |||
| | |||
{{ | |||
| | |||
| | |||
}} | }} | ||
===<big>{{clr| | ===<big>{{clr|C|2C}}</big>=== | ||
{{BBCF Move Card | |||
|input=2C | |||
|description= | |||
{{ | |||
| | |||
| | |||
*Head invulnerability from frames 9-15 | *Head invulnerability from frames 9-15 | ||
*10-18F can cut projectiles | *10-18F can cut projectiles | ||
*Must be barriered when in the air | *Must be barriered when in the air | ||
{{clr| | {{clr|C|2C}} has great vertical reach but is very punishable on whiff. If blocked, it can be cancelled into {{clr|A|214A}} or {{clr|A|623A}} to make it safe. This move should only be used as an anti-air if it certain it will at the very least be blocked. This move is useful against IAD at midrange but is very weak against cross-ups. | ||
Comboing after it can be fairly tricky. {{clr| | Comboing after it can be fairly tricky. {{clr|C|2C}} > 9hjc {{clr|A|j.2A}} works most of the time on normal and counter hit and at most height and distance. On CH, it can combo into Falling {{clr|C|j.2C}} > {{clr|A|6A}} > {{clr|B|6B}} for high damage combos. | ||
<br/>''[[{{PAGENAME}}/Frame_Data# | <br/>''[[{{PAGENAME}}/Frame_Data#Revolver_Action_Table|Gatling Options]]: Special, Jump (on hit)'' | ||
}} | |||
===<big>{{clr|A|6A}}</big>=== | |||
{{BBCF Move Card | |||
|input=6A | |||
===<big>{{clr| | |description= | ||
{{ | |||
| | |||
| | |||
*Must be barriered when in the air | *Must be barriered when in the air | ||
Situational pressure tool. In pressure, it's -1 at close range, +0 if done from a distance. While it pushes Hakumen forward, it isn't that strong in pressure as the options afterwards are limited, especially if it is barriered. {{clr| | Situational pressure tool. In pressure, it's -1 at close range, +0 if done from a distance. While it pushes Hakumen forward, it isn't that strong in pressure as the options afterwards are limited, especially if it is barriered. {{clr|A|6A}} > {{clr|B|6B}} is gapless but heavily telegraphed, as {{clr|A|6A}} doesn't have any gatling into a low. On CH, it can combo into Forward Hop > {{clr|C|5C}} > {{clr|A|214A}} or {{clr|B|214214B}}, the latter being extremely rare. | ||
<br/>''[[{{PAGENAME}}/Frame_Data# | <br/>''[[{{PAGENAME}}/Frame_Data#Revolver_Action_Table|Gatling Options]]: {{clr|B|6B}}, {{clr|D|Drives}}'' | ||
}} | |||
===<big>{{clr|B|6B}}</big>=== | |||
{{BBCF Move Card | |||
|input=6B | |||
===<big>{{clr| | |description= | ||
{{ | |||
| | |||
| | |||
*4-22F foot invulnerable | *4-22F foot invulnerable | ||
*Must be barriered when in the air | *Must be barriered when in the air | ||
One of the fastest overheads in the game, but doesn't combo into anything on a normal hit. Do not to abuse this move in pressure as it has a lot of recovery and is -4 on block. If used too predictably, it is possible to OD through it and reliably punish it. It only leads to combos on CH, rapid cancel, after a high {{clr| | One of the fastest overheads in the game, but doesn't combo into anything on a normal hit. Do not to abuse this move in pressure as it has a lot of recovery and is -4 on block. If used too predictably, it is possible to OD through it and reliably punish it. It only leads to combos on CH, rapid cancel, after a high {{clr|A|6A}} hit or into Shippu > Kishuu near the corner. | ||
{{clr| | {{clr|B|6B}} is also a versatile okizeme ender, which leads to safejumps on frame 13 reversals on grounded hit and frame 9 reversals on air hit. | ||
<br/>''[[{{PAGENAME}}/Frame_Data# | <br/>''[[{{PAGENAME}}/Frame_Data#Revolver_Action_Table|Gatling Options]]: {{clr|D|Drives}}, Super'' | ||
}} | |||
===<big>{{clr| | ===<big>{{clr|C|6C}}</big>=== | ||
{{BBCF Move Card | |||
|input=6C,6[C] Lv 1, 6[C] Lv 2 |versioned=input | |||
|description= | |||
{{ | |||
| | |||
| | |||
| | |||
The '''No Charge''' version has these unique properties: | The '''No Charge''' version has these unique properties: | ||
*Staggers on ground counter hit. | *Staggers on ground counter hit. | ||
| Line 395: | Line 170: | ||
The '''Fully Charged''' version has these unique properties: | The '''Fully Charged''' version has these unique properties: | ||
*Bonus Proration 110% | |||
*58-62F can cut projectiles | *58-62F can cut projectiles | ||
*Forces fatal counter even on normal hit | *Forces fatal counter even on normal hit | ||
| Line 406: | Line 182: | ||
While it is on paper {{clr| | While it is on paper {{clr|C|6C}} Hakumen's best move to punish moves, it requires a fatal counter to link into moves other than {{clr|A|5A}} and it can't be cancelled into overdrive. As such, {{clr|C|5C}} is often better as a punishing tool. Regardless, it can be used to punish some DPs such as Ragna and Jin's {{clr|C|623C}} for OD-less high-damage routes. | ||
In neutral, {{clr| | In neutral, {{clr|C|6C}} has a pretty large horizontal hitbox, but its long recovery and slow startup makes it a poor spacing tool. | ||
{{clr| | {{clr|C|6C}} (level 2) is essentially a combo filler in the corner since it causes slide on grounded opponents, examples include Forward Throw > {{clr|A|623A}} > {{clr|C|6C}} (level 2) or {{clr|C|41236C}}(1) > {{clr|A|623A}} > {{clr|C|6C}} (level 2). | ||
{{clr| | {{clr|C|6C}} (level 3) is an extremely situational punishing move. It can be used to punish Arakune's {{clr|C|236236C}}, Platinum's parry, Terumi's parry super, Azrael's astral and Mai's {{clr|D|236D}} (by using overdrive to make the second hit of her super whiff). | ||
</ | <br/>''[[{{PAGENAME}}/Frame_Data#Revolver_Action_Table|Gatling Options]]: Super'' | ||
}} | }} | ||
===<big>{{clr|C|3C}}</big>=== | |||
{{BBCF Move Card | |||
|input=3C | |||
|description= | |||
*7-14F can cut projectiles, Hakumen's fastest grounded move for doing so. | |||
A very fast and far reaching poke. Since it only has 8-frame of start-up, it can be used to punish EA at close range. It requires a CH or RC to combo. Up close, It can combo into {{clr|A|6A}} > {{clr|B|6B}} and {{clr|B|2B}} > {{clr|A|214A}} from further away. Since it's -12 it's extremely easy to punish as such: | |||
'''Do not autopilot combos that end with {{clr|C|3C}} in pressure.''' | |||
</ | <br/>''[[{{PAGENAME}}/Frame_Data#Revolver_Action_Table|Gatling Options]]: {{clr|B|214214B}}'' | ||
}} | |||
===<big>{{clr| | ===<big>{{clr|C|4C}}</big>=== | ||
{{BBCF Move Card | |||
|input=4C | |||
|description= | |||
{{ | |||
| | |||
| | |||
*Fast and long-ranged neutral tool. | *Fast and long-ranged neutral tool. | ||
*8-10F can cut projectiles. | *8-10F can cut projectiles. | ||
{{clr| | {{clr|C|4C}} is one of Hakumen's prime neutral tool thanks to it's great range and start-up. Be careful, as many characters can simply dash under or uses moves that low profile to avoid it (Such as Izanami's {{clr|B|2B}}). It only combos into {{clr|C|632146C}} on normal hit. On CH, it can be linked into itself, {{clr|A|214A}} or {{clr|A|623AA}}, but none of these work at max range. | ||
<br/>''[[{{PAGENAME}}/Frame_Data# | <br/>''[[{{PAGENAME}}/Frame_Data#Revolver_Action_Table|Gatling Options]]: Super'' | ||
}} | }} | ||
A | ===<big>{{clr|A|j.A}}</big>=== | ||
{{BBCF Move Card | |||
|input=j.A | |||
|description= | |||
*Late chains into {{clr|B|j.B}} | |||
A pretty decent tool for air to air situations, and for setting up a Throw Reject Miss on an unsuspecting opponent (IAD {{clr|A|j.A}} x(1~2) > Air throw). In neutral, IAD {{clr|A|j.A}} > {{clr|C|j.C}} is very strong as the {{clr|A|j.A}} deals with the other air-to-air and let the {{clr|C|j.C}} hit very close to the ground. It's fairly difficult to combo after {{clr|A|j.A}}. On normal hit, it only combos into {{clr|A|j.A}}, {{clr|B|j.B}}, {{clr|A|j.214A}} at certain heights; On CH, combos into {{clr|C|j.C}} and Falling {{clr|B|j.B}} > {{clr|C|5C}}. | |||
</ | <br/>''[[{{PAGENAME}}/Frame_Data#Revolver_Action_Table|Gatling Options]] (Can cancel into other normals after 13 frames): {{clr|A|j.A}}, {{clr|B|j.B}}, Special, Throw'' | ||
| | |||
}} | }} | ||
===<big>{{clr|B|j.B}}</big>=== | |||
{{BBCF Move Card | |||
|input=j.B | |||
|description= | |||
*Late chains into {{clr|A|j.A}} and {{clr|A|j.2A}} | |||
*Solid crossup hitbox | |||
An amazing normal with a better hitbox than it looks. It's a very good move for jump ins and for crossing the opponent up. On okizeme, after an air hit {{clr|B|6B}}, Hakumen can 9jc > {{clr|A|j.A}} (whiff) > {{clr|B|j.B}} or 669 > {{clr|A|j.A}} (whiff) > {{clr|B|j.B}} (to cross-up) for a left right/mix-up which also acts as a safejump. The 669 option is also useful to get out of the corner. | |||
<br/>''[[{{PAGENAME}}/Frame_Data#Revolver_Action_Table|Gatling Options]] (Can cancel into other normals after 15 frames): {{clr|A|j.A}}, {{clr|A|j.2A}}, Special, Jump | |||
| | |||
{{ | |||
| | |||
| | |||
}} | }} | ||
===<big>{{clr|C|j.C}}</big>=== | |||
{{BBCF Move Card | |||
|input=j.C | |||
|description= | |||
===<big>{{clr| | |||
{{ | |||
| | |||
| | |||
*Wall sticks on corner hits | *Wall sticks on corner hits | ||
*Projectile guard point 10F-19F | *Projectile guard point 10F-19F | ||
The go-to tool for Hakumen's air-to-air game. Its hitbox extends all the way from the tip of Hakumen's blade to his shoulder, which makes it great for spacing in the air. It blows the opponent back on hit, and wall sticks in the corner. On a air hit CH and near the corner, it is possible to combo with | The go-to tool for Hakumen's air-to-air game. Its hitbox extends all the way from the tip of Hakumen's blade to his shoulder, which makes it great for spacing in the air. It blows the opponent back on hit, and wall sticks in the corner. On a air hit CH and near the corner, it is possible to combo with {{clr|C|j.C}} CH > IAD {{clr|C|j.C}} > {{clr|B|j.214B}} or {{clr|C|j.C}} CH > IAD > {{clr|C|5C}} if close enough to the ground. | ||
On tall characters falling {{clr| | On tall characters falling {{clr|C|j.C}} is also a strong zoning tool. Bear in mind its slow startup means that it must be used preemptively for close to the ground air-to-air confrontations. | ||
<br/>''[[{{PAGENAME}}/Frame_Data# | <br/>''[[{{PAGENAME}}/Frame_Data#Revolver_Action_Table|Gatling Options]]: Special, Jump (on hit)'' | ||
}} | |||
</ | ===<big>{{clr|A|j.2A}}</big>=== | ||
{{BBCF Move Card | |||
|input=j.2A | |||
|description= | |||
*Projectile guard point 5F-24F | |||
Hakumen's fastest and overall best move for cutting the opponent's projectiles thanks to its long active time and early anti-projectile hitbox, and decent air-to-air tool overall. It only gatlings into {{clr|C|j.C}} and specials. Primarily used against zoners to approach. The strategy is to 9jc > Barrier > Delay {{clr|A|j.2A}}. It cuts projectiles in neutral and keeps a jump/airdash option available afterward to adapt to the situation. | |||
<br/>''[[{{PAGENAME}}/Frame_Data#Revolver_Action_Table|Gatling Options]] (Can cancel into other normals after 5 frames of recovery): {{clr|C|j.C}}, Special, Jump | |||
| | |||
}} | }} | ||
==== ==== | ===<big>{{clr|C|j.2C}}</big>=== | ||
{{BBCF Move Card | |||
|input=j.2C | |||
|description= | |||
*Projectile guard point 14F-19F | *Projectile guard point 14F-19F | ||
Decent air to ground tool, it has a bigger hitbox than {{clr|B|j.B}} but is slower and it's harder to combo after it. A very common mistake is to overuse IAD {{clr|C|j.2C}} in neutral. {{clr|C|j.2C}} is very slow and as such fairly easy to anti-air. 7/9jc > Barrier > Close to the ground {{clr|C|j.2C}} can be very strong as it exploit {{clr|C|j.2C}} great hitbox while making hard to punish. In the corner {{clr|B|6B}} > {{clr|A|j.A}}(w) > Falling {{clr|C|j.2C}} acts as a safejump. {{clr|C|j.2C}} is also used after {{clr|A|j.214A}} air combo enders to prevent delay techs, rolls or to even meaty with certain setups. | |||
<br/>''[[{{PAGENAME}}/Frame_Data#Revolver_Action_Table|Gatling Options]]: Special'' | |||
}} | }} | ||
==Drive Moves== | |||
Each of Hakumen's Drive normals automatically trigger a counterattack after blocking an opponent's strike, but not after blocking a projectile. Hakumen becomes fully invulnerable for the remainder of the Drive move if any attack is blocked, and also gains the option to cancel into any special, super, Crush Trigger or Exceed Accel if the counterattack is not triggered. Each counterattack's startup can also be cancelled into any of the same options in a short window before they are active. Any special or super (with the exceptions of {{clr|D|236236D}} or specifically OD {{clr|C|632146C}}) cancelled into this way will be fully invulnerable for the first 10 frames. | |||
< | ===<big>{{clr|D|5D}}</big>=== | ||
{{BBCF Move Card | |||
|input=5D,5[D] Lv 1,5[D] Lv 2,5D Attack |versioned=input | |||
|description= | |||
*Can be held to extend parry window | |||
*Cannot block low moves, regardless of attribute. | |||
*Gain 1 Magatama when followup attack connects. | |||
*0% heat gain multiplier (No normal heat gain outside of the fixed 1 Magatama) | |||
*Swaps sides and causes hard knockdown | |||
Your general purpose counter and the most lenient with its timing due to its ability to be held. However, this is the only normal drive move that doesn't have guard point from the first frame, so don't use it as a reversal. Gives reasonable reward on hit. | |||
{{clr|D|5D}} can act as a pseudo anti-air. It combos into {{clr|B|236B}}, {{clr|A|623A}} and can be OD cancelled | |||
<br/>''[[{{PAGENAME}}/Frame_Data#Revolver_Action_Table|Gatling Options]]: Special'' | |||
}} | }} | ||
===<big>{{clr|D|2D}}</big>=== | |||
{{BBCF Move Card | |||
|input=2D,2D Attack |versioned=input | |||
|description= | |||
*Cannot block overhead moves, regardless of attribute. | |||
*Gain 1 Magatama when followup attack connects. | |||
*0% heat gain multiplier (No normal heat gain outside of the fixed 1 Magatama) | |||
*Swaps sides and causes hard knockdown | |||
A mid and low counter that is active frame 1, so can be used as a wake-up reversal and generally effective against most grounded moves, although the follow-up attack may miss entirely depending on the hitboxes. On hit it puts the opponent behind Hakumen, useful for corner switching with an opponent. Loses to overheads, but most of these are slower than other attacks so the Guardpoint will likely have expired anyway. Just like {{clr|D|5D}}, it combos into {{clr|B|236B}}, {{clr|A|623AA}} and can be OD cancelled. | |||
</ | <br/>''[[{{PAGENAME}}/Frame_Data#Revolver_Action_Table|Gatling Options]]: Special'' | ||
}} | |||
===<big>{{clr| | ===<big>{{clr|D|6D}}</big>=== | ||
{{BBCF Move Card | |||
|input=6D,6D Attack |versioned=input | |||
|description= | |||
*Cannot block low moves, regardless of attribute. | |||
*Gain 1 Magatama when followup attack connects. | |||
*0% heat gain multiplier (No normal heat gain outside of the fixed 1 Magatama) | |||
*On successful counter, blows opponent away and wallbounces | |||
{{ | |||
| | |||
| | |||
| | |||
* | |||
*Gain 1 | |||
*0% heat gain multiplier | |||
Where {{clr| | Where {{clr|D|5D}} is a safer prediction move with a potentially bigger reward, this is more akin to a reversal, going active in 1 frame but having bad recovery. Like {{clr|D|5D}}, it catches highs and mids, but loses to lows. Sometimes used after {{clr|A|6A}} or {{clr|B|6B}} to catch attempts at poking out. Primarily used on reaction after an OD flash or against slow overheads. It can also be used to counter some IOH like Rachel's {{clr|B|5B}} > 9jc {{clr|D|j.2D}} {{clr|A|j.A}}. | ||
Unfortunately, it's very difficult to combo after it and the combos usually aren't worth doing. | Unfortunately, it's very difficult to combo after it and the combos usually aren't worth doing. | ||
<br/>''[[{{PAGENAME}}/Frame_Data# | <br/>''[[{{PAGENAME}}/Frame_Data#Revolver_Action_Table|Gatling Options]]: Special'' | ||
}} | |||
===<big>{{clr| | ===<big>{{clr|D|j.D}}</big>=== | ||
{{BBCF Move Card | |||
|input=j.D,j.D Attack |versioned=input | |||
|description= | |||
*No weakness to specific guard types, unlike other Drives. | |||
{{ | |||
| | |||
| | |||
| | |||
* | |||
*Stalls air momentum. | *Stalls air momentum. | ||
*Gain 1 | *Gain 1 Magatama when followup attack connects. | ||
*0% heat gain multiplier | *0% heat gain multiplier (No normal heat gain outside of the fixed 1 Magatama) | ||
The anti-air-to-air and anti-anti-air drive. Can be used when falling down or after an IAD to counter moves which are otherwise tough to deal with. It is also a mindgame tool after a blocked | The anti-air-to-air and anti-anti-air drive. Can be used when falling down or after an IAD to counter moves which are otherwise tough to deal with. It is also a mindgame tool after a blocked {{clr|A|j.214A}} to deter the opponent from using an anti-air. Be careful though, as it can be dealt with air grabs. After {{clr|D|j.D}}, Hakumen is in recovery until landing. As such, using it while high in the air is a risky gamble. On hit, it combos into {{clr|A|j.2A}} or {{clr|C|j.214C}}. | ||
As of CF2, an air option (double jump, air dash) is regained upon a successful catch, meaning it is always possible to go for | As of CF2, an air option (double jump, air dash) is regained upon a successful catch, meaning it is always possible to go for {{clr|D|j.D}} > {{clr|A|j.2A}} > 9jc > {{clr|B|j.B}} > {{clr|A|j.2A}} > {{clr|A|j.214A}} even after a double jump. | ||
<br/>''[[{{PAGENAME}}/Frame_Data# | <br/>''[[{{PAGENAME}}/Frame_Data#Revolver_Action_Table|Gatling Options]]: Special'' | ||
}} | |||
==Universal Mechanics== | ==Universal Mechanics== | ||
===<big>Forward Throw</big>=== | ===<big>Forward Throw</big>=== | ||
{{InputBadge|{{clr|B|B}}+{{clr|C|C}}}} | |||
{{BBCF Move Card | |||
|input=B+C | |||
|description= | |||
{{ | |||
| | |||
| | |||
*100% minimum damage (1500) | *100% minimum damage (1500) | ||
*Staggers on hit | *Staggers on hit | ||
Primarily used after a {{clr| | Primarily used after a {{clr|A|2A}} at close range or {{clr|A|623A}} in pressure. Midscreen, it combos into {{clr|C|2C}} or Forward Hop > {{clr|B|j.214B}}. In the corner, it combos into {{clr|A|623A}} > {{clr|C|6C}}(level 2). The first hit after throw is unburstable. In the corner, Throw > ODc > {{clr|C|6C}}(level 2) leads to efficient combos making it a very useful round ender. | ||
}} | |||
< | ===<big>Back Throw</big>=== | ||
</ | {{InputBadge|{{clr|B|4B}}+{{clr|C|C}}}} | ||
{{BBCF Move Card | |||
|input=4B+C | |||
|description= | |||
*100% minimum damage (1500) | |||
Hits twice, only the second move can be special cancelled. Unlike forward throw, back throw requires a Magatama midscreen to continue the combo with {{clr|A|623A}}, {{clr|A|623AA}} or Delay {{clr|A|214A}}. The first hit can be rapid cancelled into {{clr|C|5C}} OD avoiding the move's proration and thus leading to very high damage under the right circumstances. This is, however, very situational and a fairly difficult link. | |||
| | |||
}} | }} | ||
===<big>Air Throw</big>=== | ===<big>Air Throw</big>=== | ||
{{InputBadge|{{clr|B|j.B}}+{{clr|C|C}}}} | |||
{{BBCF Move Card | |||
|input=j.B+C | |||
|description= | |||
{{ | |||
| | |||
| | |||
*100% minimum damage (1500) | *100% minimum damage (1500) | ||
The second hit can combo into | The second hit can combo into {{clr|B|j.B}}, {{clr|A|j.2A}}, {{clr|C|j.2C}} (If high enough) or {{clr|A|2A}} > {{clr|A|6A}} (If too close to the ground). In the corner, combos into {{clr|C|j.C}} > {{clr|C|6C}}. This is also sometime used as an air combo ender, as not a lot of characters can deal with {{clr|C|j.C}} after teching it. | ||
}} | |||
===<big>Counter Assault</big>=== | ===<big>Counter Assault</big>=== | ||
{{InputBadge|{{clr|A|6A}}+{{clr|B|B}} while Blocking}} | |||
{{BBCF Move Card | |||
|input=6A+B | |||
|description= | |||
{{ | |||
| | |||
| | |||
*180F meter cooldown | *180F meter cooldown | ||
*1-20F invincibility | *1-20F invincibility | ||
*Requires 4 | *Requires 4 Magatama | ||
A fairly good counter assault with a nice hitbox, as it can't be low profiled and has decent reach. It is, however, not used very often as spending 4 | A fairly good counter assault with a nice hitbox, as it can't be low profiled and has decent reach. It is, however, not used very often as spending 4 Magatama is most of the time not affordable or not worth it. | ||
}} | |||
< | ===<big>Crush Trigger</big>=== | ||
</ | {{InputBadge|{{clr|A|5A}}+{{clr|B|B}} (Chargeable)}} | ||
{{BBCF Move Card | |||
|input=5A+B,5[A+B] |versioned=input | |||
|description= | |||
*Requires 2 Magatama | |||
*180F meter cooldown | |||
*Launches on air hit. | |||
Causes guard crush on normal blocking. It staggers if hits a grounded enemy and launches otherwise. When charged, this move has a 100% P2, which means it doesn't affect the damage reduction in a combo. As such, this is a great overdrive combo filler. Primarily used after {{clr|C|41236C}}(1) or Air hit {{clr|C|5C}} in OD combos. | |||
{| | |||
{{ | |||
| | |||
| | |||
}} | }} | ||
===<big>Forward Dash</big>=== | |||
{{InputBadge|66}} | |||
{{BBCF Move Card | |||
| | |input=66 | ||
|description= | |||
*Quickest forward step-dash in the game | |||
*Can be special cancelled on frame 6 into air specials. Frame 12 for Grounded specials. | |||
*No Invulnerability, but is airborne on frame 5 so can dodge most throws that way. | |||
A key move you will use a lot due to Hakumen's sluggish movement without spending resources. This move also allows you to aggressively use air specials low to the ground, and while it is technically slower than jumping to do this, it allows Hakumen to land much sooner after these moves and continue the combo as well as simply being more likely to hit someone in the first place due to the forward step. | |||
}} | }} | ||
===<big>Backdash</big>=== | |||
{{InputBadge|44}} | |||
{{BBCF Move Card | |||
|input=44 | |||
|description= | |||
*Quickest backdash in the game | |||
*Only invulnerable to throws briefly on startup ''and nothing else''. Throw invulnerability lasts until Hakumen is airborne, so is ''mostly'' throw invulnerable until he lands on frame 11. | |||
*Air Special cancellable from Frame 8, Grounded special cancels possible from frame 11 | |||
**This is later than his forward dash, making forward dash a better option overall. | |||
Hakumen's backdash, unlike most backdashes, is not a defensive tool. Instead, use it for its speed as a neutral tool to create distance when the situation is otherwise safe. If you actually need something with First-Frame invulnerability, you will need to use {{clr|D|6D}} or {{clr|D|2D}} instead. | |||
}} | |||
==Specials== | ==Specials== | ||
*Hakumen can cancel his specials and supers on hit or block into other specials, supers, Crush Trigger or Exceed Accel. Normally, each special can be used only once per string. | |||
===<big>Fuumajin</big>=== | ===<big>Fuumajin</big>=== | ||
{{InputBadge|Cut Projectile}} | |||
{{BBCF Move Card | |||
|input=Fuumajin | |||
|description= | |||
'''Hakumen's sword attacks have unique boxes for cutting projectiles. Projectile cut hitboxes are purple, attack hitboxes are red.''' | |||
Whenever one of Hakumen's sword moves "cuts" an opponent's projectile, that projectile has one hit removed and Fuumajin is spawned in its place. Hakumen also immediately gains 1 Magatama. It is a key tool for dealing with projectile heavy characters but occasionally sees use elsewhere too. While its specific usage varies a lot with the matchup, in general terms it can be used to simply deny or defend against a long ranged attack or simply to put up a barrier to stop a barrage of projectiles or your opponent closing in after their projectile. It does not go away when Hakumen is hit, making it incredibly safe to stand behind. It can be used more aggressively; correctly timing a sword strike to cut a projectile as it spawns can give you effectively additional reach or severely limit your opponent's movement options. | |||
{{ | |||
| | |||
| | |||
On paper the attack is also a good starter, but it can be difficult to capitalise on. In the event you hit your opponent at the same time as cutting a projectile, the Fuumajin will hit after the sword hit, potentially ruining any counterhit confirm. | |||
Hakumen can only have one Fuumajin active at a time; cutting another projectile will create a new Fuumajin, replacing the existing one. | |||
*Striking a projectile with the sword does not count as a hit of any kind for the purposes of cancelling into other moves. | |||
*The Fuumajin itself has guard point against anything projectile-attribute, and will reset its duration when it blocks something. Usually this means it will remove the rest of the hits of a multi-hit projectile. | |||
**It will also block Strike-Projectiles like Azrael's 2C or any of Nine's normals, even though they cannot be cut to first create a Fuumajin. | |||
*Hakumen is projectile invulnerable on frames where a Fuumajin spawns or blocks a projectile, protecting him even from beams or projectiles that don't disappear on contact. | |||
Some specific interactions: | |||
*Jin's {{MMC|chara=Jin Kisaragi|input=632146C|label=Touga Hyojin}} creates a Fuumajin when cut, but the wave will keep going and can hit Hakumen anyway. This is because the projectile hitbox is separate to the entity creating them. | |||
*Platinum's {{MMC|chara=Platinum The Trinity|input=214A/B/C|label=Dream Sally}} will be popped normally, even if you hit with the part of a slash that can only hit projectiles. | |||
*Hibiki's Shadow Clones will be destroyed normally unless it is struck while active, which is usually just before it reaches Hakumen, so the timing is quite tight. | |||
*Another Hakumen can cut a Fuumajin to create their own, where they will immediately block each other and be destroyed. | |||
*Susanoo's {{MMC|chara=Susano'o|input=6A|label=6A}} can be cut while active. Unusually however, another 6A afterwards will "block" the Fuumajin and destroy it as it has a similar projectile guard point on startup. | |||
| | |||
| | |||
}} | }} | ||
===<big>Guren</big>=== | |||
{{InputBadge|{{clr|A|214A}} with 1 Magatama}} | |||
{{BBCF Move Card | |||
|input=214A | |||
|description= | |||
Pressure and combo tool. Combos into {{clr|A|2A}}, {{clr|C|41236C}} or even {{clr|C|2C}} if the opponent is crouched. Being +1 on block, it can be followed-up by {{clr|A|2A}} to reset the pressure. However, it is fairly easy to IB as Hakumen's pressure is limited. If the opponent respects it too much, {{clr|A|214A}} > {{clr|B|6B}} can be used as a mix-up. If they instant block and mash after {{clr|A|214A}}, it is possible to {{clr|D|2D}} them to deter mashing. Do not overuse it in pressure as it drains meter pretty quickly. | |||
*30F Heat Gauge cooldown | |||
}} | |||
< | ===<big>Kishuu</big>=== | ||
{{InputBadge|{{clr|A|623A}} with 1 Magatama}} | |||
{{BBCF Move Card | |||
|input=623A | |||
|description= | |||
Has 10 frames of Head and Body invulnerability, but does not go through projectiles. In combos, this is used after air hit {{clr|C|5C}} to combo into {{clr|A|6A}}. In pressure, this is used to approach and set up throws. It can also be used after the super flash of some reversal supers to crawl under them and punish with {{clr|C|5C}} CH / {{clr|C|6C}} FC without letting the opponent RC (Valk's {{clr|D|236236D}} / Izayoi's {{clr|C|236236C}}). | |||
*30F Heat Gauge cooldown | |||
*Cancellable into Enma on frames 10-12, or Renka and Zantetsu from frame 10 onwards; these cancels count as being part of the same string. | |||
}} | }} | ||
An amazing neutral tool with a surprisingly high and far reach, deals with a plethora of pesky moves and punishes them. Midscreen, it combos into {{clr| | ===<big>Enma</big>=== | ||
As it's -4, it's punishable on IB by most {{clr| | {{InputBadge|{{clr|A|A}} after {{clr|A|623A}}}} | ||
{{BBCF Move Card | |||
|input=623A~A | |||
|description= | |||
An amazing neutral tool with a surprisingly high and far reach, deals with a plethora of pesky moves and punishes them. Midscreen, it combos into {{clr|B|5B}} (close range), {{clr|A|214A}} (far range), {{clr|C|5C}} (air hit and counter hit) or even {{clr|A|6A}} > {{clr|B|6B}} (distance, height and character specific). | |||
As it's -4, it's punishable on IB by most {{clr|A|5A}}/{{clr|A|2A}}. On block, it can be canceled into {{clr|A|214A}} for a gapless blockstring even on IB. | |||
*30F Heat Gauge cooldown, even though it doesn't cost additional meter to use. | |||
}} | |||
===<big>Renka</big>=== | ===<big>Renka</big>=== | ||
{{InputBadge|{{clr|B|236B}} with 2 Magatama}} | |||
{{BBCF Move Card | |||
|input=236B | |||
|description= | |||
A low kick followed by a mid kick that launches the opponent. A great combo tool at close range. Midscreen, it combos into {{clr|A|6A}} > {{clr|B|6B}} and IAD {{clr|C|j.2C}}. In the corner, the main combo is IAD {{clr|A|j.2A}} > {{clr|C|j.C}}. Sadly, the second hit has a poor horizontal reach limiting its usefulness in pressure and it may whiff if the opponent is too far, which is common if the opponent barrier blocks the preceding hits. | |||
Furthermore, it is possible to ODR after the first hit to make the second one whiff, forcing Hakumen to special cancel or be heavily punished. | |||
{{clr|B|236B}}(1) > {{clr|A|623A}} is 0 on block, this is, however, very costly. It has the fastest startup of any of Hakumen's grounded specials, so using it to cover unsafe specials gives tighter frametraps than Guren. | |||
Due to its ability to be jump cancelled, it is possible to perform an Overdrive Cancel by first jump cancelling this move and then cancelling the prejump frames into OD. Jump cancelling will also immediately reset a string, allowing Hakumen to cancel his prejump frames into a special that had already been used. | |||
| | |||
*60F Heat Gauge cooldown | |||
*Jump cancellable on the second hit | |||
{| | |||
{{ | |||
| | |||
}} | }} | ||
===<big>Zantetsu</big>=== | |||
{{InputBadge|{{clr|C|41236C}} with 3 Magatama}} | |||
{{BBCF Move Card | |||
|input=41236C | |||
|description= | |||
A massive overhead attack that can lead to absurd damage, followed by a rather lackluster low that ruins your combo damage after it. Prime combo filler in OD combos that can be done after {{clr|C|5C}} or {{clr|A|214A}}. {{clr|C|41236C}}(1) > {{clr|A|623A}} is +2 on block, but similarly to {{clr|B|236B}} this is very costly. | |||
Due to the first hit having amazing damage scaling, but the second hit having awful scaling, it is common to special cancel after just the first hit during long or Overdrive combos with {{clr|A|623A}} or Crush Trigger. While the second hit does strike low, this only functions as a very basic knowledge check since Hakumen cannot cancel the first hit into any other overhead to form much of a mixup. It does at least form a safe blockstring if both hits are blocked. | |||
As far as the basic {{clr|C|41236C}} combo is concerned, {{clr|C|41236C}}(2) > {{clr|A|6A}} > {{clr|B|6B}} > Air combo yields similar damage as {{clr|C|41236C}}(1) > {{clr|A|623A}} > {{clr|A|6A}} > {{clr|B|6B}} > Air combo, so the former is preferred. | |||
*90F Heat Gauge cooldown | |||
*While this move can cut projectiles, it is notably far worse than most other moves at it due to poor hitboxes and no hitboxes beyond the normal active frames, so don't use it for this purpose. | |||
}} | }} | ||
===<big>Yanagi</big>=== | |||
{{InputBadge|{{clr|D|214D}} with 2 Magatama}} | |||
{{BBCF Move Card | |||
|input=214D | |||
|description= | |||
Hakumen advances forward with a Zanshin seal that autoguards attacks and attempts to chokeslam the opponent. Like other Drive moves, Hakumen can special cancel the remaining startup of the move if it blocks an attack. '''Unlike''' other Drive moves, Hakumen attempts the grab at the end even if he didn't block any attack, allowing it to be used during combos. | |||
On block, it's -7 and therefore punishable by most {{clr|A|2A}}. It can be cancelled into {{clr|A|214A}} for a frame trap or {{clr|B|236B}} to make it gapless. However, due to what was likely an oversight, any move special cancelled into from Yanagi will be fully invulnerable for the first 10 frames, even if Yanagi didn't block anything. This gives Hakumen the option to also beat punish attempts with very delayed cancels instead of needing to commit earlier to frame trapping normally—this can make the move ''very'' scary to punish if Hakumen has any amount of meter. | |||
| | |||
{| | |||
Can sometimes be used to escape the corner but does not have guard point frame 1, so it will lose to properly timed meaties and frame traps. | |||
On hit, combo into {{clr|B|236B}} or {{clr|A|623A}} > {{clr|A|6A}} > {{clr|B|6B}}. This is also a very good OD combo ender with {{clr|A|6A}} > {{clr|B|6B}} > {{clr|D|214D}} > EA or {{clr|A|6A}} > {{clr|B|6B}} > {{clr|D|214D}} > {{clr|C|632146C}} > {{clr|A|623A}} > EA. | |||
*30F Heat Gauge cooldown | |||
}} | }} | ||
===<big>Agito</big>=== | |||
{{InputBadge|{{clr|A|j.214A}} with 1 Magatama}} | |||
{{BBCF Move Card | |||
|input=j.214A | |||
|description= | |||
Low-cost knockdown tool. Counts as a projectile, which allows it to beat most anti-airs. On counter hit, it ground bounces and combos into {{clr|C|j.2C}} or {{clr|B|j.B}} depending on the height. IAD {{clr|A|j.214A}} is a fairly ambiguous cross-up but doesn't combo into anything. | |||
As far as okizeme is concerned, {{clr|A|j.214A}} is a fairly good ender. For more details, check the okizeme strategy section: [https://dustloop.com/wiki/index.php?title=BBCF/Hakumen/Strategy#Agito link] | |||
*30F meter cooldown | |||
*Can only be used once in the air | |||
}} | |||
< | ===<big>Hotaru</big>=== | ||
{{InputBadge|{{clr|B|j.214B}} with 2 Magatama}} | |||
{{BBCF Move Card | |||
|input=j.214B | |||
|description= | |||
Primarily a combo extender, as it is possible to airdash afterward into {{clr|C|j.2C}} > {{clr|A|6A}} > {{clr|B|6B}} which leads into high damage combos. In the corner, it is used to end with {{clr|C|j.C}} > {{clr|C|6C}}/{{clr|C|5C}} > {{clr|A|6A}} > {{clr|B|6B}}, which give a much better knockdowns than {{clr|A|j.214A}}. | |||
Even though it's invulnerable, it is not that great of a wake-up option as it is not invincible frame 1 due to the jump and easily whiff if the opponent crouches or use {{clr|A|2A}}. It's a also a short/fast starter, so combos are limited afterward. | |||
*60F meter cooldown | |||
*Air-unblockable air attack. <!---what---> | |||
*Resets Hakumen's air options, and can be jump and airdash cancelled on hit/block | |||
*Can only be used once in the air | |||
< | |||
}} | }} | ||
===<big>Tsubaki</big>=== | |||
{{InputBadge|{{clr|C|j.214C}} with 3 Magatama}} | |||
{{BBCF Move Card | |||
|input=j.214C | |||
|description= | |||
Situational special. Sometime used in OD combos, however, it is harder to use than {{clr|C|41236C}}. | |||
In pressure, it guard crushes if it isn't barriered. In that case, it can combo into Forward Hop > {{clr|C|5C}} midscreen or {{clr|C|6C}} (level 2) in the corner. | |||
It can be used on wake-up to heavily punish throw attempts if the opponent is trying to play around {{clr|D|236236D}}. It combos into {{clr|A|6A}} > {{clr|B|6B}} > ... or {{clr|C|5C}} > ODc > {{clr|A|214A}}/{{clr|B|236B}} > ... | |||
Fastest startup after TK is 19 frames and 21 after a Hop. | |||
*90F Heat Gauge Cooldown | |||
*Can be used any number of times in the air. | |||
*Can cut projectiles 15F-17F | |||
*Fatal Counter | |||
}} | }} | ||
==Distortion Drives== | |||
===<big>Kokūjin: Shippu </big>=== | |||
{{InputBadge|{{clr|C|632146C}} with 4 Magatama}} | |||
{{BBCF Move Card | |||
|input=632146C,632146[C],632146C Wave |versioned=input | |||
|description= | |||
Hakumen launches a sword attack and a shockwave to the opponent. | |||
---- | |||
'''Normal Version''' | |||
Standard distortion combo ender. It can be canceled on block with {{clr|A|623A}} to make it +0 on block, though you waste 5 Magatama so think about it before throwing out. In neutral, this can be useful against zoners (Nu, Lambda, Rachel) since it cuts projectiles on all active frames, or Valkenhayn in wolf form as he can't block it. | |||
---- | |||
'''Charged Version''' | |||
You can hold the button for 100F to get the Charged Version, which is completely unblockable. Basically impractical. The hold mechanic itself is useful for timing some combos that requires height or such. | |||
---- | |||
'''Overdrive Version''' | |||
The OD version fires a taller, Reppuken-esque energy wave to the slash, with an excellent vertical hitbox, allowing one to combo afterwards. Since the energy wave has better proration than the actual slash and wallbounces it can be used in midscreen OD combos, such as CT > {{clr|C|6C}} > {{clr|C|632146C}} (wave), then follow-up with {{clr|A|623A}}. | |||
*180F Heat Gauge cooldown | |||
*30% minimum damage on slash (Uncharged: 1050[1200] Charged: 1500), 20% minimum damage on wave (500 [600]). | |||
*Normal Wave takes 13 frames to hit the opponent fullscreen and 12 frames in OD. | |||
}} | }} | ||
===<big> Kokūjin: Yukikaze</big>=== | |||
{{InputBadge|{{clr|D|236236D}} with 4 Magatama}} | |||
{{BBCF Move Card | |||
|input=236236D,236236D Attack |versioned=input | |||
|description= | |||
A super version of Hakumen's parries. If activated, Hakumen dashes forward with a slash that hits everything that is head level or lower and is fully invincible throughout. If your opponent activated it with a physical strike, they will be frozen in hitstop until this attach hits. This is a key defensive tool in most match-ups and a life changer with 4 Magatamas as the opponent has to play around it to avoid losing the momentum. Most notably, it is a fantastic tool to escape projectile-based okizeme and makes Hakumen one of the only character who can reliably escape some of them (Like Rachel's {{clr|A|22A}}. Midscreen, it can be comboed into {{clr|A|623A}} > {{clr|A|6A}} > {{clr|B|6B}}; In the corner, it can be comboed into {{clr|A|623A}} > IAD {{clr|A|j.2A}} > {{clr|C|j.C}}, then landing {{clr|C|5C}} > {{clr|A|6A}} > {{clr|B|6B}}. | |||
In Overdrive, Hakumen deals more hits and the damage increases. Special note should be taken about the OD version: unlike most other Distortion Drives, this pauses the OD timer for about the entire duration of the move. Combine this with the version's lengthy animation, a removed meter cooldown and the fact that the accelerated meter gain of OD isn't paused, by the time the move ends, most of all of the Magatama spent will have been regained. This can lead to even more damaging combos. | |||
*180F Heat Guage cooldown | |||
*Fatal Counter. | |||
*Does not catch unblockable attacks. | |||
*If cancelled into from the startup of another Drive move (after blocking an attack), the attack activates immediately instead of needing to parry another hit. | |||
*It is worth noting that the opponent can attempt to Rapid Cancel after being frozen by Yukikaze. Normally however, the opponent will be stuck in hitstop, meaning the RC will not have time to occur and not consume any meter, even though the visual effects play. | |||
*Moves that have invulnerability on the frame they trigger Yukikaze will remain invulnerable during hitstop, making it possible to RC and then perform another invulnerable action to avoid Yukikaze completely. Other notable interactions include {{Character Label|BBCF|Azrael|label=Azrael}}'s {{MiniMoveCard|game=BBCF|chara=Azrael|input=236236D|label=236236D}} as that move guard point will absorb most of Yukikaze's damage and will only end up doing 200 damage. {{Character Label|BBCF|Mu|label=Mu}}'s {{MiniMoveCard|game=BBCF|chara=Mu-12|input=623C|label=623C}} can RC after Yukikaze and high jump to avoid Yukikaze completely without having to use OD. | |||
*Despite being a sword attack when activated, this move cannot cut projectiles, not that it matters much. | |||
| | |||
{{ | |||
{{ | |||
| | |||
| | |||
}} | }} | ||
===<big> Kokūjin Oūgi: Mugen</big>=== | |||
{{InputBadge|{{clr|B|214214B}} with 8 Magatama}} | |||
{{BBCF Move Card | |||
|input=214214B | |||
|description= | |||
Hakumen's infamous install super, used to capitalise on some big counterhits while at full Heat allowing for some massively damaging combos, virtually guaranteeing victory assuming your opponent doesn't burst and you don't drop the combo. | |||
Requires 8 Magatama but does not consume any upon startup. Instead, Hakumen's heat gauge now acts as a countdown, depleting rapidly once activated and the effects of this move end only when the heat gauge has emptied. During Mugen, all other specials and distortion drives (But not his Astral Heat) may be used with no cost, the same special can be used multiple times in a string (but cannot cancel directly into itself), and specials are not affected by Same Move Proration. Conversely, no heat will be gained while Mugen is active for any reason, and Hakumen cannot use Rapid Cancel or Counter Assault while in Mugen (you have alternatives, for example {{clr|A|623A}} and Yukikaze). The entire duration of Mugen is 360F, starting after Hakumen has fully recovered from this move or he gets hit. | |||
Since it has a huge recovery, it is hard to combo into ({{clr|C|6C}} level 3 FC and {{clr|A|6A}} CH only). Alternatively, can be used in neutral as a last resort to try to turn the tide by unleashing a flurry of special moves for free, but some characters can punish it on reaction fullscreen. | |||
The main Mugen combos are {{clr|B|236B}}/{{clr|A|214A}} > ({{clr|C|41236C}}(1) > {{clr|A|623A}})xN or ({{clr|C|41236C}}(1) > {{clr|D|214D}})xN, the latter dealing less damage but being easier to perform. | |||
Under Overdrive, the Heat gauge drain is paused, even if it was activated after Mugen. This vastly increases the duration mugen will last for, potentially more than doubling it. | |||
*Meter drain does not get paused for any reason other than overdrive. Hitstop or either player's super freeze effects will not pad out the length of this move. | |||
*If Hakumen is hit before the superflash, Mugen's effects do not activate. | |||
*After Mugen's effects expire, Hakumen's passive heat gain is zero for 180F. All other Heat gain works as normal. Activating overdrive cancels this state. | |||
*Disables Same Move Proration for all of Hakumen's specials while active. | |||
}} | }} | ||
==Exceed Accel== | ==Exceed Accel== | ||
===<big>Tengai</big>=== | ===<big>Kokūjin Kingi: Tengai</big>=== | ||
{{InputBadge|{{clr|A|A}}+{{clr|B|B}}+{{clr|C|C}}+{{clr|D|D}} during Overdrive}} | |||
{{BBCF Move Card | |||
|input=A+B+C+D | |||
|description= | |||
{{ | |||
| | |||
| | |||
*Foot attribute unlike most EAs. | *Foot attribute unlike most EAs. | ||
*[[BBCF/ | *Ends all Overdrive effects the instant the initial strike connects | ||
*[[BBCF/Mechanics#Exceed_Accel| Otherwise behaves the same as every other Exceed Accel.]] | |||
*310/671 Minimum Damage | *310/671 Minimum Damage | ||
Hakumen kicks the opponent's feet on startup, then knocks them down and follows with a mighty slash. | Hakumen kicks the opponent's feet on startup, then knocks them down and follows with a mighty slash. Since Hakumen's combos are mostly limited by resources and combo time, they tend not suffer from bad scaling, meaning that tacking on this move at the end of combos will often still give decent damage very late onto the combo. The downside is that the The knockdown after it is poor and is possible to roll for free afterward. In the corner, {{clr|B|2B}} can be used to force the opponent to block after they forward roll. | ||
}} | |||
==Astral Heat== | ==Astral Heat== | ||
===<big> Kokūjin Oūgi: Akumetsu</big>=== | ===<big> Kokūjin Oūgi: Akumetsu</big>=== | ||
{{InputBadge|{{clr|D|[2]8D}} when [[BBCF/Mechanics#Astral Heat|Astral Conditions]] are met}} | |||
{{BBCF Move Card | |||
|input=[2]8D | |||
|description= | |||
{{ | |||
| | |||
| | |||
*180F cooldown | *180F cooldown | ||
*Requires 8 | *Requires 8 Magatama | ||
* | *Catches Head, Body, Foot and Burst attributes, including unblockables. | ||
*Does not trigger on Doll attacks, Throws or Projectiles. | |||
*Unlike Hakumen's other drive moves, if it triggers, the attack is ''guaranteed'' to hit | |||
*30F charge. See [[BBCF/Kagura_Mutsuki#Overview|Here]] for details on charge inputs. | |||
Catches | Catches moves with physical attributes and the rare unblockables (unlike Haku's other drives). For instance, unlike Yukikaze, this can catch Makoto's {{clr|C|41236C}}. It loses to Relius and Carl's doll attacks, grabs and projectiles (including Hazama's chain and his {{clr|C|632146C}}), but can still beat Jin's Astral. | ||
One of the most impractical Astrals in the game | One of the most impractical Astrals in the game; Hakumen usually spends meter as fast as he gets it and it relies on the opponent to be activated. Hakumen also suffers immensely from throwing away all of his meter if it fails. | ||
The most practical application this move has is baiting a burst after Throw > {{clr| | The most practical application this move has is baiting a burst after Throw > {{clr|C|2C}} while the opponent is low on health. It can also be charged and used on reaction during superflash, however, that rarely happens as most players become very careful when Haku has astral. | ||
While not good by itself, it's a formidable mindgame tool. Crouching in neutral becomes threatening as it forces the opponent to weight every move carefully. | While not good by itself, it's a formidable mindgame tool. Crouching in neutral becomes threatening as it forces the opponent to weight every move carefully. | ||
}} | |||
==Colors== | ==Colors== | ||
{{BBCFColors|Size=120|Character=Hakumen}} | {{BBCFColors|Size=120|Character=Hakumen}} | ||
<br style="clear:both;"/> | <br style="clear:both;"/> | ||
==Navigation== | ==Navigation== | ||
<center>{{Character Label|BBCF|Hakumen|42px}}</center> | <center>{{Character Label|BBCF|Hakumen|size=42px}}</center> | ||
{{ | {{BBCF/CharacterLinks}} | ||
{{notice|To edit frame data, edit values in [[{{PAGENAME}}/Data]].}} | {{notice|To edit frame data, edit values in [[{{PAGENAME}}/Data]].}} | ||
{{ | |||
{{BBCF/Navigation}} | |||
Latest revision as of 01:27, 28 March 2024
Overview
Overview
Hakumen is a high damage defensive character. His Drive is a parry which forces the cast into RPS situations where they have to guess, even when they're on the offensive. Hakumen also has a very diverse array of specials, with a unique catch: He needs to spend Heat to perform them.
To offset this catch, Hakumen passively generates Heat at all times and can generate more with his drive. Hakumen is also one of the few characters who can cancel his specials into each other and most of them have high damage and/or proration. The net result is that, with enough resources, Hakumen has an extremely high damage potential. His normals are no slouch either. Hakumen possesses some excellent normals, such as 4C and j.C for neutral and j.2A to deal with projectiles. Hakumen also has a solid defense with his drive described below, meaning overall Hakumen is a fairly well-rounded high-risk high-reward character. |
| Health |
| 12,000 |
| Prejump |
| 4F |
| Backdash |
| 15F (1~4F Inv Throw, 5~9 airborne) |
| Forward Dash |
| 16F (5~11 airborne) |
| Fastest Attack |
| 5A (5F whiffs crouchers) 2A (7F) |
| Reversals |
| 2D (Catch 1~8F) 6D (Catch 1~9F) 236236D (Catch 1~27F) [2]8D (Catch 1~16F) (Astral) |
| Fatal Starters |
| 6C j.214C 236236D |
Drive: Zanshin (God Slash)
Hakumen's Drive projects an energy barrier with a guard point that parries attacks. When triggered with a strike, Hakumen will follow up with an invincible, but blockable, counterattack. This gives Hakumen an effective counter to use against many of his opponent's options. In addition, many of Hakumen's normals cancel into his Drive. This makes Zanshin not only a great defensive tool, but an offensive one as well, countering attacks that may exploit holes in Hakumen's blockstrings. Hakumen's drives share many traits:
- The guard point protects and triggers on either side of Hakumen, and the counterattack will autocorrect to face the opponent.
- If the opponent makes contact with a strike, they experience a long hitstop while Hakumen receives none, making the follow-up much easier to land.
- On hit, the counterattack generates 1 Magatama and can be special cancelled for a combo.
- If a projectile is guarded, normal drives will not activate their counterattack, but will still remain completely invulnerable throughout recovery.
- Hakumen can also special cancel the guard point trigger itself; doing so will carry over invincibility into the next move for 10 frames. This can be used as a pseudo reversal option even against projectile attacks.
- All drives are in a counterhit state from start to finish. Poor timing or using the incorrect drive for a certain attack can lead to a heavy punish.Overdrive: Kishin (Demon God)
During Overdrive, Hakumen's gains the following buffs:
- Greatly increases passive Heat gain (see below).
- Hakumen becomes immune to Heat Gauge cooldown, vastly improving the Heat generated. Many special moves will leave Hakumen with more Heat than he started with.
- Drives generate two Magatama on hit rather than one.
- Drives on hit have more frame advantage, leading to stronger follow ups.
Unique System: Magatama
Hakumen has a unique meter system. His Heat Gauge is visually divided up into 8 "Magatama" stocks, which represent 12.5% heat gauge each. These Magatama are used for his special moves in addition to the usual uses for heat. Whilst this mostly just functions as a stylized heat meter, (Rapid cancels still cost half of a full meter, or 4 Magatama, for example) the way Hakumen's heat is generated is quite different:
- Hakumen starts a round with 1 Magatama.
- Hakumen will gain Heat passively:
- Normally, Hakumen gains 4 Heat points per frame (15 during Overdrive). One Magatama is worth 1250 Heat points, so normally it takes 312.5 frames to gain one Magatama (83.3 frames under OD). This increment takes place in real time and will not be stopped by any type of superflashes, hitstop, blockstop or timer stops (Overdrive).
- This rate is 2 per frame while Hakumen is in hitstun (10 during Overdrive).
- The gain increases by a flat 1 Heat per frame while below 35% health, regardless of state.
- The final amount is divided by 4 during Heat Cooldown unless in overdrive. Fractions are truncated, so Hakumen will generate 1 Heat point per frame and zero while in hitstun (even while below 35% health in both cases).
- Successfully hitting with his normal Drives or cutting a projectile will generate one Magatama instead of basing the gain on the damage dealt.
- Hakumen generates Heat from hitting his opponent, blocking and being hit at only 20% of the rate as anyone else. Even though they spend meter to do so and usually incur a cooldown, Special Moves still generate Heat on hit.
Normal Moves
5A


- Must be barriered when in the air
On paper this is one of the best jabs in the game; It's one of the rare 5f normals, quick recovery and +3 on block. In reality, however, its hitboxes render it terrible in pressure as it whiffs on everyone crouching except Hakumen and Tager. 2A > 5A also works in pressure on Relius and Kagura due to their blocking hitboxes. These problems don't apply when using it as an anti-air move, where its hitbox and Barrier-only property make it excellent for this purpose.
Gatling Options (Can cancel into other normals after 10 frames): 5B, 6A, 6B, 3C, Drives, Special, Throw, Jump
- Cancellable into normals from frame 10
5B

Situational pressure tool


| Damage | GuardHow this attack can be guarded. Throws have their throw range listed instead. | StartupHow many frames the attack needs to go through in order to reach its active frames. The listed startup frame coincides with the move's first active frame. | ActiveHow many frames where there is a hitbox that can hit an opponent. The first active frame occurs on the listed startup frame. | RecoveryHow many frames that the character must go through after an attack's active frames to automatically go back to a neutral stance, or the total duration of the move if it has no hitbox/creates projectiles. | Frame AdvHow many frames the attacker's recovery ends before the defender's blockstun ends if the attack is blocked. A positive value indicates that the attacker recovers first, while a negative value indicates that the defender recovers first. This value usually assumes that the attack's first active frame (of each hit, if multi-hit) is blocked. | On ODRThe difference between the attacker's total animation length and the period the opponent is in overdrive raid. This frame advantage is based off the assumption that both players input during the hitstop of a prior move, so that this attack and ODR start on the same frame. | AttributeSome attacks are invulnerable to attacks with specific attributes. This notes what attributes each attack possesses. H - Head B - Body F - Foot P - Projectile. Independent projectiles will have their Durability level listed, e.g. a projectile with Durability level 2 will show P2 T - Throw D - Doll attack, such as Carl's or Relius' doll Burst - Burst, which has its own unique attribute |
Invuln |
|---|---|---|---|---|---|---|---|---|
| 730 | Mid | 10 | 2 | 15 | 0 | B |
- Does not hit everyone crouching from far away
- Must be barriered when in the air
- Hakumen's hurtbox moves far back during start up
Fairly situational 5B. While it's 0 on block and jump cancellable, it suffers from a poor horizontal hitbox which hinders its usefulness in pressure. At close range, it can gatling into 2B for a 2-frame gap frame trap or 6B for a 50/50.
In neutral, it isn't that good either due to its poor hitbox and fairly high recovery. Thanks to its awkward hurtbox, it has some niche punishing purposes like making the first hit of Kokonoe's 214214x whiff and preventing her from using RC.
Gatling Options (Can cancel into other normals after 21 frames): 5A, 2A, 2B, 6A, 6B, Drives, Special, Jump
| Starter RatingDetermines the starting value of the hitstun/untech decay timer and subsequent combo length | P1Proration applied to future hits when used as the first hit of a combo | P2Proration applied to future hits when used during any part of a combo | Attack LevelDefault Attack Level Values
| |||||||||||||||||||||||||||||||||||
|---|---|---|---|---|---|---|---|---|---|---|---|---|---|---|---|---|---|---|---|---|---|---|---|---|---|---|---|---|---|---|---|---|---|---|---|---|---|---|
| Long | 100 | 89 | 3 |
- Cancellable into normals from frame 21
5C

Main punish move and OD combo filler


Frame 13, projectile cut only

Active Frames


| Damage | GuardHow this attack can be guarded. Throws have their throw range listed instead. | StartupHow many frames the attack needs to go through in order to reach its active frames. The listed startup frame coincides with the move's first active frame. | ActiveHow many frames where there is a hitbox that can hit an opponent. The first active frame occurs on the listed startup frame. | RecoveryHow many frames that the character must go through after an attack's active frames to automatically go back to a neutral stance, or the total duration of the move if it has no hitbox/creates projectiles. | Frame AdvHow many frames the attacker's recovery ends before the defender's blockstun ends if the attack is blocked. A positive value indicates that the attacker recovers first, while a negative value indicates that the defender recovers first. This value usually assumes that the attack's first active frame (of each hit, if multi-hit) is blocked. | On ODRThe difference between the attacker's total animation length and the period the opponent is in overdrive raid. This frame advantage is based off the assumption that both players input during the hitstop of a prior move, so that this attack and ODR start on the same frame. | AttributeSome attacks are invulnerable to attacks with specific attributes. This notes what attributes each attack possesses. H - Head B - Body F - Foot P - Projectile. Independent projectiles will have their Durability level listed, e.g. a projectile with Durability level 2 will show P2 T - Throw D - Doll attack, such as Carl's or Relius' doll Burst - Burst, which has its own unique attribute |
Invuln |
|---|---|---|---|---|---|---|---|---|
| 1100 | Mid | 14 | 2 | 20 | -3 | B | (13~15 P) |
- 13F-15F can cut projectiles
- Must be barriered when in the air
- Hard Knockdown on airborne opponents
- Forces crouching on hit
Haku's standard punish move. It forces crouching on hit, which can lead to high damage combos with only one Magatama with 214A > 2C. Can be cancelled into overdrive. On a 5C CH > OD if the opponent bursts immediately, there is enough time to block the burst and punish with another 5C.
In neutral, it can act as a pseudo high-risk high-reward anti-air if spaced correctly.
Gatling Options: Special
| Starter RatingDetermines the starting value of the hitstun/untech decay timer and subsequent combo length | P1Proration applied to future hits when used as the first hit of a combo | P2Proration applied to future hits when used during any part of a combo | Attack LevelDefault Attack Level Values
| |||||||||||||||||||||||||||||||||||
|---|---|---|---|---|---|---|---|---|---|---|---|---|---|---|---|---|---|---|---|---|---|---|---|---|---|---|---|---|---|---|---|---|---|---|---|---|---|---|
| Long | 100 | 92 | 4 |
- (Can cut projectiles on these frames, Hakumen is projectile invulnerable on the frame a projectile is cut)
- Forces crouching on standing hit
2A

Key pressure and neutral tool


| Damage | GuardHow this attack can be guarded. Throws have their throw range listed instead. | StartupHow many frames the attack needs to go through in order to reach its active frames. The listed startup frame coincides with the move's first active frame. | ActiveHow many frames where there is a hitbox that can hit an opponent. The first active frame occurs on the listed startup frame. | RecoveryHow many frames that the character must go through after an attack's active frames to automatically go back to a neutral stance, or the total duration of the move if it has no hitbox/creates projectiles. | Frame AdvHow many frames the attacker's recovery ends before the defender's blockstun ends if the attack is blocked. A positive value indicates that the attacker recovers first, while a negative value indicates that the defender recovers first. This value usually assumes that the attack's first active frame (of each hit, if multi-hit) is blocked. | On ODRThe difference between the attacker's total animation length and the period the opponent is in overdrive raid. This frame advantage is based off the assumption that both players input during the hitstop of a prior move, so that this attack and ODR start on the same frame. | AttributeSome attacks are invulnerable to attacks with specific attributes. This notes what attributes each attack possesses. H - Head B - Body F - Foot P - Projectile. Independent projectiles will have their Durability level listed, e.g. a projectile with Durability level 2 will show P2 T - Throw D - Doll attack, such as Carl's or Relius' doll Burst - Burst, which has its own unique attribute |
Invuln |
|---|---|---|---|---|---|---|---|---|
| 300 | Mid | 7 | 3 | 9 | 0 | F |
One of the furthest-reaching 2A of the cast and amazing in neutral. In pressure, it can be linked into itself (gapless), 2B (can be DP'ed on IB), 6A (frame trap) or any special. Additionally, while 2A > 6B isn't a gatling it but can be used as a mix-up option. Beware, that 2A > 6B/2B may whiff if done from too far.
Gatling Options (Can cancel into other normals after 11 frames): 5A, 5B, 2A, 2B, 6A, 6B, 3C, Drives, Special, Throw
| Starter RatingDetermines the starting value of the hitstun/untech decay timer and subsequent combo length | P1Proration applied to future hits when used as the first hit of a combo | P2Proration applied to future hits when used during any part of a combo | Attack LevelDefault Attack Level Values
| |||||||||||||||||||||||||||||||||||
|---|---|---|---|---|---|---|---|---|---|---|---|---|---|---|---|---|---|---|---|---|---|---|---|---|---|---|---|---|---|---|---|---|---|---|---|---|---|---|
| Normal | 100 | 80 | 1 |
- Cancellable into 6A immediately on hit/block
- Cancellable into other normals from frame 11
2B

Amazing neutral and pressure tool


| Damage | GuardHow this attack can be guarded. Throws have their throw range listed instead. | StartupHow many frames the attack needs to go through in order to reach its active frames. The listed startup frame coincides with the move's first active frame. | ActiveHow many frames where there is a hitbox that can hit an opponent. The first active frame occurs on the listed startup frame. | RecoveryHow many frames that the character must go through after an attack's active frames to automatically go back to a neutral stance, or the total duration of the move if it has no hitbox/creates projectiles. | Frame AdvHow many frames the attacker's recovery ends before the defender's blockstun ends if the attack is blocked. A positive value indicates that the attacker recovers first, while a negative value indicates that the defender recovers first. This value usually assumes that the attack's first active frame (of each hit, if multi-hit) is blocked. | On ODRThe difference between the attacker's total animation length and the period the opponent is in overdrive raid. This frame advantage is based off the assumption that both players input during the hitstop of a prior move, so that this attack and ODR start on the same frame. | AttributeSome attacks are invulnerable to attacks with specific attributes. This notes what attributes each attack possesses. H - Head B - Body F - Foot P - Projectile. Independent projectiles will have their Durability level listed, e.g. a projectile with Durability level 2 will show P2 T - Throw D - Doll attack, such as Carl's or Relius' doll Burst - Burst, which has its own unique attribute |
Invuln |
|---|---|---|---|---|---|---|---|---|
| 650 | Low | 8 | 6 | 15 | -4 | F |
- Air tight blockstring when late chaining into 5A
- Good active frames make it good for checking approaches, catching rolls, and as a meaty.
With its great range and quick start-up, this is one of Hakumen's best moves for footsies. Being a 8-frame low, it enables 50/50 mix-up when combined with 6B. In pressure, it can be followed up with 623A > Throw or 214A (can be DP'ed on IB).
Gatling Options (Can cancel into other normals after 18 frames): 5A, 2A, Drives, Special
| Starter RatingDetermines the starting value of the hitstun/untech decay timer and subsequent combo length | P1Proration applied to future hits when used as the first hit of a combo | P2Proration applied to future hits when used during any part of a combo | Attack LevelDefault Attack Level Values
| |||||||||||||||||||||||||||||||||||
|---|---|---|---|---|---|---|---|---|---|---|---|---|---|---|---|---|---|---|---|---|---|---|---|---|---|---|---|---|---|---|---|---|---|---|---|---|---|---|
| Long | 90 | 89 | 3 |
- Cancellable into normals from frame 18
2C

High risk/high reward anti-air


Frames 10-12, Projectile cut only

Frames 13-15

Frames 16-18 Projectile Cut only


| Damage | GuardHow this attack can be guarded. Throws have their throw range listed instead. | StartupHow many frames the attack needs to go through in order to reach its active frames. The listed startup frame coincides with the move's first active frame. | ActiveHow many frames where there is a hitbox that can hit an opponent. The first active frame occurs on the listed startup frame. | RecoveryHow many frames that the character must go through after an attack's active frames to automatically go back to a neutral stance, or the total duration of the move if it has no hitbox/creates projectiles. | Frame AdvHow many frames the attacker's recovery ends before the defender's blockstun ends if the attack is blocked. A positive value indicates that the attacker recovers first, while a negative value indicates that the defender recovers first. This value usually assumes that the attack's first active frame (of each hit, if multi-hit) is blocked. | On ODRThe difference between the attacker's total animation length and the period the opponent is in overdrive raid. This frame advantage is based off the assumption that both players input during the hitstop of a prior move, so that this attack and ODR start on the same frame. | AttributeSome attacks are invulnerable to attacks with specific attributes. This notes what attributes each attack possesses. H - Head B - Body F - Foot P - Projectile. Independent projectiles will have their Durability level listed, e.g. a projectile with Durability level 2 will show P2 T - Throw D - Doll attack, such as Carl's or Relius' doll Burst - Burst, which has its own unique attribute |
Invuln |
|---|---|---|---|---|---|---|---|---|
| 1050 | Mid | 13 | 3 | 33 | -17 | B | 9~15 H (10~18 P) |
- Head invulnerability from frames 9-15
- 10-18F can cut projectiles
- Must be barriered when in the air
2C has great vertical reach but is very punishable on whiff. If blocked, it can be cancelled into 214A or 623A to make it safe. This move should only be used as an anti-air if it certain it will at the very least be blocked. This move is useful against IAD at midrange but is very weak against cross-ups.
Comboing after it can be fairly tricky. 2C > 9hjc j.2A works most of the time on normal and counter hit and at most height and distance. On CH, it can combo into Falling j.2C > 6A > 6B for high damage combos.
Gatling Options: Special, Jump (on hit)
| Starter RatingDetermines the starting value of the hitstun/untech decay timer and subsequent combo length | P1Proration applied to future hits when used as the first hit of a combo | P2Proration applied to future hits when used during any part of a combo | Attack LevelDefault Attack Level Values
| |||||||||||||||||||||||||||||||||||
|---|---|---|---|---|---|---|---|---|---|---|---|---|---|---|---|---|---|---|---|---|---|---|---|---|---|---|---|---|---|---|---|---|---|---|---|---|---|---|
| Long | 90 | 82 | 4 |
- (Can cut projectiles on these frames, Hakumen is projectile invulnerable on the frame a projectile is cut)
6A

Situational in pressure and important combo filler


| Damage | GuardHow this attack can be guarded. Throws have their throw range listed instead. | StartupHow many frames the attack needs to go through in order to reach its active frames. The listed startup frame coincides with the move's first active frame. | ActiveHow many frames where there is a hitbox that can hit an opponent. The first active frame occurs on the listed startup frame. | RecoveryHow many frames that the character must go through after an attack's active frames to automatically go back to a neutral stance, or the total duration of the move if it has no hitbox/creates projectiles. | Frame AdvHow many frames the attacker's recovery ends before the defender's blockstun ends if the attack is blocked. A positive value indicates that the attacker recovers first, while a negative value indicates that the defender recovers first. This value usually assumes that the attack's first active frame (of each hit, if multi-hit) is blocked. | On ODRThe difference between the attacker's total animation length and the period the opponent is in overdrive raid. This frame advantage is based off the assumption that both players input during the hitstop of a prior move, so that this attack and ODR start on the same frame. | AttributeSome attacks are invulnerable to attacks with specific attributes. This notes what attributes each attack possesses. H - Head B - Body F - Foot P - Projectile. Independent projectiles will have their Durability level listed, e.g. a projectile with Durability level 2 will show P2 T - Throw D - Doll attack, such as Carl's or Relius' doll Burst - Burst, which has its own unique attribute |
Invuln |
|---|---|---|---|---|---|---|---|---|
| 720 | Mid | 12 | 4 | 16 | -1 | B |
- Must be barriered when in the air
Situational pressure tool. In pressure, it's -1 at close range, +0 if done from a distance. While it pushes Hakumen forward, it isn't that strong in pressure as the options afterwards are limited, especially if it is barriered. 6A > 6B is gapless but heavily telegraphed, as 6A doesn't have any gatling into a low. On CH, it can combo into Forward Hop > 5C > 214A or 214214B, the latter being extremely rare.
Gatling Options: 6B, Drives
| Starter RatingDetermines the starting value of the hitstun/untech decay timer and subsequent combo length | P1Proration applied to future hits when used as the first hit of a combo | P2Proration applied to future hits when used during any part of a combo | Attack LevelDefault Attack Level Values
| |||||||||||||||||||||||||||||||||||
|---|---|---|---|---|---|---|---|---|---|---|---|---|---|---|---|---|---|---|---|---|---|---|---|---|---|---|---|---|---|---|---|---|---|---|---|---|---|---|
| Long | 100 | 89 | 3 |
- Due to its hitbox, the first active frame of the move is likely to whiff in pressure. This makes it +0 on block instead of -1
- Crumple Duration 29F, Crumple Fall 65F
6B

Unreactable overhead unless you're SKD


First hit, frames 18-19

Second hit, frames 20-22


| Damage | GuardHow this attack can be guarded. Throws have their throw range listed instead. | StartupHow many frames the attack needs to go through in order to reach its active frames. The listed startup frame coincides with the move's first active frame. | ActiveHow many frames where there is a hitbox that can hit an opponent. The first active frame occurs on the listed startup frame. | RecoveryHow many frames that the character must go through after an attack's active frames to automatically go back to a neutral stance, or the total duration of the move if it has no hitbox/creates projectiles. | Frame AdvHow many frames the attacker's recovery ends before the defender's blockstun ends if the attack is blocked. A positive value indicates that the attacker recovers first, while a negative value indicates that the defender recovers first. This value usually assumes that the attack's first active frame (of each hit, if multi-hit) is blocked. | On ODRThe difference between the attacker's total animation length and the period the opponent is in overdrive raid. This frame advantage is based off the assumption that both players input during the hitstop of a prior move, so that this attack and ODR start on the same frame. | AttributeSome attacks are invulnerable to attacks with specific attributes. This notes what attributes each attack possesses. H - Head B - Body F - Foot P - Projectile. Independent projectiles will have their Durability level listed, e.g. a projectile with Durability level 2 will show P2 T - Throw D - Doll attack, such as Carl's or Relius' doll Burst - Burst, which has its own unique attribute |
Invuln |
|---|---|---|---|---|---|---|---|---|
| 590×2 | High, Mid | 18 | 2,3 | 23 | -4 | B | 4~22 F |
- 4-22F foot invulnerable
- Must be barriered when in the air
One of the fastest overheads in the game, but doesn't combo into anything on a normal hit. Do not to abuse this move in pressure as it has a lot of recovery and is -4 on block. If used too predictably, it is possible to OD through it and reliably punish it. It only leads to combos on CH, rapid cancel, after a high 6A hit or into Shippu > Kishuu near the corner.
6B is also a versatile okizeme ender, which leads to safejumps on frame 13 reversals on grounded hit and frame 9 reversals on air hit.
Gatling Options: Drives, Super
| Starter RatingDetermines the starting value of the hitstun/untech decay timer and subsequent combo length | P1Proration applied to future hits when used as the first hit of a combo | P2Proration applied to future hits when used during any part of a combo | Attack LevelDefault Attack Level Values
| |||||||||||||||||||||||||||||||||||
|---|---|---|---|---|---|---|---|---|---|---|---|---|---|---|---|---|---|---|---|---|---|---|---|---|---|---|---|---|---|---|---|---|---|---|---|---|---|---|
| Normal | 80 | 92 | 4 |
- Bonus Proration 110%
- Can cancel into 214D and Supers
6C

DP and reversal super punish


2 Frames before active, Projectile Cut Only

Active Frames


| Version | Damage | GuardHow this attack can be guarded. Throws have their throw range listed instead. | StartupHow many frames the attack needs to go through in order to reach its active frames. The listed startup frame coincides with the move's first active frame. | ActiveHow many frames where there is a hitbox that can hit an opponent. The first active frame occurs on the listed startup frame. | RecoveryHow many frames that the character must go through after an attack's active frames to automatically go back to a neutral stance, or the total duration of the move if it has no hitbox/creates projectiles. | Frame AdvHow many frames the attacker's recovery ends before the defender's blockstun ends if the attack is blocked. A positive value indicates that the attacker recovers first, while a negative value indicates that the defender recovers first. This value usually assumes that the attack's first active frame (of each hit, if multi-hit) is blocked. | On ODRThe difference between the attacker's total animation length and the period the opponent is in overdrive raid. This frame advantage is based off the assumption that both players input during the hitstop of a prior move, so that this attack and ODR start on the same frame. | AttributeSome attacks are invulnerable to attacks with specific attributes. This notes what attributes each attack possesses. H - Head B - Body F - Foot P - Projectile. Independent projectiles will have their Durability level listed, e.g. a projectile with Durability level 2 will show P2 T - Throw D - Doll attack, such as Carl's or Relius' doll Burst - Burst, which has its own unique attribute |
Invuln |
|---|---|---|---|---|---|---|---|---|---|
| 6C | 1500 | Mid | 20~24 | 3 | 25 | -7 | B | ((2F before Active)~(End of Active) P) | |
| 6[C] Lv 1 | 1700 | Mid | 25~59 | 3 | 25 | -7 | B | ((2F before Active)~(End of Active) P) | |
| 6[C] Lv 2 | 2000 | Mid | 60 | 3 | 25 | -7 | B | (58~62 P) |
The No Charge version has these unique properties:
- Staggers on ground counter hit.
- Slides on air counter hit.
The Partial Charged version has these unique properties:
- Slides on normal and counter hit.
The Fully Charged version has these unique properties:
- Bonus Proration 110%
- 58-62F can cut projectiles
- Forces fatal counter even on normal hit
- Best opener P1/P2 and up front values by far.
Each version has the following properties:
- Can cut projectiles starting from 2F before the active frames.
- Fatal counter
- Must be barriered when in the air
While it is on paper 6C Hakumen's best move to punish moves, it requires a fatal counter to link into moves other than 5A and it can't be cancelled into overdrive. As such, 5C is often better as a punishing tool. Regardless, it can be used to punish some DPs such as Ragna and Jin's 623C for OD-less high-damage routes.
In neutral, 6C has a pretty large horizontal hitbox, but its long recovery and slow startup makes it a poor spacing tool.
6C (level 2) is essentially a combo filler in the corner since it causes slide on grounded opponents, examples include Forward Throw > 623A > 6C (level 2) or 41236C(1) > 623A > 6C (level 2).
6C (level 3) is an extremely situational punishing move. It can be used to punish Arakune's 236236C, Platinum's parry, Terumi's parry super, Azrael's astral and Mai's 236D (by using overdrive to make the second hit of her super whiff).
Gatling Options: Super
| Version | Starter RatingDetermines the starting value of the hitstun/untech decay timer and subsequent combo length | P1Proration applied to future hits when used as the first hit of a combo | P2Proration applied to future hits when used during any part of a combo | Attack LevelDefault Attack Level Values
| |||||||||||||||||||||||||||||||||||
|---|---|---|---|---|---|---|---|---|---|---|---|---|---|---|---|---|---|---|---|---|---|---|---|---|---|---|---|---|---|---|---|---|---|---|---|---|---|---|---|
| 6C | Long | 100 | 94 | 5 | |||||||||||||||||||||||||||||||||||
| 6[C] Lv 1 | Long | 100 | 94 | 5 | |||||||||||||||||||||||||||||||||||
| 6[C] Lv 2 | Long | 100 | 94 | 5 |
6C:
- Fatal Counter
- (Can cut projectiles on these frames, Hakumen is projectile invulnerable on the frame a projectile is cut)
- Maximum Slide duration 10F
6[C] Lv 1:
- Fatal Counter
- (Can cut projectiles on these frames, Hakumen is projectile invulnerable on the frame a projectile is cut)
- Maximum Slide duration 10F
6[C] Lv 2:
- Bonus Proration 110%
- Fatal Counter even on normal hit
- (Can cut projectiles on these frames, Hakumen is projectile invulnerable on the frame a projectile is cut)
- Maximum Slide duration 10F
3C

Counter poke and high-reward punish tool. NOT a pressure tool


Frame 7 Projectile Cut Only

Frames 8-10

Frames 11-14 Projectile Cut Only


| Damage | GuardHow this attack can be guarded. Throws have their throw range listed instead. | StartupHow many frames the attack needs to go through in order to reach its active frames. The listed startup frame coincides with the move's first active frame. | ActiveHow many frames where there is a hitbox that can hit an opponent. The first active frame occurs on the listed startup frame. | RecoveryHow many frames that the character must go through after an attack's active frames to automatically go back to a neutral stance, or the total duration of the move if it has no hitbox/creates projectiles. | Frame AdvHow many frames the attacker's recovery ends before the defender's blockstun ends if the attack is blocked. A positive value indicates that the attacker recovers first, while a negative value indicates that the defender recovers first. This value usually assumes that the attack's first active frame (of each hit, if multi-hit) is blocked. | On ODRThe difference between the attacker's total animation length and the period the opponent is in overdrive raid. This frame advantage is based off the assumption that both players input during the hitstop of a prior move, so that this attack and ODR start on the same frame. | AttributeSome attacks are invulnerable to attacks with specific attributes. This notes what attributes each attack possesses. H - Head B - Body F - Foot P - Projectile. Independent projectiles will have their Durability level listed, e.g. a projectile with Durability level 2 will show P2 T - Throw D - Doll attack, such as Carl's or Relius' doll Burst - Burst, which has its own unique attribute |
Invuln |
|---|---|---|---|---|---|---|---|---|
| 1200 | Low | 8 | 3 | 28 | -12 | F | (7~14 P) |
- 7-14F can cut projectiles, Hakumen's fastest grounded move for doing so.
A very fast and far reaching poke. Since it only has 8-frame of start-up, it can be used to punish EA at close range. It requires a CH or RC to combo. Up close, It can combo into 6A > 6B and 2B > 214A from further away. Since it's -12 it's extremely easy to punish as such:
Do not autopilot combos that end with 3C in pressure.
Gatling Options: 214214B
| Starter RatingDetermines the starting value of the hitstun/untech decay timer and subsequent combo length | P1Proration applied to future hits when used as the first hit of a combo | P2Proration applied to future hits when used during any part of a combo | Attack LevelDefault Attack Level Values
| |||||||||||||||||||||||||||||||||||
|---|---|---|---|---|---|---|---|---|---|---|---|---|---|---|---|---|---|---|---|---|---|---|---|---|---|---|---|---|---|---|---|---|---|---|---|---|---|---|
| Long | 90 | 92 | 4 |
- (Can cut projectiles on these frames, Hakumen is projectile invulnerable on the frame a projectile is cut)
4C

Key ground neutral tool


Frame 8 Projectile Cut only

Frame 9 Projectile Cut only

Frame 10


| Damage | GuardHow this attack can be guarded. Throws have their throw range listed instead. | StartupHow many frames the attack needs to go through in order to reach its active frames. The listed startup frame coincides with the move's first active frame. | ActiveHow many frames where there is a hitbox that can hit an opponent. The first active frame occurs on the listed startup frame. | RecoveryHow many frames that the character must go through after an attack's active frames to automatically go back to a neutral stance, or the total duration of the move if it has no hitbox/creates projectiles. | Frame AdvHow many frames the attacker's recovery ends before the defender's blockstun ends if the attack is blocked. A positive value indicates that the attacker recovers first, while a negative value indicates that the defender recovers first. This value usually assumes that the attack's first active frame (of each hit, if multi-hit) is blocked. | On ODRThe difference between the attacker's total animation length and the period the opponent is in overdrive raid. This frame advantage is based off the assumption that both players input during the hitstop of a prior move, so that this attack and ODR start on the same frame. | AttributeSome attacks are invulnerable to attacks with specific attributes. This notes what attributes each attack possesses. H - Head B - Body F - Foot P - Projectile. Independent projectiles will have their Durability level listed, e.g. a projectile with Durability level 2 will show P2 T - Throw D - Doll attack, such as Carl's or Relius' doll Burst - Burst, which has its own unique attribute |
Invuln |
|---|---|---|---|---|---|---|---|---|
| 900 | All | 10 | 1 | 24 | -4 | B | (8~10 P) |
- Fast and long-ranged neutral tool.
- 8-10F can cut projectiles.
4C is one of Hakumen's prime neutral tool thanks to it's great range and start-up. Be careful, as many characters can simply dash under or uses moves that low profile to avoid it (Such as Izanami's 2B). It only combos into 632146C on normal hit. On CH, it can be linked into itself, 214A or 623AA, but none of these work at max range.
Gatling Options: Super
| Starter RatingDetermines the starting value of the hitstun/untech decay timer and subsequent combo length | P1Proration applied to future hits when used as the first hit of a combo | P2Proration applied to future hits when used during any part of a combo | Attack LevelDefault Attack Level Values
| |||||||||||||||||||||||||||||||||||
|---|---|---|---|---|---|---|---|---|---|---|---|---|---|---|---|---|---|---|---|---|---|---|---|---|---|---|---|---|---|---|---|---|---|---|---|---|---|---|
| Long | 100 | 89 | 3 |
- (Can cut projectiles on these frames, Hakumen is projectile invulnerable on the frame a projectile is cut)
j.A

Close air-to-air tool


| Damage | GuardHow this attack can be guarded. Throws have their throw range listed instead. | StartupHow many frames the attack needs to go through in order to reach its active frames. The listed startup frame coincides with the move's first active frame. | ActiveHow many frames where there is a hitbox that can hit an opponent. The first active frame occurs on the listed startup frame. | RecoveryHow many frames that the character must go through after an attack's active frames to automatically go back to a neutral stance, or the total duration of the move if it has no hitbox/creates projectiles. | Frame AdvHow many frames the attacker's recovery ends before the defender's blockstun ends if the attack is blocked. A positive value indicates that the attacker recovers first, while a negative value indicates that the defender recovers first. This value usually assumes that the attack's first active frame (of each hit, if multi-hit) is blocked. | On ODRThe difference between the attacker's total animation length and the period the opponent is in overdrive raid. This frame advantage is based off the assumption that both players input during the hitstop of a prior move, so that this attack and ODR start on the same frame. | AttributeSome attacks are invulnerable to attacks with specific attributes. This notes what attributes each attack possesses. H - Head B - Body F - Foot P - Projectile. Independent projectiles will have their Durability level listed, e.g. a projectile with Durability level 2 will show P2 T - Throw D - Doll attack, such as Carl's or Relius' doll Burst - Burst, which has its own unique attribute |
Invuln |
|---|---|---|---|---|---|---|---|---|
| 300 | High/Air | 7 | 3 | 9 | H |
- Late chains into j.B
A pretty decent tool for air to air situations, and for setting up a Throw Reject Miss on an unsuspecting opponent (IAD j.A x(1~2) > Air throw). In neutral, IAD j.A > j.C is very strong as the j.A deals with the other air-to-air and let the j.C hit very close to the ground. It's fairly difficult to combo after j.A. On normal hit, it only combos into j.A, j.B, j.214A at certain heights; On CH, combos into j.C and Falling j.B > 5C.
Gatling Options (Can cancel into other normals after 13 frames): j.A, j.B, Special, Throw
| Starter RatingDetermines the starting value of the hitstun/untech decay timer and subsequent combo length | P1Proration applied to future hits when used as the first hit of a combo | P2Proration applied to future hits when used during any part of a combo | Attack LevelDefault Attack Level Values
| |||||||||||||||||||||||||||||||||||
|---|---|---|---|---|---|---|---|---|---|---|---|---|---|---|---|---|---|---|---|---|---|---|---|---|---|---|---|---|---|---|---|---|---|---|---|---|---|---|
| Normal | 80 | 80 | 1 |
- Cancellable into normals from frame 13
j.B

Amazing jump-in


| Damage | GuardHow this attack can be guarded. Throws have their throw range listed instead. | StartupHow many frames the attack needs to go through in order to reach its active frames. The listed startup frame coincides with the move's first active frame. | ActiveHow many frames where there is a hitbox that can hit an opponent. The first active frame occurs on the listed startup frame. | RecoveryHow many frames that the character must go through after an attack's active frames to automatically go back to a neutral stance, or the total duration of the move if it has no hitbox/creates projectiles. | Frame AdvHow many frames the attacker's recovery ends before the defender's blockstun ends if the attack is blocked. A positive value indicates that the attacker recovers first, while a negative value indicates that the defender recovers first. This value usually assumes that the attack's first active frame (of each hit, if multi-hit) is blocked. | On ODRThe difference between the attacker's total animation length and the period the opponent is in overdrive raid. This frame advantage is based off the assumption that both players input during the hitstop of a prior move, so that this attack and ODR start on the same frame. | AttributeSome attacks are invulnerable to attacks with specific attributes. This notes what attributes each attack possesses. H - Head B - Body F - Foot P - Projectile. Independent projectiles will have their Durability level listed, e.g. a projectile with Durability level 2 will show P2 T - Throw D - Doll attack, such as Carl's or Relius' doll Burst - Burst, which has its own unique attribute |
Invuln |
|---|---|---|---|---|---|---|---|---|
| 650 | High/Air | 9 | 3 | 20 | H |
- Late chains into j.A and j.2A
- Solid crossup hitbox
An amazing normal with a better hitbox than it looks. It's a very good move for jump ins and for crossing the opponent up. On okizeme, after an air hit 6B, Hakumen can 9jc > j.A (whiff) > j.B or 669 > j.A (whiff) > j.B (to cross-up) for a left right/mix-up which also acts as a safejump. The 669 option is also useful to get out of the corner.
Gatling Options (Can cancel into other normals after 15 frames): j.A, j.2A, Special, Jump
| Starter RatingDetermines the starting value of the hitstun/untech decay timer and subsequent combo length | P1Proration applied to future hits when used as the first hit of a combo | P2Proration applied to future hits when used during any part of a combo | Attack LevelDefault Attack Level Values
| |||||||||||||||||||||||||||||||||||
|---|---|---|---|---|---|---|---|---|---|---|---|---|---|---|---|---|---|---|---|---|---|---|---|---|---|---|---|---|---|---|---|---|---|---|---|---|---|---|
| Long | 80 | 89 | 3 |
- Cancellable into normals from frame 15
j.C

Main air neutral tool


Frames 10-11 Projectile Cut only

Frames 12-13

Frames 14-19 Projectile Cut only


| Damage | GuardHow this attack can be guarded. Throws have their throw range listed instead. | StartupHow many frames the attack needs to go through in order to reach its active frames. The listed startup frame coincides with the move's first active frame. | ActiveHow many frames where there is a hitbox that can hit an opponent. The first active frame occurs on the listed startup frame. | RecoveryHow many frames that the character must go through after an attack's active frames to automatically go back to a neutral stance, or the total duration of the move if it has no hitbox/creates projectiles. | Frame AdvHow many frames the attacker's recovery ends before the defender's blockstun ends if the attack is blocked. A positive value indicates that the attacker recovers first, while a negative value indicates that the defender recovers first. This value usually assumes that the attack's first active frame (of each hit, if multi-hit) is blocked. | On ODRThe difference between the attacker's total animation length and the period the opponent is in overdrive raid. This frame advantage is based off the assumption that both players input during the hitstop of a prior move, so that this attack and ODR start on the same frame. | AttributeSome attacks are invulnerable to attacks with specific attributes. This notes what attributes each attack possesses. H - Head B - Body F - Foot P - Projectile. Independent projectiles will have their Durability level listed, e.g. a projectile with Durability level 2 will show P2 T - Throw D - Doll attack, such as Carl's or Relius' doll Burst - Burst, which has its own unique attribute |
Invuln |
|---|---|---|---|---|---|---|---|---|
| 1000 | All | 12 | 2 | 32+3L | H | (10~19 P) |
- Wall sticks on corner hits
- Projectile guard point 10F-19F
The go-to tool for Hakumen's air-to-air game. Its hitbox extends all the way from the tip of Hakumen's blade to his shoulder, which makes it great for spacing in the air. It blows the opponent back on hit, and wall sticks in the corner. On a air hit CH and near the corner, it is possible to combo with j.C CH > IAD j.C > j.214B or j.C CH > IAD > 5C if close enough to the ground.
On tall characters falling j.C is also a strong zoning tool. Bear in mind its slow startup means that it must be used preemptively for close to the ground air-to-air confrontations.
Gatling Options: Special, Jump (on hit)
| Starter RatingDetermines the starting value of the hitstun/untech decay timer and subsequent combo length | P1Proration applied to future hits when used as the first hit of a combo | P2Proration applied to future hits when used during any part of a combo | Attack LevelDefault Attack Level Values
| |||||||||||||||||||||||||||||||||||
|---|---|---|---|---|---|---|---|---|---|---|---|---|---|---|---|---|---|---|---|---|---|---|---|---|---|---|---|---|---|---|---|---|---|---|---|---|---|---|
| Long | 80 | 92 | 4 |
- (Can cut projectiles on these frames, Hakumen is projectile invulnerable on the frame a projectile is cut)
- Landing recovery applies only if move reaches active frames
j.2A

Anti-zoner tool


Frames 5-10 Projectile Cut only
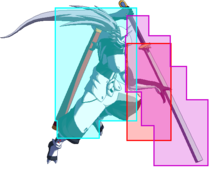
Frames 11-14

Frames15-18

Frames 19-22


| Damage | GuardHow this attack can be guarded. Throws have their throw range listed instead. | StartupHow many frames the attack needs to go through in order to reach its active frames. The listed startup frame coincides with the move's first active frame. | ActiveHow many frames where there is a hitbox that can hit an opponent. The first active frame occurs on the listed startup frame. | RecoveryHow many frames that the character must go through after an attack's active frames to automatically go back to a neutral stance, or the total duration of the move if it has no hitbox/creates projectiles. | Frame AdvHow many frames the attacker's recovery ends before the defender's blockstun ends if the attack is blocked. A positive value indicates that the attacker recovers first, while a negative value indicates that the defender recovers first. This value usually assumes that the attack's first active frame (of each hit, if multi-hit) is blocked. | On ODRThe difference between the attacker's total animation length and the period the opponent is in overdrive raid. This frame advantage is based off the assumption that both players input during the hitstop of a prior move, so that this attack and ODR start on the same frame. | AttributeSome attacks are invulnerable to attacks with specific attributes. This notes what attributes each attack possesses. H - Head B - Body F - Foot P - Projectile. Independent projectiles will have their Durability level listed, e.g. a projectile with Durability level 2 will show P2 T - Throw D - Doll attack, such as Carl's or Relius' doll Burst - Burst, which has its own unique attribute |
Invuln |
|---|---|---|---|---|---|---|---|---|
| 700 | High/Air | 11 | 12 | 12 | H | (5~24 P) |
- Projectile guard point 5F-24F
Hakumen's fastest and overall best move for cutting the opponent's projectiles thanks to its long active time and early anti-projectile hitbox, and decent air-to-air tool overall. It only gatlings into j.C and specials. Primarily used against zoners to approach. The strategy is to 9jc > Barrier > Delay j.2A. It cuts projectiles in neutral and keeps a jump/airdash option available afterward to adapt to the situation.
Gatling Options (Can cancel into other normals after 5 frames of recovery): j.C, Special, Jump
| Starter RatingDetermines the starting value of the hitstun/untech decay timer and subsequent combo length | P1Proration applied to future hits when used as the first hit of a combo | P2Proration applied to future hits when used during any part of a combo | Attack LevelDefault Attack Level Values
| |||||||||||||||||||||||||||||||||||
|---|---|---|---|---|---|---|---|---|---|---|---|---|---|---|---|---|---|---|---|---|---|---|---|---|---|---|---|---|---|---|---|---|---|---|---|---|---|---|
| Long | 80 | 89 | 3 |
- (Can cut projectiles on these frames, Hakumen is projectile invulnerable on the frame a projectile is cut)
- Immediately enters recovery on hit/block
- Cancellable into j.C from 5th frame of recovery
j.2C

Don't use j.2C when you're high in the air


Frames 14-15 Projectile Cut only

Frames 16-18

Frames 19


| Damage | GuardHow this attack can be guarded. Throws have their throw range listed instead. | StartupHow many frames the attack needs to go through in order to reach its active frames. The listed startup frame coincides with the move's first active frame. | ActiveHow many frames where there is a hitbox that can hit an opponent. The first active frame occurs on the listed startup frame. | RecoveryHow many frames that the character must go through after an attack's active frames to automatically go back to a neutral stance, or the total duration of the move if it has no hitbox/creates projectiles. | Frame AdvHow many frames the attacker's recovery ends before the defender's blockstun ends if the attack is blocked. A positive value indicates that the attacker recovers first, while a negative value indicates that the defender recovers first. This value usually assumes that the attack's first active frame (of each hit, if multi-hit) is blocked. | On ODRThe difference between the attacker's total animation length and the period the opponent is in overdrive raid. This frame advantage is based off the assumption that both players input during the hitstop of a prior move, so that this attack and ODR start on the same frame. | AttributeSome attacks are invulnerable to attacks with specific attributes. This notes what attributes each attack possesses. H - Head B - Body F - Foot P - Projectile. Independent projectiles will have their Durability level listed, e.g. a projectile with Durability level 2 will show P2 T - Throw D - Doll attack, such as Carl's or Relius' doll Burst - Burst, which has its own unique attribute |
Invuln |
|---|---|---|---|---|---|---|---|---|
| 1200 | High/Air | 16 | 4 | 30 | H | (14~19 P) |
- Projectile guard point 14F-19F
Decent air to ground tool, it has a bigger hitbox than j.B but is slower and it's harder to combo after it. A very common mistake is to overuse IAD j.2C in neutral. j.2C is very slow and as such fairly easy to anti-air. 7/9jc > Barrier > Close to the ground j.2C can be very strong as it exploit j.2C great hitbox while making hard to punish. In the corner 6B > j.A(w) > Falling j.2C acts as a safejump. j.2C is also used after j.214A air combo enders to prevent delay techs, rolls or to even meaty with certain setups.
Gatling Options: Special
| Starter RatingDetermines the starting value of the hitstun/untech decay timer and subsequent combo length | P1Proration applied to future hits when used as the first hit of a combo | P2Proration applied to future hits when used during any part of a combo | Attack LevelDefault Attack Level Values
| |||||||||||||||||||||||||||||||||||
|---|---|---|---|---|---|---|---|---|---|---|---|---|---|---|---|---|---|---|---|---|---|---|---|---|---|---|---|---|---|---|---|---|---|---|---|---|---|---|
| Long | 80 | 92 | 4 |
- (Can cut projectiles on these frames, Hakumen is projectile invulnerable on the frame a projectile is cut)
Drive Moves
Each of Hakumen's Drive normals automatically trigger a counterattack after blocking an opponent's strike, but not after blocking a projectile. Hakumen becomes fully invulnerable for the remainder of the Drive move if any attack is blocked, and also gains the option to cancel into any special, super, Crush Trigger or Exceed Accel if the counterattack is not triggered. Each counterattack's startup can also be cancelled into any of the same options in a short window before they are active. Any special or super (with the exceptions of 236236D or specifically OD 632146C) cancelled into this way will be fully invulnerable for the first 10 frames.
5D


PREDICTABO


Catch hitbox

Attack hitbox


| Version | Damage | GuardHow this attack can be guarded. Throws have their throw range listed instead. | StartupHow many frames the attack needs to go through in order to reach its active frames. The listed startup frame coincides with the move's first active frame. | ActiveHow many frames where there is a hitbox that can hit an opponent. The first active frame occurs on the listed startup frame. | RecoveryHow many frames that the character must go through after an attack's active frames to automatically go back to a neutral stance, or the total duration of the move if it has no hitbox/creates projectiles. | Frame AdvHow many frames the attacker's recovery ends before the defender's blockstun ends if the attack is blocked. A positive value indicates that the attacker recovers first, while a negative value indicates that the defender recovers first. This value usually assumes that the attack's first active frame (of each hit, if multi-hit) is blocked. | On ODRThe difference between the attacker's total animation length and the period the opponent is in overdrive raid. This frame advantage is based off the assumption that both players input during the hitstop of a prior move, so that this attack and ODR start on the same frame. | AttributeSome attacks are invulnerable to attacks with specific attributes. This notes what attributes each attack possesses. H - Head B - Body F - Foot P - Projectile. Independent projectiles will have their Durability level listed, e.g. a projectile with Durability level 2 will show P2 T - Throw D - Doll attack, such as Carl's or Relius' doll Burst - Burst, which has its own unique attribute |
Invuln |
|---|---|---|---|---|---|---|---|---|---|
| 5D | 40 | 6~20 Catch HBFP | |||||||
| 5[D] Lv 1 | 50 | 6~30 Catch HBFP | |||||||
| 5[D] Lv 2 | 60 | 6~40 Catch HBFP | |||||||
| 5D Attack | 0, 1000 | 16 | 10 | 10 | -1 | BT | 1~End All |
- Can be held to extend parry window
- Cannot block low moves, regardless of attribute.
- Gain 1 Magatama when followup attack connects.
- 0% heat gain multiplier (No normal heat gain outside of the fixed 1 Magatama)
- Swaps sides and causes hard knockdown
Your general purpose counter and the most lenient with its timing due to its ability to be held. However, this is the only normal drive move that doesn't have guard point from the first frame, so don't use it as a reversal. Gives reasonable reward on hit.
5D can act as a pseudo anti-air. It combos into 236B, 623A and can be OD cancelled
Gatling Options: Special
| Version | Starter RatingDetermines the starting value of the hitstun/untech decay timer and subsequent combo length | P1Proration applied to future hits when used as the first hit of a combo | P2Proration applied to future hits when used during any part of a combo | Attack LevelDefault Attack Level Values
| |||||||||||||||||||||||||||||||||||
|---|---|---|---|---|---|---|---|---|---|---|---|---|---|---|---|---|---|---|---|---|---|---|---|---|---|---|---|---|---|---|---|---|---|---|---|---|---|---|---|
| 5D | |||||||||||||||||||||||||||||||||||||||
| 5[D] Lv 1 | |||||||||||||||||||||||||||||||||||||||
| 5[D] Lv 2 | |||||||||||||||||||||||||||||||||||||||
| 5D Attack | Very Short | 100 | 100, 72 | 0, 4 |
5D:
- Only guards attacks that can be blocked high/mid
- Cancels into attack only after guarding a non-projectile
- Counterhit state for entire move
- On Guard Point, hitstop for Hakumen is 2F. Opponent hitstop is 14F
5[D] Lv 1:
- Only guards attacks that can be blocked high/mid
- Cancels into attack only after guarding a non-projectile
- Counterhit state for entire move
- On Guard Point, hitstop for Hakumen is 2F. Opponent hitstop is 14F
5[D] Lv 2:
- Only guards attacks that can be blocked high/mid
- Cancels into attack only after guarding a non-projectile
- Counterhit state for entire move
- On Guard Point, hitstop for Hakumen is 2F. Opponent hitstop is 14F
5D Attack:
- Cancellable into specials/supers/CT/EA on frames 11-15
- Cannot hit opponents in jump startup
2D

Best Drive


Catch hitbox

Attack hitbox


| Version | Damage | GuardHow this attack can be guarded. Throws have their throw range listed instead. | StartupHow many frames the attack needs to go through in order to reach its active frames. The listed startup frame coincides with the move's first active frame. | ActiveHow many frames where there is a hitbox that can hit an opponent. The first active frame occurs on the listed startup frame. | RecoveryHow many frames that the character must go through after an attack's active frames to automatically go back to a neutral stance, or the total duration of the move if it has no hitbox/creates projectiles. | Frame AdvHow many frames the attacker's recovery ends before the defender's blockstun ends if the attack is blocked. A positive value indicates that the attacker recovers first, while a negative value indicates that the defender recovers first. This value usually assumes that the attack's first active frame (of each hit, if multi-hit) is blocked. | On ODRThe difference between the attacker's total animation length and the period the opponent is in overdrive raid. This frame advantage is based off the assumption that both players input during the hitstop of a prior move, so that this attack and ODR start on the same frame. | AttributeSome attacks are invulnerable to attacks with specific attributes. This notes what attributes each attack possesses. H - Head B - Body F - Foot P - Projectile. Independent projectiles will have their Durability level listed, e.g. a projectile with Durability level 2 will show P2 T - Throw D - Doll attack, such as Carl's or Relius' doll Burst - Burst, which has its own unique attribute |
Invuln |
|---|---|---|---|---|---|---|---|---|---|
| 2D | 46 | 1~8 Catch HBFP | |||||||
| 2D Attack | 0, 1000 | 16 | 10 | 15 | -6 | FT | 1~End All |
- Cannot block overhead moves, regardless of attribute.
- Gain 1 Magatama when followup attack connects.
- 0% heat gain multiplier (No normal heat gain outside of the fixed 1 Magatama)
- Swaps sides and causes hard knockdown
A mid and low counter that is active frame 1, so can be used as a wake-up reversal and generally effective against most grounded moves, although the follow-up attack may miss entirely depending on the hitboxes. On hit it puts the opponent behind Hakumen, useful for corner switching with an opponent. Loses to overheads, but most of these are slower than other attacks so the Guardpoint will likely have expired anyway. Just like 5D, it combos into 236B, 623AA and can be OD cancelled.
Gatling Options: Special
| Version | Starter RatingDetermines the starting value of the hitstun/untech decay timer and subsequent combo length | P1Proration applied to future hits when used as the first hit of a combo | P2Proration applied to future hits when used during any part of a combo | Attack LevelDefault Attack Level Values
| |||||||||||||||||||||||||||||||||||
|---|---|---|---|---|---|---|---|---|---|---|---|---|---|---|---|---|---|---|---|---|---|---|---|---|---|---|---|---|---|---|---|---|---|---|---|---|---|---|---|
| 2D | |||||||||||||||||||||||||||||||||||||||
| 2D Attack | Very Short | 100 | 100, 72 | 0, 4 |
2D:
- Only guards attacks that can be blocked mid/low
- Cancels into attack only after guarding a non-projectile
- After guarding a projectile attack, Hakumen is fully invincible for rest of move
- Counterhit state for entire move
- On Guard Point, hitstop for Hakumen is 2F. Opponent hitstop is 14F
2D Attack:
- Cancellable into specials/supers/CT/EA on frames 11-15
- Cannot hit opponents in jump startup
6D

Situational counter


Catch hitbox

Attack hitbox


| Version | Damage | GuardHow this attack can be guarded. Throws have their throw range listed instead. | StartupHow many frames the attack needs to go through in order to reach its active frames. The listed startup frame coincides with the move's first active frame. | ActiveHow many frames where there is a hitbox that can hit an opponent. The first active frame occurs on the listed startup frame. | RecoveryHow many frames that the character must go through after an attack's active frames to automatically go back to a neutral stance, or the total duration of the move if it has no hitbox/creates projectiles. | Frame AdvHow many frames the attacker's recovery ends before the defender's blockstun ends if the attack is blocked. A positive value indicates that the attacker recovers first, while a negative value indicates that the defender recovers first. This value usually assumes that the attack's first active frame (of each hit, if multi-hit) is blocked. | On ODRThe difference between the attacker's total animation length and the period the opponent is in overdrive raid. This frame advantage is based off the assumption that both players input during the hitstop of a prior move, so that this attack and ODR start on the same frame. | AttributeSome attacks are invulnerable to attacks with specific attributes. This notes what attributes each attack possesses. H - Head B - Body F - Foot P - Projectile. Independent projectiles will have their Durability level listed, e.g. a projectile with Durability level 2 will show P2 T - Throw D - Doll attack, such as Carl's or Relius' doll Burst - Burst, which has its own unique attribute |
Invuln |
|---|---|---|---|---|---|---|---|---|---|
| 6D | 43 | 1~9 Catch HBFP | |||||||
| 6D Attack | 0, 1000 | 16 | 10 | 10 | -1 | BT | 1~End All |
- Cannot block low moves, regardless of attribute.
- Gain 1 Magatama when followup attack connects.
- 0% heat gain multiplier (No normal heat gain outside of the fixed 1 Magatama)
- On successful counter, blows opponent away and wallbounces
Where 5D is a safer prediction move with a potentially bigger reward, this is more akin to a reversal, going active in 1 frame but having bad recovery. Like 5D, it catches highs and mids, but loses to lows. Sometimes used after 6A or 6B to catch attempts at poking out. Primarily used on reaction after an OD flash or against slow overheads. It can also be used to counter some IOH like Rachel's 5B > 9jc j.2D j.A.
Unfortunately, it's very difficult to combo after it and the combos usually aren't worth doing.
Gatling Options: Special
| Version | Starter RatingDetermines the starting value of the hitstun/untech decay timer and subsequent combo length | P1Proration applied to future hits when used as the first hit of a combo | P2Proration applied to future hits when used during any part of a combo | Attack LevelDefault Attack Level Values
| |||||||||||||||||||||||||||||||||||
|---|---|---|---|---|---|---|---|---|---|---|---|---|---|---|---|---|---|---|---|---|---|---|---|---|---|---|---|---|---|---|---|---|---|---|---|---|---|---|---|
| 6D | |||||||||||||||||||||||||||||||||||||||
| 6D Attack | Very Short | 100 | 100, 72 | 0, 4 |
6D:
- Only guards attacks that can be blocked high/mid
- Cancels into attack only after guarding a non-projectile
- After guarding a projectile attack, Hakumen is fully invincible for rest of move
- Counterhit state for entire move
- On Guard Point, hitstop for Hakumen is 2F. Opponent hitstop is 14F
6D Attack:
- Cancellable into specials/supers/CT/EA on frames 11-15
- Cannot hit opponents in jump startup
j.D

You shouldn't have used that anti-air


Catch hitbox

Attack hitbox


| Version | Damage | GuardHow this attack can be guarded. Throws have their throw range listed instead. | StartupHow many frames the attack needs to go through in order to reach its active frames. The listed startup frame coincides with the move's first active frame. | ActiveHow many frames where there is a hitbox that can hit an opponent. The first active frame occurs on the listed startup frame. | RecoveryHow many frames that the character must go through after an attack's active frames to automatically go back to a neutral stance, or the total duration of the move if it has no hitbox/creates projectiles. | Frame AdvHow many frames the attacker's recovery ends before the defender's blockstun ends if the attack is blocked. A positive value indicates that the attacker recovers first, while a negative value indicates that the defender recovers first. This value usually assumes that the attack's first active frame (of each hit, if multi-hit) is blocked. | On ODRThe difference between the attacker's total animation length and the period the opponent is in overdrive raid. This frame advantage is based off the assumption that both players input during the hitstop of a prior move, so that this attack and ODR start on the same frame. | AttributeSome attacks are invulnerable to attacks with specific attributes. This notes what attributes each attack possesses. H - Head B - Body F - Foot P - Projectile. Independent projectiles will have their Durability level listed, e.g. a projectile with Durability level 2 will show P2 T - Throw D - Doll attack, such as Carl's or Relius' doll Burst - Burst, which has its own unique attribute |
Invuln |
|---|---|---|---|---|---|---|---|---|---|
| j.D | Until L+17 | 1~10 Catch HBFP | |||||||
| j.D Attack | 0, 1000 | 14 | 10 | 6 | HT | 1~End All |
- No weakness to specific guard types, unlike other Drives.
- Stalls air momentum.
- Gain 1 Magatama when followup attack connects.
- 0% heat gain multiplier (No normal heat gain outside of the fixed 1 Magatama)
The anti-air-to-air and anti-anti-air drive. Can be used when falling down or after an IAD to counter moves which are otherwise tough to deal with. It is also a mindgame tool after a blocked j.214A to deter the opponent from using an anti-air. Be careful though, as it can be dealt with air grabs. After j.D, Hakumen is in recovery until landing. As such, using it while high in the air is a risky gamble. On hit, it combos into j.2A or j.214C.
As of CF2, an air option (double jump, air dash) is regained upon a successful catch, meaning it is always possible to go for j.D > j.2A > 9jc > j.B > j.2A > j.214A even after a double jump.
Gatling Options: Special
| Version | Starter RatingDetermines the starting value of the hitstun/untech decay timer and subsequent combo length | P1Proration applied to future hits when used as the first hit of a combo | P2Proration applied to future hits when used during any part of a combo | Attack LevelDefault Attack Level Values
| |||||||||||||||||||||||||||||||||||
|---|---|---|---|---|---|---|---|---|---|---|---|---|---|---|---|---|---|---|---|---|---|---|---|---|---|---|---|---|---|---|---|---|---|---|---|---|---|---|---|
| j.D | |||||||||||||||||||||||||||||||||||||||
| j.D Attack | Very Short | 100 | 100, 67 |
j.D:
- Only guards attacks that can be air barrier blocked
- Cancels into attack only after guarding a non-projectile
- After guarding a projectile attack, Hakumen is fully invincible for rest of move
- Counterhit state for entire move
- On Guard Point, hitstop for Hakumen is 0F. Opponent hitstop is 12F
j.D Attack:
- Cancellable into specials on frames 11-13
- Cannot hit opponents in jump startup
Universal Mechanics
Forward Throw
B+C

Decent but often predictable

| Damage | GuardHow this attack can be guarded. Throws have their throw range listed instead. | StartupHow many frames the attack needs to go through in order to reach its active frames. The listed startup frame coincides with the move's first active frame. | ActiveHow many frames where there is a hitbox that can hit an opponent. The first active frame occurs on the listed startup frame. | RecoveryHow many frames that the character must go through after an attack's active frames to automatically go back to a neutral stance, or the total duration of the move if it has no hitbox/creates projectiles. | Frame AdvHow many frames the attacker's recovery ends before the defender's blockstun ends if the attack is blocked. A positive value indicates that the attacker recovers first, while a negative value indicates that the defender recovers first. This value usually assumes that the attack's first active frame (of each hit, if multi-hit) is blocked. | On ODRThe difference between the attacker's total animation length and the period the opponent is in overdrive raid. This frame advantage is based off the assumption that both players input during the hitstop of a prior move, so that this attack and ODR start on the same frame. | AttributeSome attacks are invulnerable to attacks with specific attributes. This notes what attributes each attack possesses. H - Head B - Body F - Foot P - Projectile. Independent projectiles will have their Durability level listed, e.g. a projectile with Durability level 2 will show P2 T - Throw D - Doll attack, such as Carl's or Relius' doll Burst - Burst, which has its own unique attribute |
Invuln |
|---|---|---|---|---|---|---|---|---|
| 0, 1500 | Throw | 7 | 3 | 23 | T |
- 100% minimum damage (1500)
- Staggers on hit
Primarily used after a 2A at close range or 623A in pressure. Midscreen, it combos into 2C or Forward Hop > j.214B. In the corner, it combos into 623A > 6C(level 2). The first hit after throw is unburstable. In the corner, Throw > ODc > 6C(level 2) leads to efficient combos making it a very useful round ender.
| Starter RatingDetermines the starting value of the hitstun/untech decay timer and subsequent combo length | P1Proration applied to future hits when used as the first hit of a combo | P2Proration applied to future hits when used during any part of a combo | Attack LevelDefault Attack Level Values
| |||||||||||||||||||||||||||||||||||
|---|---|---|---|---|---|---|---|---|---|---|---|---|---|---|---|---|---|---|---|---|---|---|---|---|---|---|---|---|---|---|---|---|---|---|---|---|---|---|
| Normal | 100 | 50 | 0, 4 |
- Minimum Damage 100% (1500)
- Crumple Duration 45F, Crumple Fall 77F
Back Throw
4B+C

Can be RC'd for high damage combos

| Damage | GuardHow this attack can be guarded. Throws have their throw range listed instead. | StartupHow many frames the attack needs to go through in order to reach its active frames. The listed startup frame coincides with the move's first active frame. | ActiveHow many frames where there is a hitbox that can hit an opponent. The first active frame occurs on the listed startup frame. | RecoveryHow many frames that the character must go through after an attack's active frames to automatically go back to a neutral stance, or the total duration of the move if it has no hitbox/creates projectiles. | Frame AdvHow many frames the attacker's recovery ends before the defender's blockstun ends if the attack is blocked. A positive value indicates that the attacker recovers first, while a negative value indicates that the defender recovers first. This value usually assumes that the attack's first active frame (of each hit, if multi-hit) is blocked. | On ODRThe difference between the attacker's total animation length and the period the opponent is in overdrive raid. This frame advantage is based off the assumption that both players input during the hitstop of a prior move, so that this attack and ODR start on the same frame. | AttributeSome attacks are invulnerable to attacks with specific attributes. This notes what attributes each attack possesses. H - Head B - Body F - Foot P - Projectile. Independent projectiles will have their Durability level listed, e.g. a projectile with Durability level 2 will show P2 T - Throw D - Doll attack, such as Carl's or Relius' doll Burst - Burst, which has its own unique attribute |
Invuln |
|---|---|---|---|---|---|---|---|---|
| 0, 750×2 | Throw | 7 | 3 | 23 | T |
- 100% minimum damage (1500)
Hits twice, only the second move can be special cancelled. Unlike forward throw, back throw requires a Magatama midscreen to continue the combo with 623A, 623AA or Delay 214A. The first hit can be rapid cancelled into 5C OD avoiding the move's proration and thus leading to very high damage under the right circumstances. This is, however, very situational and a fairly difficult link.
| Starter RatingDetermines the starting value of the hitstun/untech decay timer and subsequent combo length | P1Proration applied to future hits when used as the first hit of a combo | P2Proration applied to future hits when used during any part of a combo | Attack LevelDefault Attack Level Values
| |||||||||||||||||||||||||||||||||||
|---|---|---|---|---|---|---|---|---|---|---|---|---|---|---|---|---|---|---|---|---|---|---|---|---|---|---|---|---|---|---|---|---|---|---|---|---|---|---|
| Normal | 100 | 50 | 0, 2, 4 |
- Minimum Damage 100% (1500)
Air Throw
j.B+C

Not an air combo ender unless you're Camellia

| Damage | GuardHow this attack can be guarded. Throws have their throw range listed instead. | StartupHow many frames the attack needs to go through in order to reach its active frames. The listed startup frame coincides with the move's first active frame. | ActiveHow many frames where there is a hitbox that can hit an opponent. The first active frame occurs on the listed startup frame. | RecoveryHow many frames that the character must go through after an attack's active frames to automatically go back to a neutral stance, or the total duration of the move if it has no hitbox/creates projectiles. | Frame AdvHow many frames the attacker's recovery ends before the defender's blockstun ends if the attack is blocked. A positive value indicates that the attacker recovers first, while a negative value indicates that the defender recovers first. This value usually assumes that the attack's first active frame (of each hit, if multi-hit) is blocked. | On ODRThe difference between the attacker's total animation length and the period the opponent is in overdrive raid. This frame advantage is based off the assumption that both players input during the hitstop of a prior move, so that this attack and ODR start on the same frame. | AttributeSome attacks are invulnerable to attacks with specific attributes. This notes what attributes each attack possesses. H - Head B - Body F - Foot P - Projectile. Independent projectiles will have their Durability level listed, e.g. a projectile with Durability level 2 will show P2 T - Throw D - Doll attack, such as Carl's or Relius' doll Burst - Burst, which has its own unique attribute |
Invuln |
|---|---|---|---|---|---|---|---|---|
| 0, 200, 1300 | Throw | 7 | 3 | 23+3L | T |
- 100% minimum damage (1500)
The second hit can combo into j.B, j.2A, j.2C (If high enough) or 2A > 6A (If too close to the ground). In the corner, combos into j.C > 6C. This is also sometime used as an air combo ender, as not a lot of characters can deal with j.C after teching it.
| Starter RatingDetermines the starting value of the hitstun/untech decay timer and subsequent combo length | P1Proration applied to future hits when used as the first hit of a combo | P2Proration applied to future hits when used during any part of a combo | Attack LevelDefault Attack Level Values
| |||||||||||||||||||||||||||||||||||
|---|---|---|---|---|---|---|---|---|---|---|---|---|---|---|---|---|---|---|---|---|---|---|---|---|---|---|---|---|---|---|---|---|---|---|---|---|---|---|
| Normal | 100 | 50 | 0, 1, 4 |
- Minimum Damage 100% (1500)
Counter Assault
6A+B while Blocking
Good hitbox, if you need to use it
| Damage | GuardHow this attack can be guarded. Throws have their throw range listed instead. | StartupHow many frames the attack needs to go through in order to reach its active frames. The listed startup frame coincides with the move's first active frame. | ActiveHow many frames where there is a hitbox that can hit an opponent. The first active frame occurs on the listed startup frame. | RecoveryHow many frames that the character must go through after an attack's active frames to automatically go back to a neutral stance, or the total duration of the move if it has no hitbox/creates projectiles. | Frame AdvHow many frames the attacker's recovery ends before the defender's blockstun ends if the attack is blocked. A positive value indicates that the attacker recovers first, while a negative value indicates that the defender recovers first. This value usually assumes that the attack's first active frame (of each hit, if multi-hit) is blocked. | On ODRThe difference between the attacker's total animation length and the period the opponent is in overdrive raid. This frame advantage is based off the assumption that both players input during the hitstop of a prior move, so that this attack and ODR start on the same frame. | AttributeSome attacks are invulnerable to attacks with specific attributes. This notes what attributes each attack possesses. H - Head B - Body F - Foot P - Projectile. Independent projectiles will have their Durability level listed, e.g. a projectile with Durability level 2 will show P2 T - Throw D - Doll attack, such as Carl's or Relius' doll Burst - Burst, which has its own unique attribute |
Invuln |
|---|---|---|---|---|---|---|---|---|
| 0 | all | 13 | 3 | 30 | -14 | B | 1~20 All |
- 180F meter cooldown
- 1-20F invincibility
- Requires 4 Magatama
A fairly good counter assault with a nice hitbox, as it can't be low profiled and has decent reach. It is, however, not used very often as spending 4 Magatama is most of the time not affordable or not worth it.
| Starter RatingDetermines the starting value of the hitstun/untech decay timer and subsequent combo length | P1Proration applied to future hits when used as the first hit of a combo | P2Proration applied to future hits when used during any part of a combo | Attack LevelDefault Attack Level Values
| |||||||||||||||||||||||||||||||||||
|---|---|---|---|---|---|---|---|---|---|---|---|---|---|---|---|---|---|---|---|---|---|---|---|---|---|---|---|---|---|---|---|---|---|---|---|---|---|---|
| Very Short | 50 | 92 | 4 |
Crush Trigger
5A+B (Chargeable)

Overdrive combo filler


| Version | Damage | GuardHow this attack can be guarded. Throws have their throw range listed instead. | StartupHow many frames the attack needs to go through in order to reach its active frames. The listed startup frame coincides with the move's first active frame. | ActiveHow many frames where there is a hitbox that can hit an opponent. The first active frame occurs on the listed startup frame. | RecoveryHow many frames that the character must go through after an attack's active frames to automatically go back to a neutral stance, or the total duration of the move if it has no hitbox/creates projectiles. | Frame AdvHow many frames the attacker's recovery ends before the defender's blockstun ends if the attack is blocked. A positive value indicates that the attacker recovers first, while a negative value indicates that the defender recovers first. This value usually assumes that the attack's first active frame (of each hit, if multi-hit) is blocked. | On ODRThe difference between the attacker's total animation length and the period the opponent is in overdrive raid. This frame advantage is based off the assumption that both players input during the hitstop of a prior move, so that this attack and ODR start on the same frame. | AttributeSome attacks are invulnerable to attacks with specific attributes. This notes what attributes each attack possesses. H - Head B - Body F - Foot P - Projectile. Independent projectiles will have their Durability level listed, e.g. a projectile with Durability level 2 will show P2 T - Throw D - Doll attack, such as Carl's or Relius' doll Burst - Burst, which has its own unique attribute |
Invuln |
|---|---|---|---|---|---|---|---|---|---|
| 5A+B | 1000 | Guard Break 32/Barrier | 20 | 1 | 25 | 0 (With Barrier) | B | ||
| 5[A+B] | 1000 | Guard Break 60/Barrier | 30~61 | 1 | 25 | 0 (With barrier) | B |
- Requires 2 Magatama
- 180F meter cooldown
- Launches on air hit.
Causes guard crush on normal blocking. It staggers if hits a grounded enemy and launches otherwise. When charged, this move has a 100% P2, which means it doesn't affect the damage reduction in a combo. As such, this is a great overdrive combo filler. Primarily used after 41236C(1) or Air hit 5C in OD combos.
| Version | Starter RatingDetermines the starting value of the hitstun/untech decay timer and subsequent combo length | P1Proration applied to future hits when used as the first hit of a combo | P2Proration applied to future hits when used during any part of a combo | Attack LevelDefault Attack Level Values
| |||||||||||||||||||||||||||||||||||
|---|---|---|---|---|---|---|---|---|---|---|---|---|---|---|---|---|---|---|---|---|---|---|---|---|---|---|---|---|---|---|---|---|---|---|---|---|---|---|---|
| 5A+B | Normal | 80 | 60 | ||||||||||||||||||||||||||||||||||||
| 5[A+B] | Long | 80 | 100 |
5A+B:
- Crumple Duration 50F, Crumple Fall 83F
5[A+B]:
- Crumple Duration 50F, Crumple Fall 83F
Forward Dash
66

Learn to cancel this into air specials.

| Damage | GuardHow this attack can be guarded. Throws have their throw range listed instead. | StartupHow many frames the attack needs to go through in order to reach its active frames. The listed startup frame coincides with the move's first active frame. | ActiveHow many frames where there is a hitbox that can hit an opponent. The first active frame occurs on the listed startup frame. | RecoveryHow many frames that the character must go through after an attack's active frames to automatically go back to a neutral stance, or the total duration of the move if it has no hitbox/creates projectiles. | Frame AdvHow many frames the attacker's recovery ends before the defender's blockstun ends if the attack is blocked. A positive value indicates that the attacker recovers first, while a negative value indicates that the defender recovers first. This value usually assumes that the attack's first active frame (of each hit, if multi-hit) is blocked. | On ODRThe difference between the attacker's total animation length and the period the opponent is in overdrive raid. This frame advantage is based off the assumption that both players input during the hitstop of a prior move, so that this attack and ODR start on the same frame. | AttributeSome attacks are invulnerable to attacks with specific attributes. This notes what attributes each attack possesses. H - Head B - Body F - Foot P - Projectile. Independent projectiles will have their Durability level listed, e.g. a projectile with Durability level 2 will show P2 T - Throw D - Doll attack, such as Carl's or Relius' doll Burst - Burst, which has its own unique attribute |
Invuln |
|---|---|---|---|---|---|---|---|---|
| 16 |
- Quickest forward step-dash in the game
- Can be special cancelled on frame 6 into air specials. Frame 12 for Grounded specials.
- No Invulnerability, but is airborne on frame 5 so can dodge most throws that way.
A key move you will use a lot due to Hakumen's sluggish movement without spending resources. This move also allows you to aggressively use air specials low to the ground, and while it is technically slower than jumping to do this, it allows Hakumen to land much sooner after these moves and continue the combo as well as simply being more likely to hit someone in the first place due to the forward step.
| Starter RatingDetermines the starting value of the hitstun/untech decay timer and subsequent combo length | P1Proration applied to future hits when used as the first hit of a combo | P2Proration applied to future hits when used during any part of a combo | Attack LevelDefault Attack Level Values
| |||||||||||||||||||||||||||||||||||
|---|---|---|---|---|---|---|---|---|---|---|---|---|---|---|---|---|---|---|---|---|---|---|---|---|---|---|---|---|---|---|---|---|---|---|---|---|---|---|
- Special cancellable from Frame 6
Backdash
44

This will get you sniped by projectiles

| Damage | GuardHow this attack can be guarded. Throws have their throw range listed instead. | StartupHow many frames the attack needs to go through in order to reach its active frames. The listed startup frame coincides with the move's first active frame. | ActiveHow many frames where there is a hitbox that can hit an opponent. The first active frame occurs on the listed startup frame. | RecoveryHow many frames that the character must go through after an attack's active frames to automatically go back to a neutral stance, or the total duration of the move if it has no hitbox/creates projectiles. | Frame AdvHow many frames the attacker's recovery ends before the defender's blockstun ends if the attack is blocked. A positive value indicates that the attacker recovers first, while a negative value indicates that the defender recovers first. This value usually assumes that the attack's first active frame (of each hit, if multi-hit) is blocked. | On ODRThe difference between the attacker's total animation length and the period the opponent is in overdrive raid. This frame advantage is based off the assumption that both players input during the hitstop of a prior move, so that this attack and ODR start on the same frame. | AttributeSome attacks are invulnerable to attacks with specific attributes. This notes what attributes each attack possesses. H - Head B - Body F - Foot P - Projectile. Independent projectiles will have their Durability level listed, e.g. a projectile with Durability level 2 will show P2 T - Throw D - Doll attack, such as Carl's or Relius' doll Burst - Burst, which has its own unique attribute |
Invuln |
|---|---|---|---|---|---|---|---|---|
| 15 | 1-4T |
- Quickest backdash in the game
- Only invulnerable to throws briefly on startup and nothing else. Throw invulnerability lasts until Hakumen is airborne, so is mostly throw invulnerable until he lands on frame 11.
- Air Special cancellable from Frame 8, Grounded special cancels possible from frame 11
- This is later than his forward dash, making forward dash a better option overall.
Hakumen's backdash, unlike most backdashes, is not a defensive tool. Instead, use it for its speed as a neutral tool to create distance when the situation is otherwise safe. If you actually need something with First-Frame invulnerability, you will need to use 6D or 2D instead.
| Starter RatingDetermines the starting value of the hitstun/untech decay timer and subsequent combo length | P1Proration applied to future hits when used as the first hit of a combo | P2Proration applied to future hits when used during any part of a combo | Attack LevelDefault Attack Level Values
| |||||||||||||||||||||||||||||||||||
|---|---|---|---|---|---|---|---|---|---|---|---|---|---|---|---|---|---|---|---|---|---|---|---|---|---|---|---|---|---|---|---|---|---|---|---|---|---|---|
- Special cancellable from Frame 8
Specials
- Hakumen can cancel his specials and supers on hit or block into other specials, supers, Crush Trigger or Exceed Accel. Normally, each special can be used only once per string.
Fuumajin
Cut Projectile

This is a message to all Hazama players: please stop swinging into this


| Damage | GuardHow this attack can be guarded. Throws have their throw range listed instead. | StartupHow many frames the attack needs to go through in order to reach its active frames. The listed startup frame coincides with the move's first active frame. | ActiveHow many frames where there is a hitbox that can hit an opponent. The first active frame occurs on the listed startup frame. | RecoveryHow many frames that the character must go through after an attack's active frames to automatically go back to a neutral stance, or the total duration of the move if it has no hitbox/creates projectiles. | Frame AdvHow many frames the attacker's recovery ends before the defender's blockstun ends if the attack is blocked. A positive value indicates that the attacker recovers first, while a negative value indicates that the defender recovers first. This value usually assumes that the attack's first active frame (of each hit, if multi-hit) is blocked. | On ODRThe difference between the attacker's total animation length and the period the opponent is in overdrive raid. This frame advantage is based off the assumption that both players input during the hitstop of a prior move, so that this attack and ODR start on the same frame. | AttributeSome attacks are invulnerable to attacks with specific attributes. This notes what attributes each attack possesses. H - Head B - Body F - Foot P - Projectile. Independent projectiles will have their Durability level listed, e.g. a projectile with Durability level 2 will show P2 T - Throw D - Doll attack, such as Carl's or Relius' doll Burst - Burst, which has its own unique attribute |
Invuln |
|---|---|---|---|---|---|---|---|---|
| 900 | all | 1 | 92 | P | 1~End Guard xP |
Hakumen's sword attacks have unique boxes for cutting projectiles. Projectile cut hitboxes are purple, attack hitboxes are red.
Whenever one of Hakumen's sword moves "cuts" an opponent's projectile, that projectile has one hit removed and Fuumajin is spawned in its place. Hakumen also immediately gains 1 Magatama. It is a key tool for dealing with projectile heavy characters but occasionally sees use elsewhere too. While its specific usage varies a lot with the matchup, in general terms it can be used to simply deny or defend against a long ranged attack or simply to put up a barrier to stop a barrage of projectiles or your opponent closing in after their projectile. It does not go away when Hakumen is hit, making it incredibly safe to stand behind. It can be used more aggressively; correctly timing a sword strike to cut a projectile as it spawns can give you effectively additional reach or severely limit your opponent's movement options.
On paper the attack is also a good starter, but it can be difficult to capitalise on. In the event you hit your opponent at the same time as cutting a projectile, the Fuumajin will hit after the sword hit, potentially ruining any counterhit confirm.
Hakumen can only have one Fuumajin active at a time; cutting another projectile will create a new Fuumajin, replacing the existing one.
- Striking a projectile with the sword does not count as a hit of any kind for the purposes of cancelling into other moves.
- The Fuumajin itself has guard point against anything projectile-attribute, and will reset its duration when it blocks something. Usually this means it will remove the rest of the hits of a multi-hit projectile.
- It will also block Strike-Projectiles like Azrael's 2C or any of Nine's normals, even though they cannot be cut to first create a Fuumajin.
- Hakumen is projectile invulnerable on frames where a Fuumajin spawns or blocks a projectile, protecting him even from beams or projectiles that don't disappear on contact.
Some specific interactions:
- Jin's Touga Hyojin
 GuardAllStartup1+(30 Flash)+8RecoveryTotal: 44Advantage-16 creates a Fuumajin when cut, but the wave will keep going and can hit Hakumen anyway. This is because the projectile hitbox is separate to the entity creating them.
 - Platinum's Dream Sally
 GuardAllStartup28RecoveryTotal 48Advantage-6 will be popped normally, even if you hit with the part of a slash that can only hit projectiles.
 - Hibiki's Shadow Clones will be destroyed normally unless it is struck while active, which is usually just before it reaches Hakumen, so the timing is quite tight.
- Another Hakumen can cut a Fuumajin to create their own, where they will immediately block each other and be destroyed.
- Susanoo's 6A
 GuardAllStartup16RecoveryTotal 52Advantage-10 can be cut while active. Unusually however, another 6A afterwards will "block" the Fuumajin and destroy it as it has a similar projectile guard point on startup.


| Starter RatingDetermines the starting value of the hitstun/untech decay timer and subsequent combo length | P1Proration applied to future hits when used as the first hit of a combo | P2Proration applied to future hits when used during any part of a combo | Attack LevelDefault Attack Level Values
| |||||||||||||||||||||||||||||||||||
|---|---|---|---|---|---|---|---|---|---|---|---|---|---|---|---|---|---|---|---|---|---|---|---|---|---|---|---|---|---|---|---|---|---|---|---|---|---|---|
| Long | 85 | 89 | 3 |
- If another projectile touches Fuumajin, its active frames are reset
- When cutting opponent's projectile, Hakumen and opponent's projectile both experience 0F hitstop
- Invuln listed is what the Fuumajin itself interacts with
- Hakumen is projectile invulnerable during the frame he cuts a projectile, or an existing Fuumajin blocks a projectile
Guren
214A with 1 Magatama

Pressure reset


| Damage | GuardHow this attack can be guarded. Throws have their throw range listed instead. | StartupHow many frames the attack needs to go through in order to reach its active frames. The listed startup frame coincides with the move's first active frame. | ActiveHow many frames where there is a hitbox that can hit an opponent. The first active frame occurs on the listed startup frame. | RecoveryHow many frames that the character must go through after an attack's active frames to automatically go back to a neutral stance, or the total duration of the move if it has no hitbox/creates projectiles. | Frame AdvHow many frames the attacker's recovery ends before the defender's blockstun ends if the attack is blocked. A positive value indicates that the attacker recovers first, while a negative value indicates that the defender recovers first. This value usually assumes that the attack's first active frame (of each hit, if multi-hit) is blocked. | On ODRThe difference between the attacker's total animation length and the period the opponent is in overdrive raid. This frame advantage is based off the assumption that both players input during the hitstop of a prior move, so that this attack and ODR start on the same frame. | AttributeSome attacks are invulnerable to attacks with specific attributes. This notes what attributes each attack possesses. H - Head B - Body F - Foot P - Projectile. Independent projectiles will have their Durability level listed, e.g. a projectile with Durability level 2 will show P2 T - Throw D - Doll attack, such as Carl's or Relius' doll Burst - Burst, which has its own unique attribute |
Invuln |
|---|---|---|---|---|---|---|---|---|
| 950 | All | 14 | 3 | 15 | +1 | B |
Pressure and combo tool. Combos into 2A, 41236C or even 2C if the opponent is crouched. Being +1 on block, it can be followed-up by 2A to reset the pressure. However, it is fairly easy to IB as Hakumen's pressure is limited. If the opponent respects it too much, 214A > 6B can be used as a mix-up. If they instant block and mash after 214A, it is possible to 2D them to deter mashing. Do not overuse it in pressure as it drains meter pretty quickly.
- 30F Heat Gauge cooldown
| Starter RatingDetermines the starting value of the hitstun/untech decay timer and subsequent combo length | P1Proration applied to future hits when used as the first hit of a combo | P2Proration applied to future hits when used during any part of a combo | Attack LevelDefault Attack Level Values
| |||||||||||||||||||||||||||||||||||
|---|---|---|---|---|---|---|---|---|---|---|---|---|---|---|---|---|---|---|---|---|---|---|---|---|---|---|---|---|---|---|---|---|---|---|---|---|---|---|
| Long | 100 | 92 | 4 |
- Heat Gauge Cooldown 30F
- If cancelled into from Drive counterattack startup or 214D (startup or on block), is invulnerable frames 1~10
Kishuu
623A with 1 Magatama

Goes under some supers


| Damage | GuardHow this attack can be guarded. Throws have their throw range listed instead. | StartupHow many frames the attack needs to go through in order to reach its active frames. The listed startup frame coincides with the move's first active frame. | ActiveHow many frames where there is a hitbox that can hit an opponent. The first active frame occurs on the listed startup frame. | RecoveryHow many frames that the character must go through after an attack's active frames to automatically go back to a neutral stance, or the total duration of the move if it has no hitbox/creates projectiles. | Frame AdvHow many frames the attacker's recovery ends before the defender's blockstun ends if the attack is blocked. A positive value indicates that the attacker recovers first, while a negative value indicates that the defender recovers first. This value usually assumes that the attack's first active frame (of each hit, if multi-hit) is blocked. | On ODRThe difference between the attacker's total animation length and the period the opponent is in overdrive raid. This frame advantage is based off the assumption that both players input during the hitstop of a prior move, so that this attack and ODR start on the same frame. | AttributeSome attacks are invulnerable to attacks with specific attributes. This notes what attributes each attack possesses. H - Head B - Body F - Foot P - Projectile. Independent projectiles will have their Durability level listed, e.g. a projectile with Durability level 2 will show P2 T - Throw D - Doll attack, such as Carl's or Relius' doll Burst - Burst, which has its own unique attribute |
Invuln |
|---|---|---|---|---|---|---|---|---|
| 18 | 5~14 HB |
Has 10 frames of Head and Body invulnerability, but does not go through projectiles. In combos, this is used after air hit 5C to combo into 6A. In pressure, this is used to approach and set up throws. It can also be used after the super flash of some reversal supers to crawl under them and punish with 5C CH / 6C FC without letting the opponent RC (Valk's 236236D / Izayoi's 236236C).
- 30F Heat Gauge cooldown
- Cancellable into Enma on frames 10-12, or Renka and Zantetsu from frame 10 onwards; these cancels count as being part of the same string.
| Starter RatingDetermines the starting value of the hitstun/untech decay timer and subsequent combo length | P1Proration applied to future hits when used as the first hit of a combo | P2Proration applied to future hits when used during any part of a combo | Attack LevelDefault Attack Level Values
| |||||||||||||||||||||||||||||||||||
|---|---|---|---|---|---|---|---|---|---|---|---|---|---|---|---|---|---|---|---|---|---|---|---|---|---|---|---|---|---|---|---|---|---|---|---|---|---|---|
- Can cancel into Enma on frames 10-12
- Can cancel into 236B or 41236C from frame 10 until end
- Heat Gauge Cooldown 30F
- If cancelled into from Drive counterattack startup or 214D (startup or on block), is fully invulnerable frames 1~10 (returns to HB invuln only frames 11~14)
Enma
A after 623A

Best neutral tool


Frames 6-8

Frames 9-12


| Damage | GuardHow this attack can be guarded. Throws have their throw range listed instead. | StartupHow many frames the attack needs to go through in order to reach its active frames. The listed startup frame coincides with the move's first active frame. | ActiveHow many frames where there is a hitbox that can hit an opponent. The first active frame occurs on the listed startup frame. | RecoveryHow many frames that the character must go through after an attack's active frames to automatically go back to a neutral stance, or the total duration of the move if it has no hitbox/creates projectiles. | Frame AdvHow many frames the attacker's recovery ends before the defender's blockstun ends if the attack is blocked. A positive value indicates that the attacker recovers first, while a negative value indicates that the defender recovers first. This value usually assumes that the attack's first active frame (of each hit, if multi-hit) is blocked. | On ODRThe difference between the attacker's total animation length and the period the opponent is in overdrive raid. This frame advantage is based off the assumption that both players input during the hitstop of a prior move, so that this attack and ODR start on the same frame. | AttributeSome attacks are invulnerable to attacks with specific attributes. This notes what attributes each attack possesses. H - Head B - Body F - Foot P - Projectile. Independent projectiles will have their Durability level listed, e.g. a projectile with Durability level 2 will show P2 T - Throw D - Doll attack, such as Carl's or Relius' doll Burst - Burst, which has its own unique attribute |
Invuln |
|---|---|---|---|---|---|---|---|---|
| 1060 | Mid | 6 | 7 | 16 | -4 | B | 1~8 HB |
An amazing neutral tool with a surprisingly high and far reach, deals with a plethora of pesky moves and punishes them. Midscreen, it combos into 5B (close range), 214A (far range), 5C (air hit and counter hit) or even 6A > 6B (distance, height and character specific). As it's -4, it's punishable on IB by most 5A/2A. On block, it can be canceled into 214A for a gapless blockstring even on IB.
- 30F Heat Gauge cooldown, even though it doesn't cost additional meter to use.
| Starter RatingDetermines the starting value of the hitstun/untech decay timer and subsequent combo length | P1Proration applied to future hits when used as the first hit of a combo | P2Proration applied to future hits when used during any part of a combo | Attack LevelDefault Attack Level Values
| |||||||||||||||||||||||||||||||||||
|---|---|---|---|---|---|---|---|---|---|---|---|---|---|---|---|---|---|---|---|---|---|---|---|---|---|---|---|---|---|---|---|---|---|---|---|---|---|---|
| Long | 100 | 72 | 4 |
- Heat Gauge Cooldown 30F
Renka
236B with 2 Magatama

Combo filler


First hit

Second hit


| Damage | GuardHow this attack can be guarded. Throws have their throw range listed instead. | StartupHow many frames the attack needs to go through in order to reach its active frames. The listed startup frame coincides with the move's first active frame. | ActiveHow many frames where there is a hitbox that can hit an opponent. The first active frame occurs on the listed startup frame. | RecoveryHow many frames that the character must go through after an attack's active frames to automatically go back to a neutral stance, or the total duration of the move if it has no hitbox/creates projectiles. | Frame AdvHow many frames the attacker's recovery ends before the defender's blockstun ends if the attack is blocked. A positive value indicates that the attacker recovers first, while a negative value indicates that the defender recovers first. This value usually assumes that the attack's first active frame (of each hit, if multi-hit) is blocked. | On ODRThe difference between the attacker's total animation length and the period the opponent is in overdrive raid. This frame advantage is based off the assumption that both players input during the hitstop of a prior move, so that this attack and ODR start on the same frame. | AttributeSome attacks are invulnerable to attacks with specific attributes. This notes what attributes each attack possesses. H - Head B - Body F - Foot P - Projectile. Independent projectiles will have their Durability level listed, e.g. a projectile with Durability level 2 will show P2 T - Throw D - Doll attack, such as Carl's or Relius' doll Burst - Burst, which has its own unique attribute |
Invuln |
|---|---|---|---|---|---|---|---|---|
| 1000×2 | Low, Mid | 9 | 3(12)3 | 21 | -5 | F, B |
A low kick followed by a mid kick that launches the opponent. A great combo tool at close range. Midscreen, it combos into 6A > 6B and IAD j.2C. In the corner, the main combo is IAD j.2A > j.C. Sadly, the second hit has a poor horizontal reach limiting its usefulness in pressure and it may whiff if the opponent is too far, which is common if the opponent barrier blocks the preceding hits. Furthermore, it is possible to ODR after the first hit to make the second one whiff, forcing Hakumen to special cancel or be heavily punished. 236B(1) > 623A is 0 on block, this is, however, very costly. It has the fastest startup of any of Hakumen's grounded specials, so using it to cover unsafe specials gives tighter frametraps than Guren. Due to its ability to be jump cancelled, it is possible to perform an Overdrive Cancel by first jump cancelling this move and then cancelling the prejump frames into OD. Jump cancelling will also immediately reset a string, allowing Hakumen to cancel his prejump frames into a special that had already been used.
- 60F Heat Gauge cooldown
- Jump cancellable on the second hit
| Starter RatingDetermines the starting value of the hitstun/untech decay timer and subsequent combo length | P1Proration applied to future hits when used as the first hit of a combo | P2Proration applied to future hits when used during any part of a combo | Attack LevelDefault Attack Level Values
| |||||||||||||||||||||||||||||||||||
|---|---|---|---|---|---|---|---|---|---|---|---|---|---|---|---|---|---|---|---|---|---|---|---|---|---|---|---|---|---|---|---|---|---|---|---|---|---|---|
| Long | 90 | 82, 92 | 4 |
- Second hit is jump cancellable
- Heat Gauge Cooldown 60F
- If cancelled into from Drive counterattack startup or 214D (startup or on block), is invulnerable frames 1~10
- Crumple Duration 39F, Crumple Fall 72F
- On Ch Crumple Duration 59F, Crumple Fall 96F
Zantetsu
41236C with 3 Magatama

First hit will be bursted 99% of the time


Frames 21-23

Frames 38-40


| Damage | GuardHow this attack can be guarded. Throws have their throw range listed instead. | StartupHow many frames the attack needs to go through in order to reach its active frames. The listed startup frame coincides with the move's first active frame. | ActiveHow many frames where there is a hitbox that can hit an opponent. The first active frame occurs on the listed startup frame. | RecoveryHow many frames that the character must go through after an attack's active frames to automatically go back to a neutral stance, or the total duration of the move if it has no hitbox/creates projectiles. | Frame AdvHow many frames the attacker's recovery ends before the defender's blockstun ends if the attack is blocked. A positive value indicates that the attacker recovers first, while a negative value indicates that the defender recovers first. This value usually assumes that the attack's first active frame (of each hit, if multi-hit) is blocked. | On ODRThe difference between the attacker's total animation length and the period the opponent is in overdrive raid. This frame advantage is based off the assumption that both players input during the hitstop of a prior move, so that this attack and ODR start on the same frame. | AttributeSome attacks are invulnerable to attacks with specific attributes. This notes what attributes each attack possesses. H - Head B - Body F - Foot P - Projectile. Independent projectiles will have their Durability level listed, e.g. a projectile with Durability level 2 will show P2 T - Throw D - Doll attack, such as Carl's or Relius' doll Burst - Burst, which has its own unique attribute |
Invuln |
|---|---|---|---|---|---|---|---|---|
| 2100, 800 | High/Air, Low/Air | 21 | 3(14)3 | 18 | -2 | B,F | (21~23, 38~40 P) |
A massive overhead attack that can lead to absurd damage, followed by a rather lackluster low that ruins your combo damage after it. Prime combo filler in OD combos that can be done after 5C or 214A. 41236C(1) > 623A is +2 on block, but similarly to 236B this is very costly.
Due to the first hit having amazing damage scaling, but the second hit having awful scaling, it is common to special cancel after just the first hit during long or Overdrive combos with 623A or Crush Trigger. While the second hit does strike low, this only functions as a very basic knowledge check since Hakumen cannot cancel the first hit into any other overhead to form much of a mixup. It does at least form a safe blockstring if both hits are blocked.
As far as the basic 41236C combo is concerned, 41236C(2) > 6A > 6B > Air combo yields similar damage as 41236C(1) > 623A > 6A > 6B > Air combo, so the former is preferred.
- 90F Heat Gauge cooldown
- While this move can cut projectiles, it is notably far worse than most other moves at it due to poor hitboxes and no hitboxes beyond the normal active frames, so don't use it for this purpose.
| Starter RatingDetermines the starting value of the hitstun/untech decay timer and subsequent combo length | P1Proration applied to future hits when used as the first hit of a combo | P2Proration applied to future hits when used during any part of a combo | Attack LevelDefault Attack Level Values
| |||||||||||||||||||||||||||||||||||
|---|---|---|---|---|---|---|---|---|---|---|---|---|---|---|---|---|---|---|---|---|---|---|---|---|---|---|---|---|---|---|---|---|---|---|---|---|---|---|
| Normal | 90 | 94, 72 | 5, 4 |
- (Can cut projectiles on these frames, Hakumen is projectile invulnerable on the frame a projectile is cut)
- Heat Gauge Cooldown 90F
- If cancelled into from Drive counterattack startup or 214D (startup or on block), is invulnerable frames 1~10
Yanagi
214D with 2 Magatama


Counterpoke and OD combo filler


Traveling hitbox

Attack hitbox, can hit without counter activation


| Damage | GuardHow this attack can be guarded. Throws have their throw range listed instead. | StartupHow many frames the attack needs to go through in order to reach its active frames. The listed startup frame coincides with the move's first active frame. | ActiveHow many frames where there is a hitbox that can hit an opponent. The first active frame occurs on the listed startup frame. | RecoveryHow many frames that the character must go through after an attack's active frames to automatically go back to a neutral stance, or the total duration of the move if it has no hitbox/creates projectiles. | Frame AdvHow many frames the attacker's recovery ends before the defender's blockstun ends if the attack is blocked. A positive value indicates that the attacker recovers first, while a negative value indicates that the defender recovers first. This value usually assumes that the attack's first active frame (of each hit, if multi-hit) is blocked. | On ODRThe difference between the attacker's total animation length and the period the opponent is in overdrive raid. This frame advantage is based off the assumption that both players input during the hitstop of a prior move, so that this attack and ODR start on the same frame. | AttributeSome attacks are invulnerable to attacks with specific attributes. This notes what attributes each attack possesses. H - Head B - Body F - Foot P - Projectile. Independent projectiles will have their Durability level listed, e.g. a projectile with Durability level 2 will show P2 T - Throw D - Doll attack, such as Carl's or Relius' doll Burst - Burst, which has its own unique attribute |
Invuln |
|---|---|---|---|---|---|---|---|---|
| 0, 2500 | all | 30 | 3 | 18 | -7 | BT | 4~27 Guard HBFP |
Hakumen advances forward with a Zanshin seal that autoguards attacks and attempts to chokeslam the opponent. Like other Drive moves, Hakumen can special cancel the remaining startup of the move if it blocks an attack. Unlike other Drive moves, Hakumen attempts the grab at the end even if he didn't block any attack, allowing it to be used during combos.
On block, it's -7 and therefore punishable by most 2A. It can be cancelled into 214A for a frame trap or 236B to make it gapless. However, due to what was likely an oversight, any move special cancelled into from Yanagi will be fully invulnerable for the first 10 frames, even if Yanagi didn't block anything. This gives Hakumen the option to also beat punish attempts with very delayed cancels instead of needing to commit earlier to frame trapping normally—this can make the move very scary to punish if Hakumen has any amount of meter.
Can sometimes be used to escape the corner but does not have guard point frame 1, so it will lose to properly timed meaties and frame traps.
On hit, combo into 236B or 623A > 6A > 6B. This is also a very good OD combo ender with 6A > 6B > 214D > EA or 6A > 6B > 214D > 632146C > 623A > EA.
- 30F Heat Gauge cooldown
| Starter RatingDetermines the starting value of the hitstun/untech decay timer and subsequent combo length | P1Proration applied to future hits when used as the first hit of a combo | P2Proration applied to future hits when used during any part of a combo | Attack LevelDefault Attack Level Values
| |||||||||||||||||||||||||||||||||||
|---|---|---|---|---|---|---|---|---|---|---|---|---|---|---|---|---|---|---|---|---|---|---|---|---|---|---|---|---|---|---|---|---|---|---|---|---|---|---|
| Normal | 100 | 100, 72 | 2 |
- If Guard Point blocks an attack, can cancel into specials on whiff/startup
- On Guard Point, hitstop for Hakumen and Opponent 14F
- After guarding an attack, remaining Guard frames are replaced with Full Invincibility
- Heat Gauge Cooldown 60F
- If cancelled into from Drive counterattack startup, is invulnerable frames 1~10
Agito
j.214A with 1 Magatama

Air ender and beats anti-air


| Damage | GuardHow this attack can be guarded. Throws have their throw range listed instead. | StartupHow many frames the attack needs to go through in order to reach its active frames. The listed startup frame coincides with the move's first active frame. | ActiveHow many frames where there is a hitbox that can hit an opponent. The first active frame occurs on the listed startup frame. | RecoveryHow many frames that the character must go through after an attack's active frames to automatically go back to a neutral stance, or the total duration of the move if it has no hitbox/creates projectiles. | Frame AdvHow many frames the attacker's recovery ends before the defender's blockstun ends if the attack is blocked. A positive value indicates that the attacker recovers first, while a negative value indicates that the defender recovers first. This value usually assumes that the attack's first active frame (of each hit, if multi-hit) is blocked. | On ODRThe difference between the attacker's total animation length and the period the opponent is in overdrive raid. This frame advantage is based off the assumption that both players input during the hitstop of a prior move, so that this attack and ODR start on the same frame. | AttributeSome attacks are invulnerable to attacks with specific attributes. This notes what attributes each attack possesses. H - Head B - Body F - Foot P - Projectile. Independent projectiles will have their Durability level listed, e.g. a projectile with Durability level 2 will show P2 T - Throw D - Doll attack, such as Carl's or Relius' doll Burst - Burst, which has its own unique attribute |
Invuln |
|---|---|---|---|---|---|---|---|---|
| 950 | All | 12 | 4 | Total 35 | -2 | P1 |
Low-cost knockdown tool. Counts as a projectile, which allows it to beat most anti-airs. On counter hit, it ground bounces and combos into j.2C or j.B depending on the height. IAD j.214A is a fairly ambiguous cross-up but doesn't combo into anything.
As far as okizeme is concerned, j.214A is a fairly good ender. For more details, check the okizeme strategy section: link
- 30F meter cooldown
- Can only be used once in the air
| Starter RatingDetermines the starting value of the hitstun/untech decay timer and subsequent combo length | P1Proration applied to future hits when used as the first hit of a combo | P2Proration applied to future hits when used during any part of a combo | Attack LevelDefault Attack Level Values
| |||||||||||||||||||||||||||||||||||
|---|---|---|---|---|---|---|---|---|---|---|---|---|---|---|---|---|---|---|---|---|---|---|---|---|---|---|---|---|---|---|---|---|---|---|---|---|---|---|
| Long | 70 | 92 | 3 |
- Heat Gauge Cooldown 30F
- If cancelled into from Drive counterattack startup, is invulnerable frames 1~10
Hotaru
j.214B with 2 Magatama

NOT a reversal on wakeup and can be low-profiled


| Damage | GuardHow this attack can be guarded. Throws have their throw range listed instead. | StartupHow many frames the attack needs to go through in order to reach its active frames. The listed startup frame coincides with the move's first active frame. | ActiveHow many frames where there is a hitbox that can hit an opponent. The first active frame occurs on the listed startup frame. | RecoveryHow many frames that the character must go through after an attack's active frames to automatically go back to a neutral stance, or the total duration of the move if it has no hitbox/creates projectiles. | Frame AdvHow many frames the attacker's recovery ends before the defender's blockstun ends if the attack is blocked. A positive value indicates that the attacker recovers first, while a negative value indicates that the defender recovers first. This value usually assumes that the attack's first active frame (of each hit, if multi-hit) is blocked. | On ODRThe difference between the attacker's total animation length and the period the opponent is in overdrive raid. This frame advantage is based off the assumption that both players input during the hitstop of a prior move, so that this attack and ODR start on the same frame. | AttributeSome attacks are invulnerable to attacks with specific attributes. This notes what attributes each attack possesses. H - Head B - Body F - Foot P - Projectile. Independent projectiles will have their Durability level listed, e.g. a projectile with Durability level 2 will show P2 T - Throw D - Doll attack, such as Carl's or Relius' doll Burst - Burst, which has its own unique attribute |
Invuln |
|---|---|---|---|---|---|---|---|---|
| 1500 | Mid | 11 | 3 | 35 | H | 1~17 All |
Primarily a combo extender, as it is possible to airdash afterward into j.2C > 6A > 6B which leads into high damage combos. In the corner, it is used to end with j.C > 6C/5C > 6A > 6B, which give a much better knockdowns than j.214A. Even though it's invulnerable, it is not that great of a wake-up option as it is not invincible frame 1 due to the jump and easily whiff if the opponent crouches or use 2A. It's a also a short/fast starter, so combos are limited afterward.
- 60F meter cooldown
- Air-unblockable air attack.
- Resets Hakumen's air options, and can be jump and airdash cancelled on hit/block
- Can only be used once in the air
| Starter RatingDetermines the starting value of the hitstun/untech decay timer and subsequent combo length | P1Proration applied to future hits when used as the first hit of a combo | P2Proration applied to future hits when used during any part of a combo | Attack LevelDefault Attack Level Values
| |||||||||||||||||||||||||||||||||||
|---|---|---|---|---|---|---|---|---|---|---|---|---|---|---|---|---|---|---|---|---|---|---|---|---|---|---|---|---|---|---|---|---|---|---|---|---|---|---|
| Very Short | 80 | 92 | 3 |
- Resets air options (Jump/Airdash)
- Heat Gauge Cooldown 60F
Tsubaki
j.214C with 3 Magatama

Throw crush on wakeup. Not an overhead


| Damage | GuardHow this attack can be guarded. Throws have their throw range listed instead. | StartupHow many frames the attack needs to go through in order to reach its active frames. The listed startup frame coincides with the move's first active frame. | ActiveHow many frames where there is a hitbox that can hit an opponent. The first active frame occurs on the listed startup frame. | RecoveryHow many frames that the character must go through after an attack's active frames to automatically go back to a neutral stance, or the total duration of the move if it has no hitbox/creates projectiles. | Frame AdvHow many frames the attacker's recovery ends before the defender's blockstun ends if the attack is blocked. A positive value indicates that the attacker recovers first, while a negative value indicates that the defender recovers first. This value usually assumes that the attack's first active frame (of each hit, if multi-hit) is blocked. | On ODRThe difference between the attacker's total animation length and the period the opponent is in overdrive raid. This frame advantage is based off the assumption that both players input during the hitstop of a prior move, so that this attack and ODR start on the same frame. | AttributeSome attacks are invulnerable to attacks with specific attributes. This notes what attributes each attack possesses. H - Head B - Body F - Foot P - Projectile. Independent projectiles will have their Durability level listed, e.g. a projectile with Durability level 2 will show P2 T - Throw D - Doll attack, such as Carl's or Relius' doll Burst - Burst, which has its own unique attribute |
Invuln |
|---|---|---|---|---|---|---|---|---|
| 2500 | Guard Break 60/Barrier | 15 | 3 | 22+4L | H | (15~17 P) |
Situational special. Sometime used in OD combos, however, it is harder to use than 41236C. In pressure, it guard crushes if it isn't barriered. In that case, it can combo into Forward Hop > 5C midscreen or 6C (level 2) in the corner.
It can be used on wake-up to heavily punish throw attempts if the opponent is trying to play around 236236D. It combos into 6A > 6B > ... or 5C > ODc > 214A/236B > ...
Fastest startup after TK is 19 frames and 21 after a Hop.
- 90F Heat Gauge Cooldown
- Can be used any number of times in the air.
- Can cut projectiles 15F-17F
- Fatal Counter
| Starter RatingDetermines the starting value of the hitstun/untech decay timer and subsequent combo length | P1Proration applied to future hits when used as the first hit of a combo | P2Proration applied to future hits when used during any part of a combo | Attack LevelDefault Attack Level Values
| |||||||||||||||||||||||||||||||||||
|---|---|---|---|---|---|---|---|---|---|---|---|---|---|---|---|---|---|---|---|---|---|---|---|---|---|---|---|---|---|---|---|---|---|---|---|---|---|---|
| Long | 90 | 92 | 4 |
- Fatal Counter
- (Can cut projectiles on these frames, Hakumen is projectile invulnerable on the frame a projectile is cut)
- Heat Gauge Cooldown 90F
- If cancelled into from Drive counterattack startup, is invulnerable frames 1~10
Distortion Drives
Kokūjin: Shippu
632146C with 4 Magatama


Will come out when you hold forward before 2B > Zantetsu


Strike hitbox

Traveling projectile hitbox


| Version | Damage | GuardHow this attack can be guarded. Throws have their throw range listed instead. | StartupHow many frames the attack needs to go through in order to reach its active frames. The listed startup frame coincides with the move's first active frame. | ActiveHow many frames where there is a hitbox that can hit an opponent. The first active frame occurs on the listed startup frame. | RecoveryHow many frames that the character must go through after an attack's active frames to automatically go back to a neutral stance, or the total duration of the move if it has no hitbox/creates projectiles. | Frame AdvHow many frames the attacker's recovery ends before the defender's blockstun ends if the attack is blocked. A positive value indicates that the attacker recovers first, while a negative value indicates that the defender recovers first. This value usually assumes that the attack's first active frame (of each hit, if multi-hit) is blocked. | On ODRThe difference between the attacker's total animation length and the period the opponent is in overdrive raid. This frame advantage is based off the assumption that both players input during the hitstop of a prior move, so that this attack and ODR start on the same frame. | AttributeSome attacks are invulnerable to attacks with specific attributes. This notes what attributes each attack possesses. H - Head B - Body F - Foot P - Projectile. Independent projectiles will have their Durability level listed, e.g. a projectile with Durability level 2 will show P2 T - Throw D - Doll attack, such as Carl's or Relius' doll Burst - Burst, which has its own unique attribute |
Invuln |
|---|---|---|---|---|---|---|---|---|---|
| 632146C | 3500 [4000] | All | 14+(47 Flash)+7 | 4 | 41 | -26 | B | ((Active Frames) P) | |
| 632146[C] | 5000 | Unblockable | 14+(47 Flash)+86 | 4 | 41 | B | (100~103 P) | ||
| 632146C Wave | 2500 [3000] | All | 14+(47 Flash)+11~90 | Until Hit | Total: 65~144 | P3 |
Hakumen launches a sword attack and a shockwave to the opponent.
Normal Version
Standard distortion combo ender. It can be canceled on block with 623A to make it +0 on block, though you waste 5 Magatama so think about it before throwing out. In neutral, this can be useful against zoners (Nu, Lambda, Rachel) since it cuts projectiles on all active frames, or Valkenhayn in wolf form as he can't block it.
Charged Version
You can hold the button for 100F to get the Charged Version, which is completely unblockable. Basically impractical. The hold mechanic itself is useful for timing some combos that requires height or such.
Overdrive Version
The OD version fires a taller, Reppuken-esque energy wave to the slash, with an excellent vertical hitbox, allowing one to combo afterwards. Since the energy wave has better proration than the actual slash and wallbounces it can be used in midscreen OD combos, such as CT > 6C > 632146C (wave), then follow-up with 623A.
- 180F Heat Gauge cooldown
- 30% minimum damage on slash (Uncharged: 1050[1200] Charged: 1500), 20% minimum damage on wave (500 [600]).
- Normal Wave takes 13 frames to hit the opponent fullscreen and 12 frames in OD.
| Version | Starter RatingDetermines the starting value of the hitstun/untech decay timer and subsequent combo length | P1Proration applied to future hits when used as the first hit of a combo | P2Proration applied to future hits when used during any part of a combo | Attack LevelDefault Attack Level Values
| |||||||||||||||||||||||||||||||||||
|---|---|---|---|---|---|---|---|---|---|---|---|---|---|---|---|---|---|---|---|---|---|---|---|---|---|---|---|---|---|---|---|---|---|---|---|---|---|---|---|
| 632146C | Normal | 100 | 60 | 4 | |||||||||||||||||||||||||||||||||||
| 632146[C] | Normal | 100 | 60 | 4 | |||||||||||||||||||||||||||||||||||
| 632146C Wave | Normal | 100 | 80 | 4 [5] |
632146C:
- Values in [] are during OD
- (Can cut projectiles on these frames, Hakumen is projectile invulnerable on the frame a projectile is cut)
- Minimum Damage 30%: 1050 [1200]
- If cancelled into from Drive counterattack startup or 214D (startup or on block) and not in OD, is invulnerable frames 1~10
632146[C]:
- Values in [] are during OD
- (Can cut projectiles on these frames, Hakumen is projectile invulnerable on the frame a projectile is cut)
- Minimum Damage 30%: 1500
- If cancelled into from Drive counterattack startup or 214D (startup or on block) and not in OD, is invulnerable frames 1~10
632146C Wave:
- Values in [] are during OD
- Only appears if Shippu does not touch opponent
- Activates the first frame Shippu becomes active
- Minimum Damage 20%: 500 [600]
Kokūjin: Yukikaze
236236D with 4 Magatama

No

As wide as the stage. Only way to avoid is jump


Catch hitbox

Attack hitbox


| Version | Damage | GuardHow this attack can be guarded. Throws have their throw range listed instead. | StartupHow many frames the attack needs to go through in order to reach its active frames. The listed startup frame coincides with the move's first active frame. | ActiveHow many frames where there is a hitbox that can hit an opponent. The first active frame occurs on the listed startup frame. | RecoveryHow many frames that the character must go through after an attack's active frames to automatically go back to a neutral stance, or the total duration of the move if it has no hitbox/creates projectiles. | Frame AdvHow many frames the attacker's recovery ends before the defender's blockstun ends if the attack is blocked. A positive value indicates that the attacker recovers first, while a negative value indicates that the defender recovers first. This value usually assumes that the attack's first active frame (of each hit, if multi-hit) is blocked. | On ODRThe difference between the attacker's total animation length and the period the opponent is in overdrive raid. This frame advantage is based off the assumption that both players input during the hitstop of a prior move, so that this attack and ODR start on the same frame. | AttributeSome attacks are invulnerable to attacks with specific attributes. This notes what attributes each attack possesses. H - Head B - Body F - Foot P - Projectile. Independent projectiles will have their Durability level listed, e.g. a projectile with Durability level 2 will show P2 T - Throw D - Doll attack, such as Carl's or Relius' doll Burst - Burst, which has its own unique attribute |
Invuln |
|---|---|---|---|---|---|---|---|---|---|
| 236236D | 44 | 1~27 Catch HBFP, Burst | |||||||
| 236236D Attack | 3200 [1800, 120×18, 2100] |
Unblockable | 1+(36 Flash)+43 | 3,3,3,3 | 39 | B | 1~End All |
A super version of Hakumen's parries. If activated, Hakumen dashes forward with a slash that hits everything that is head level or lower and is fully invincible throughout. If your opponent activated it with a physical strike, they will be frozen in hitstop until this attach hits. This is a key defensive tool in most match-ups and a life changer with 4 Magatamas as the opponent has to play around it to avoid losing the momentum. Most notably, it is a fantastic tool to escape projectile-based okizeme and makes Hakumen one of the only character who can reliably escape some of them (Like Rachel's 22A. Midscreen, it can be comboed into 623A > 6A > 6B; In the corner, it can be comboed into 623A > IAD j.2A > j.C, then landing 5C > 6A > 6B.
In Overdrive, Hakumen deals more hits and the damage increases. Special note should be taken about the OD version: unlike most other Distortion Drives, this pauses the OD timer for about the entire duration of the move. Combine this with the version's lengthy animation, a removed meter cooldown and the fact that the accelerated meter gain of OD isn't paused, by the time the move ends, most of all of the Magatama spent will have been regained. This can lead to even more damaging combos.
- 180F Heat Guage cooldown
- Fatal Counter.
- Does not catch unblockable attacks.
- If cancelled into from the startup of another Drive move (after blocking an attack), the attack activates immediately instead of needing to parry another hit.
- It is worth noting that the opponent can attempt to Rapid Cancel after being frozen by Yukikaze. Normally however, the opponent will be stuck in hitstop, meaning the RC will not have time to occur and not consume any meter, even though the visual effects play.
- Moves that have invulnerability on the frame they trigger Yukikaze will remain invulnerable during hitstop, making it possible to RC and then perform another invulnerable action to avoid Yukikaze completely. Other notable interactions include
 Azrael's 236236D
 GuardAll
(see notes)Startup7+(122 Flash)+4
[7+(149 Flash)+4]Recovery54Advantage-38 as that move guard point will absorb most of Yukikaze's damage and will only end up doing 200 damage. Mu's 623C
 GuardAllStartup14Recovery37Advantage-26 can RC after Yukikaze and high jump to avoid Yukikaze completely without having to use OD.
 - Despite being a sword attack when activated, this move cannot cut projectiles, not that it matters much.


| Version | Starter RatingDetermines the starting value of the hitstun/untech decay timer and subsequent combo length | P1Proration applied to future hits when used as the first hit of a combo | P2Proration applied to future hits when used during any part of a combo | Attack LevelDefault Attack Level Values
| |||||||||||||||||||||||||||||||||||
|---|---|---|---|---|---|---|---|---|---|---|---|---|---|---|---|---|---|---|---|---|---|---|---|---|---|---|---|---|---|---|---|---|---|---|---|---|---|---|---|
| 236236D | |||||||||||||||||||||||||||||||||||||||
| 236236D Attack | Normal | 100 | 30 [98×19, 45] |
4 |
236236D:
- Cannot guard against unblockables
- Counterhit state for entire move
- On Guard Point, hitstop for Hakumen 3F, opponent hitstop 47F
- Parry reversal
236236D Attack:
- Values in [] are during OD
- Fatal Counter
- Immediately enters recovery [begins followup hits] on hit
- Minimum Damage 20%: 640 [1320]
Kokūjin Oūgi: Mugen
214214B with 8 Magatama

"Mugen" literally means "infinite"

| Damage | GuardHow this attack can be guarded. Throws have their throw range listed instead. | StartupHow many frames the attack needs to go through in order to reach its active frames. The listed startup frame coincides with the move's first active frame. | ActiveHow many frames where there is a hitbox that can hit an opponent. The first active frame occurs on the listed startup frame. | RecoveryHow many frames that the character must go through after an attack's active frames to automatically go back to a neutral stance, or the total duration of the move if it has no hitbox/creates projectiles. | Frame AdvHow many frames the attacker's recovery ends before the defender's blockstun ends if the attack is blocked. A positive value indicates that the attacker recovers first, while a negative value indicates that the defender recovers first. This value usually assumes that the attack's first active frame (of each hit, if multi-hit) is blocked. | On ODRThe difference between the attacker's total animation length and the period the opponent is in overdrive raid. This frame advantage is based off the assumption that both players input during the hitstop of a prior move, so that this attack and ODR start on the same frame. | AttributeSome attacks are invulnerable to attacks with specific attributes. This notes what attributes each attack possesses. H - Head B - Body F - Foot P - Projectile. Independent projectiles will have their Durability level listed, e.g. a projectile with Durability level 2 will show P2 T - Throw D - Doll attack, such as Carl's or Relius' doll Burst - Burst, which has its own unique attribute |
Invuln |
|---|---|---|---|---|---|---|---|---|
| 16+(90 Flash)+30 |
Hakumen's infamous install super, used to capitalise on some big counterhits while at full Heat allowing for some massively damaging combos, virtually guaranteeing victory assuming your opponent doesn't burst and you don't drop the combo.
Requires 8 Magatama but does not consume any upon startup. Instead, Hakumen's heat gauge now acts as a countdown, depleting rapidly once activated and the effects of this move end only when the heat gauge has emptied. During Mugen, all other specials and distortion drives (But not his Astral Heat) may be used with no cost, the same special can be used multiple times in a string (but cannot cancel directly into itself), and specials are not affected by Same Move Proration. Conversely, no heat will be gained while Mugen is active for any reason, and Hakumen cannot use Rapid Cancel or Counter Assault while in Mugen (you have alternatives, for example 623A and Yukikaze). The entire duration of Mugen is 360F, starting after Hakumen has fully recovered from this move or he gets hit.
Since it has a huge recovery, it is hard to combo into (6C level 3 FC and 6A CH only). Alternatively, can be used in neutral as a last resort to try to turn the tide by unleashing a flurry of special moves for free, but some characters can punish it on reaction fullscreen.
The main Mugen combos are 236B/214A > (41236C(1) > 623A)xN or (41236C(1) > 214D)xN, the latter dealing less damage but being easier to perform.
Under Overdrive, the Heat gauge drain is paused, even if it was activated after Mugen. This vastly increases the duration mugen will last for, potentially more than doubling it.
- Meter drain does not get paused for any reason other than overdrive. Hitstop or either player's super freeze effects will not pad out the length of this move.
- If Hakumen is hit before the superflash, Mugen's effects do not activate.
- After Mugen's effects expire, Hakumen's passive heat gain is zero for 180F. All other Heat gain works as normal. Activating overdrive cancels this state.
- Disables Same Move Proration for all of Hakumen's specials while active.
| Starter RatingDetermines the starting value of the hitstun/untech decay timer and subsequent combo length | P1Proration applied to future hits when used as the first hit of a combo | P2Proration applied to future hits when used during any part of a combo | Attack LevelDefault Attack Level Values
| |||||||||||||||||||||||||||||||||||
|---|---|---|---|---|---|---|---|---|---|---|---|---|---|---|---|---|---|---|---|---|---|---|---|---|---|---|---|---|---|---|---|---|---|---|---|---|---|---|
- Costs 8 orbs
- Allows unlimited use of specials and Distortion Drives for the duration
- SMP for Specials is removed during Mugen
- If cancelled into from Drive counterattack startup or 214D (startup or on block), is invulnerable frames 1~10
Exceed Accel
Kokūjin Kingi: Tengai
A+B+C+D during Overdrive

One of the better EA's


| Damage | GuardHow this attack can be guarded. Throws have their throw range listed instead. | StartupHow many frames the attack needs to go through in order to reach its active frames. The listed startup frame coincides with the move's first active frame. | ActiveHow many frames where there is a hitbox that can hit an opponent. The first active frame occurs on the listed startup frame. | RecoveryHow many frames that the character must go through after an attack's active frames to automatically go back to a neutral stance, or the total duration of the move if it has no hitbox/creates projectiles. | Frame AdvHow many frames the attacker's recovery ends before the defender's blockstun ends if the attack is blocked. A positive value indicates that the attacker recovers first, while a negative value indicates that the defender recovers first. This value usually assumes that the attack's first active frame (of each hit, if multi-hit) is blocked. | On ODRThe difference between the attacker's total animation length and the period the opponent is in overdrive raid. This frame advantage is based off the assumption that both players input during the hitstop of a prior move, so that this attack and ODR start on the same frame. | AttributeSome attacks are invulnerable to attacks with specific attributes. This notes what attributes each attack possesses. H - Head B - Body F - Foot P - Projectile. Independent projectiles will have their Durability level listed, e.g. a projectile with Durability level 2 will show P2 T - Throw D - Doll attack, such as Carl's or Relius' doll Burst - Burst, which has its own unique attribute |
Invuln |
|---|---|---|---|---|---|---|---|---|
| 600, 1000, 1500 {600, 1000, 4500} |
all | 20 [10] | 3 | 34 | -10 | -30 [-20] | F | 1~22 All [1~12 All] |
- Foot attribute unlike most EAs.
- Ends all Overdrive effects the instant the initial strike connects
- Otherwise behaves the same as every other Exceed Accel.
- 310/671 Minimum Damage
Hakumen kicks the opponent's feet on startup, then knocks them down and follows with a mighty slash. Since Hakumen's combos are mostly limited by resources and combo time, they tend not suffer from bad scaling, meaning that tacking on this move at the end of combos will often still give decent damage very late onto the combo. The downside is that the The knockdown after it is poor and is possible to roll for free afterward. In the corner, 2B can be used to force the opponent to block after they forward roll.
| Starter RatingDetermines the starting value of the hitstun/untech decay timer and subsequent combo length | P1Proration applied to future hits when used as the first hit of a combo | P2Proration applied to future hits when used during any part of a combo | Attack LevelDefault Attack Level Values
| |||||||||||||||||||||||||||||||||||
|---|---|---|---|---|---|---|---|---|---|---|---|---|---|---|---|---|---|---|---|---|---|---|---|---|---|---|---|---|---|---|---|---|---|---|---|---|---|---|
| 125 | 80 |
- Values in [] are when canceled into or immediately after activating Overdrive
- Values in {} are during Active Flow
- Cannot counter hit
- Mimimum Damage 10%: 310 {610+61}
Astral Heat
Kokūjin Oūgi: Akumetsu
[2]8D when Astral Conditions are met

Worst astral in the game

But at least it looks really cool


| Damage | GuardHow this attack can be guarded. Throws have their throw range listed instead. | StartupHow many frames the attack needs to go through in order to reach its active frames. The listed startup frame coincides with the move's first active frame. | ActiveHow many frames where there is a hitbox that can hit an opponent. The first active frame occurs on the listed startup frame. | RecoveryHow many frames that the character must go through after an attack's active frames to automatically go back to a neutral stance, or the total duration of the move if it has no hitbox/creates projectiles. | Frame AdvHow many frames the attacker's recovery ends before the defender's blockstun ends if the attack is blocked. A positive value indicates that the attacker recovers first, while a negative value indicates that the defender recovers first. This value usually assumes that the attack's first active frame (of each hit, if multi-hit) is blocked. | On ODRThe difference between the attacker's total animation length and the period the opponent is in overdrive raid. This frame advantage is based off the assumption that both players input during the hitstop of a prior move, so that this attack and ODR start on the same frame. | AttributeSome attacks are invulnerable to attacks with specific attributes. This notes what attributes each attack possesses. H - Head B - Body F - Foot P - Projectile. Independent projectiles will have their Durability level listed, e.g. a projectile with Durability level 2 will show P2 T - Throw D - Doll attack, such as Carl's or Relius' doll Burst - Burst, which has its own unique attribute |
Invuln |
|---|---|---|---|---|---|---|---|---|
| 38000 | Unblockable | 1+(60 Flash)+36 | HBF | 1~20 Guard HBF, Burst |
- 180F cooldown
- Requires 8 Magatama
- Catches Head, Body, Foot and Burst attributes, including unblockables.
- Does not trigger on Doll attacks, Throws or Projectiles.
- Unlike Hakumen's other drive moves, if it triggers, the attack is guaranteed to hit
- 30F charge. See Here for details on charge inputs.
Catches moves with physical attributes and the rare unblockables (unlike Haku's other drives). For instance, unlike Yukikaze, this can catch Makoto's 41236C. It loses to Relius and Carl's doll attacks, grabs and projectiles (including Hazama's chain and his 632146C), but can still beat Jin's Astral.
One of the most impractical Astrals in the game; Hakumen usually spends meter as fast as he gets it and it relies on the opponent to be activated. Hakumen also suffers immensely from throwing away all of his meter if it fails.
The most practical application this move has is baiting a burst after Throw > 2C while the opponent is low on health. It can also be charged and used on reaction during superflash, however, that rarely happens as most players become very careful when Haku has astral.
While not good by itself, it's a formidable mindgame tool. Crouching in neutral becomes threatening as it forces the opponent to weight every move carefully.
| Starter RatingDetermines the starting value of the hitstun/untech decay timer and subsequent combo length | P1Proration applied to future hits when used as the first hit of a combo | P2Proration applied to future hits when used during any part of a combo | Attack LevelDefault Attack Level Values
| |||||||||||||||||||||||||||||||||||
|---|---|---|---|---|---|---|---|---|---|---|---|---|---|---|---|---|---|---|---|---|---|---|---|---|---|---|---|---|---|---|---|---|---|---|---|---|---|---|
| Long | 0 |
- Astral attack only occurs if guard point successfully blocks a move
- Does not block Carl/Relius doll attacks
- 180F Heat cooldown
- Counterhit state for entire move
Colors
 |
 |
 |
 |
 |
 |
 |
 |
 |
 |
 |
 |
 |
 |
 |
 |
 |
 |
 |
 |
 |
 |
 |
 |
To edit frame data, edit values in BBCF/Hakumen/Data.
Amane
Arakune
Azrael
Bang
Bullet
Carl
Celica
Es
Hakumen
Hazama
Hibiki
Tager
Izanami
Izayoi
Jin
Jubei
Kagura
Kokonoe
Lambda-11
Litchi
Mai
Makoto
Mu-12
Naoto
Nine
Noel
Nu-13
Platinum
Rachel
Ragna
Relius
Susano'o
Taokaka
Tsubaki
Valkenhayn
Terumi
System Pages
Mechanics
Application & Advanced Information
Archived Information