GGACR/Zappa

From Dustloop Wiki

Overview

Overview

Zappa is simultaneously the most unique and complex character on the +R roster. Coming to the fight with his menagerie of spirits assisting him, Zappa acts as a "stance" character, switching between numerous movesets in an attempt to overwhelm his opponents.

Zappa's core mechanic are his ghost "Summons". By pressing 236PGGAC Zappa konnichiwa.pngGuardMidStartup10Recovery20Advantage-12 (or sometimes when he's hit), Zappa will summon one of three spirits to his side. These spirits heavily modify and bolster his kit in unique ways. To keep it simple for now, Dog transforms Zappa into a puppet pressure character, Triplets turn him into a trickster with strong screen control and pressure, and Sword makes Zappa into a mixup character capable of long-range zoning. Zappa always starts off without a summon (called "Naked" by the community), but this stance comes with its own benefit of access to his invulnerable 236PGGAC Zappa konnichiwa.pngGuardMidStartup10Recovery20Advantage-12 which is powerful both defensively and as a counterpoke. Each summon comes with its own unique specials and sometimes gives Zappa new normals as well.

When Zappa hits the opponent with certain specials he can earn "orbs", glowing balls of light which fly around him. When Zappa reaches eight orbs his next 236PGGAC Zappa konnichiwa.pngGuardMidStartup10Recovery20Advantage-12 will summon the mighty Raou, a unique lightning spirit summon with some of the best moves in the entire gameGGAC Zappa edogai.pngGuardMidStartup4Recovery37Advantage-30. While summoning Raou can be a powerful checkmate to end the round, Zappa doesn't need to rely on Raou to close out the fight. He acts more as a reward for successfully controlling the round for long enough instead of an end-goal to reach.

Instead, Zappa's real strength comes from his incredible adaptability. On paper, he's the best character in the game, capable of doing pretty much every style of play (pressure, zoning, mixups, and evasion) well. In practice, Zappa can only do some of these things at any given time, and his player must be aware of all the different factors at play when piloting him. Zappa being hurt at all causes him to lose or reroll his summon, which can seriously interrupt your mental focus and demand you readjust your gameplan on the fly. Certain summons are better for different matchups as well, which can force Zappa into disadvantageous situations if he draws the wrong summon during a critical moment. Being as adaptable as Zappa is a must for playing him, as is knowing all the elements of his massive kit.

All in all, Zappa rewards knowledge and flexibility like few other characters on the roster. If you can come to grips with the strange gameplan that Zappa offers and are willing to put time into learning him, then he will return the favor several times over.
GGACR Zappa Nameplate.png
GGACR Zappa Portrait.png
Damage Received Mod
×1
Guts Rating
2/5
Gravity Mod
×1
Stun Resistance
60
Prejump
3F
Backdash
11F (1~10F Strike Invuln)
Wakeup Timing
21F (Face Up)/ 27F (Face Down)
Number of Jumps:
2
Number of Air Dashes:
1
Unique Movement Options
Low Profile Run
Fastest Attack
-
Reversals
-

Pros And Cons

 Zappa is "Naked" in this form, lacking a summon. In exchange for none of the firepower or versatility of his summons, he has an excellent keepaway and defensive game to get them online as soon as possible.

Pros
Cons
  • Slippery: Zappa's extraordinary backdash and fast low profile dash make him one of the most elusive characters in the game when he's grounded.
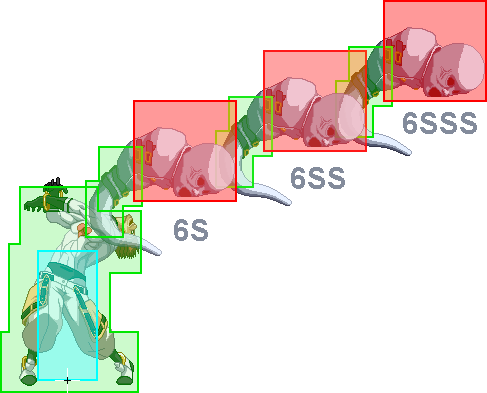
  • Mixups Galore: Zappa has access to a variety of grounded overheads including his 16f 214D and 6H, some of which come with him into other summons.
  • Tricky Normals: Zappa has many normals that shrink his hurtbox to go under the opponent's attack as well as his 5K which raises his hurtbox to go over lows. This makes Zappa very difficult to poke against for most characters.
  • Free Summons: Zappa has a 3/8 chance each time he leaves hitstun to get a summon. 1/8 of the time this results in getting Dog, which can act as a "get out of jail free card" and let Zappa escape pressure or even start a combo of his own.
  • Excellent DP: Although it is only available when Zappa has no summon, 236P is a very strong reversal that can get Zappa out of difficult situations or be used to counterpoke.
  • High Stun Potential: 2H has a 2x stun modifier and on air CH combos into itself, which is often enough to stun characters by itself.
  • Low Damage Output : Naked Zappa generally does very little damage off of regular confirms, instead routing into 236P after a small combo.
  • Limited Air Control: Naked Zappa cannot end confirms in a hard knockdown vs airborne opponents and he generally lacks strong air to air or jump-in tools.
  • Poor Grounded Anti-Airs: Lacking a traditional 6P or alternative strong anti-air buttons, Naked Zappa has limited ability to directly threaten airborne opponents from the ground.

 Zappa summons a shadowy Dog to assist him in battle. While Dog is summoned, Zappa becomes like a miniature  Eddie, working in tandem with his canine companion to create suffocating pressure situations.

Pros
Cons
  • Dog Pressure: If Zappa manages to either get his opponent into the corner or sandwiched between him and the dog, he can create some of the most intense pressure in the entire game. Numerous resets, dozens of high/low and left/right mixups and the threat of a grab on top of it all can make the opponent dread seeing him pop up.
  • Unblockables: With the use of 4DD combined with a low from Zappa even the most defensive opponents can be opened up.
  • Infinites: If the opponent is between Zappa and the dog when hit Zappa can choose to combo infinitely until he decides to go for a reset or the opponent bursts.
  • Amazing Defense: Not only can the dog absorb one hit for Zappa, it can also attack at all times, even when Zappa is blocking, stunned, or even while he is bursting. This allows Zappa to start offense even when he is defending, making Dog an incredibly strong tool.
  • Invincible While Idle: Dog cannot be hit if it is not in an attack or recovery animation unless it stays still for 6 seconds straight.
  • Demanding Positioning: Dog takes a significant amount of time to cross the stage and must be present for Zappa to extend his combos, meaning Zappa must remain close to the dog lest he be caught in a bad position. Additionally, while the dog being vulnerable while attacking can be a great boon for Zappa when he's on the defense, it also means that the summon is easy to lose while positioning it in neutral. Zappa must be especially cautious of multihit moves as they can blow through the dog and still hit Zappa.
  • Limited Knockdowns: Because he loses access to his regular 2D Zappa is unable to knock down the opponent unless the dog is in position to help. Additionally, Zappa with Dog usually gets limited conversions that don't lead to a knockdown off of hits vs airborne opponents.

 Zappa summons three ghostly Triplets to help him in battle. While Triplets are summoned, Zappa becomes a trickster with access to extended pressure and screen control, capable of flooding the screen with numerous projectiles.

Pros
Cons
  • Zoning Extraordinaire: With 236P/K/S/H/D Zappa can control a ludicrous amount of space on the screen, warding off approaches and locking the opponent down.
  • Misfortune Curse: If you manage to curse the opponent they will be forced to be careful of the random items, allowing Zappa to take the initiative. Misfortune items can also save Zappa from pressure, extend combos, or even set up unblockables.
  • Tricky: Triplets give Zappa a variety of options which let him confuse and frustrate the opponent. Zappa can stall in the air with repeated triplet tosses, hit them with lingering hitboxes while jumping over their heads, cause chaos by spawning multiple items at once after comboing into 236D, and generally annoy the opponent to no end.
  • Extensive Pressure: Triplet normals cancel into themselves and other Triplet normals allowing Zappa to perform extended pressure, especially with the help of curse items and his highly useful triplet toss FRC. When the other player is in the corner Zappa can continue pressure almost indefinitely if he has a good read on his opponent.
  • Orb Generation: Landing Triplet Toss and doing Triplet combos consistently rewards Zappa with orbs that he can use to eventually summon Raou.
  • Poor Damage: Triplets do extremely low damage and instead rely heavily on repeatedly opening up the opponent.
  • Misfortune Interruption: When the opponent is cursed the random items can sometimes interrupt Zappa's combos or otg knocked down opponents.
  • Limited Triplets: Should Zappa rely too heavily on his ghost toss specials or 2H/jH he will be left vulnerable until his ghosts return to him.
  • Extended Hurtboxes: Most Triplet normals extend Zappa's hurtbox signficantly which can make them vulnerable to being counterpoked.

 Zappa summons a bloodstained sword to help him in battle. While Sword is summoned, Zappa gains access to numerous extremely powerful mixups and fully disjointed long range pokes.

Pros
Cons
  • Fully Disjointed: Sword has a unique property in that it does not have a hurtbox, which makes it extremely effective in neutral and invalidates many options that the opponent might otherwise use to escape pressure such as burst, dp, or dead angle and allows spaced Sword normals to be fully reversal safe during combos and okizeme From Japanese "起き攻め". Attacking an opponent about to wake up after they were knocked down, usually with meaty attacks or mix-ups..
  • Strong Zoning: Because the sword can reach roughly 3/4ths of the screen, Zappa can use it to zone out opponents with very little risk to himself, especially versus characters with subpar mobility.
  • Amazing High-Low Mixup: When Zappa obtains Sword he gains access to some very strong high-low mixup tools such as his 6P>2K gatling (which is exclusive to Sword), 6H (a 13f overhead that turns into a low later on in the move), 2S (a ranged low), and his j.S (which hits high and can be used as an instant overhead). These tools allow Zappa to keep his opponent guessing from all ranges.
  • Plethora of Strong Tools: Sword gives Zappa a variety of useful tools that allow him to move across the screen quickly, anti-air, extend pressure, and recall sword. In addition to this, every Sword special has an FRC point to make it safe or to extend pressure/combos.
  • Oppressive Corner Pressure: Sword has some of the strongest corner pressure in the game. When an opponent is forced into the corner Zappa can use Come Close, and I'll Kill You (also known as Swipe) to cause a hard knockdown. This allows Zappa's to keep pressuring the opponent after every corner combo and force Zappa's opponent to work to get out of his pressure.
  • Dead Zone: Due to the sword lingering in place after completing a move, poor placement or exploitable gaps in pressure will allow an opponent to get between Zappa and the Sword. Once this happens Zappa's options become much more limited, as he will either have to go for a risky option such as Please Fall (DP), run away, or rely on his P and K normals to bail him out.
  • Highly Committal Normals: Sword normals such as 2H (37f), 5H (39f), and 6H(45f) are all moves with high total frame counts that leave Zappa completely vulnerable should the opponent avoid them.
  • Limited Access to Knockdowns: Although Zappa retains his 2D allowing him to KD midscreen when close to the opponent, Sword normals and specials generally do not result in hard knockdown unless the opponent is grounded and in the corner.
  • Other Limitations: All sword normals build 0 guard bar and every sword normal/special other than 236S is air-blockable without Faultless Defense unlike most grounded moves in the game.

 Zappa collects eight Orbs, allowing him to summon the mighty Raou! With excellent control of the screen and absurd damage potential, Raoh is to be feared by opponents!

Pros
Cons
  • Damage like His Namesake: With 50% meter and a 214S starter close to the corner Raou is capable of dealing close to an entire health bar's worth of damage. Even outside of this situation he does enough damage that often even a single confirm is enough to close out a round.
  • Strong Normals: Raou gives Zappa access to some very useful normals with far reaching hitboxes that can be used for poking, frame traps, and extended pressure.
  • Amazing DP: Raou's 214S is one of the best invincible reversals in the game, coming out on frame 4 and reaching almost to the top of the screen with an air-unblockable mountain of a hitbox.
  • High Threat Projectiles: Raou's 236S followups are air unblockable and lead into a full combo on hit, which combined with their multiple trajectories and large hitboxes makes them a threatening screen presence.
  • Chip Damage: Raou's 236S projectile and 632146S super both do highly increased chip damage, forcing the opponent to choose between losing their meter or taking significant (sometimes fatal) damage.
  • You Are Already Unsummoned: After 15 seconds Raou disappears, leaving Zappa summonless.
  • Limited Mixup: Raou's only option for a grounded overhead is his 5D. This means that Raou can sometimes struggle to open an opponent up before he disappears.
  • Enlarged Hurtboxes: Although Raou's normals are quite powerful, they also expand Zappa's hurtbox significantly and make him vulnerable to counterpokes.

Unique Mechanics

Summons

Zappa has the ability to summon one of 4 familiars which will augment his playstyle significantly by replacing his specials and normals. Zappa's forms are in brief:

GGACR Zappa Summonless Icon.pngNaked or Summonless - This state is his weakest form. Zappa will start the round this way and return to it if he takes damage.
GGACR Zappa Triplets Icon.pngTriplets - Grant Zappa a flexible projectile special with 5 different trajectories that curses the opponent on hit, causing random items to harass them. Also gives Zappa augmented normals that can cancel into each other on whiff.
GGACR Zappa Sword Icon.pngSword - Grants Zappa overwhelming mixup potential while also allowing him to attack from nearly fullscreen.
GGACR Zappa Dog Icon.pngDog - Replaces his Dust button with a familiar which can act autonomously from Zappa, even while he is attacking or blocking.
GGACR Zappa Raoh Icon.pngRaou - Raou only appears when Zappa has 8 orbs. Raou has amazing damage, reach, and speed, but is balanced by very poor mixups.

Orbs GGACR Zappa Orb.png

Zappa has a unique resource called Orbs which he gains by hitting enemies with certain moves.

Orbs will be shown as balls of light which float in a circle around Zappa's body. Zappa's special moves will grant Zappa with 1 to 3 orbs if they successfully hit, depending on the move. Zappa will start each round with 0 orbs, and can have a maximum of 8 orbs. When Zappa has 8 orbs, his next summon special will summon Raou who is a unique summon that only lasts 15 seconds.

Normals and Specials

  • Zappa will always have access to his P and K normals.
  • Dog overrides Zappa's D normals.
  • Triplets override Zappa's S and H normals.
  • Sword overrides Zappa's S and H normals.
  • Raou overrides Zappa's S, H normals and 5D.
GGACR Zappa Summonless Icon.png   Naked
GGACR Zappa Dog Icon.png   Dog
GGACR Zappa Triplets Icon.png   Triplets
GGACR Zappa Sword Icon.png   Sword
GGACR Zappa Raoh Icon.png   Raou

5P

Damage Guard Startup Active Recovery On-Block Invuln
9 Mid 5 2 6 +2

Tied with 2P for Zappa's fastest normal.

  • Decent range and good speed make this an acceptable poke, and also make it good for tick throws and frame traps.
Gatling Options
Normals Summon
6P, 5K, 2K, c.S, f.S, 2S, 5H, 2H, 6H Any
5P, 2P Triplets, Sword, Raou
6S Triplets
5D, 2D Any except Dog
FRC Window Proration Guard Bar+ Guard Bar- Level
N/A 90% 3 8 1

5K

Damage Guard Startup Active Recovery On-Block Invuln
22 Mid 9 6 8 -2 1~4F, 9~14F, 19~22F Feet
5~8F, 15~18F Lower Body

A low crush and an unorthodox poke.

  • Can chain into 2H for an air combo if it hits an enemy airborne.
  • Floats on hit.
  • Knocks down enemy on ground CH.
Gatling Options
Normals Summon
6P, f.S, 2S, 5H, 2H Any
c.S Any except Naked
6S Triplets
6H Naked and Sword
5D, 2D Any except Dog
FRC Window Proration Guard Bar+ Guard Bar- Level
N/A 6 7 2

c.S

Damage Guard Startup Active Recovery On-Block Invuln
26 Mid 8 6 18 -10

Good combo starter, but otherwise c.S doesn't stand out in neutral.

  • It's mostly delegated to combo filler.
  • Against crouching opponents combos into 2H with dash momentum.
Gatling Options
Normals Summon
6P, f.S, 2S, 5H, 2H Naked and Dog
6H, 5D, 2D Naked
FRC Window Proration Guard Bar+ Guard Bar- Level
N/A 10 7 3

f.S

Version Damage Guard Startup Active Recovery On-Block Invuln
f.S 30 Mid 13 9 10 -5
f.S Puddle 0 Low 34 3

Easily one of Zappa's best normals, hitting for good damage and with the highest range out of Zappa's notable normal attacks.

  • Activates at a surprisingly close range, and can combo into 2S or 2D if you're close enough, allowing Zappa to go into Centipedes if naked, or into other setups with the Dog.
  • At a far enough range, this move changes to the grounded version of f.S. Can be jumped cancelled into something like j.K or j.S if you're close enough.
  • The puddle knocks down opponent on hit. Great overall, with some deceptive range, and can be used in conjunction with the dog for an unblockable setup.
Gatling Options
Normals Summon
2S, 5H, 2H Naked and Dog
6H, 5D, 2D Naked
Version FRC Window Proration Guard Bar+ Guard Bar- Level
f.S N/A 10 7 3
f.S Puddle N/A 5 7 2

f.S:

  • Turns into puddle on whiff

f.S Puddle:

5H

Damage Guard Startup Active Recovery On-Block Invuln
20×3 High 22 3×6 12 -13 22~39F Lower Body

One of the weirdest moves in the game: a six hitbox overhead that's unsafe even on hit if it connects early due to only being able to do a maximum of 3 hits. Good guard bar plus and high damage if it connects make it a strong tool with Dog but it is generally worthless when naked.

  • The move has two FRC points during the 4th and 6th hitboxes. Since the move can only hit three times these will usually be after the active frames but if you do the move from further away you can FRC the 4th hit into an immediate 2K for a 50/50 that leads into a combo with dog support.
FRC Window Proration Guard Bar+ Guard Bar- Level
31~33F, 37~39F 11×3 6×3 4
  • Max 3 hits

5D

Damage Guard Startup Active Recovery On-Block Invuln
17 High 26 4 22 -9 10~33F Throw
18~37F Lower Body

Another interesting move, Zappa's dust is easy to see, but comes out relatively quickly, has both throw and lower body invincibility, and is the one of the only two Dusts in the game that can be special cancelled!

  • The most common followup out of 5D is to do an Impossible Dust with jD, land, and perform (2H) Centipedes.
FRC Window Proration Guard Bar+ Guard Bar- Level
N/A 11 20 4
  • Zappa is in CH state during move

6P

Damage Guard Startup Active Recovery On-Block Invuln
24 Low 11 3 18 -7 1~13F Above Knees

An excellent move that's more suited to poking than anti-air due to its low to the ground hitbox.

  • You'll be dashing into this move a lot, using it to start pressure or combos because of its invincibility and ability to jump cancel.
  • If used against jump ins, it'll usually make an opponent pass through you rather than hit them, but can be used in an emergency. 6P will be seeing a lot of use from you.
Gatling Options
Normals Summon
f.S, 2S, 5H, 2H, 6H Any
2K Sword
c.S Any except Naked
6S Triplets
5D, 2D Any except Dog
FRC Window Proration Guard Bar+ Guard Bar- Level
N/A 90% 8 7 3
  • Causes knockdown on ground CH

6H

Damage Guard Startup Active Recovery On-Block Invuln
50 High 21 19 14 -14 44~49F Low Profile
50~57F Above Feet

Another one of Zappa's several overheads, this one is quite a bit more useful than 5H, but is still extremely unsafe and only meant to be used sparingly.

  • If you have the dog to cover your pressure, this move is excellent, but otherwise is seldom used.
  • Note that it won't knockdown in the corner unless it lands as a counter hit. A tricky mixup you can use if you have the meter is to jump install into 6H, RC it on block (from far enough out) and airdash in.
  • On Counter Hit, you're going to lead into something mean, or as mean as you can get with naked Zappa.
FRC Window Proration Guard Bar+ Guard Bar- Level
N/A 15 6 5
  • Zappa is airborne from 19~39F
  • Untechable on CH for 60F

2P

Damage Guard Startup Active Recovery On-Block Invuln
12 Mid 5 3 9 -2 1~End Low Profile

Another good, fast poke, 2P is a great combo starter, going into 2K into whatever.

  • It's generally best to go into 2K, 2D, Centipedes when naked, or whatever combo you'd like when using a summon.
Gatling Options
Normals Summon
6P, 5K, 2K, c.S, f.S, 2S, 5H, 2H Any
5P, 2P Triplets, Sword, Raou
6H Sword
5D, 2D Any except Dog
FRC Window Proration Guard Bar+ Guard Bar- Level
N/A 90% 3 8 1

2K

Damage Guard Startup Active Recovery On-Block Invuln
16 Low 7 6 7 -1

Yet another low profile Zappa poke, and among the better moves in Zappa's overall tookit. 2K hits low, goes under a lot of things, moves Zappa slightly forwards, and comes out at a decent speed.

    • The push forward is particularly important for compensating for Zappa's short range when naked, and particularly in Dog combos.
  • Its gatling routes change depending on your summon, so keep in mind that you'll have more options based on your current spirit. Definitely a good low option.
Gatling Options
Normals Summon
6P, c.S, f.S, 2S, 2H Any
5H, 6H Sword
5D, 2D Any except Dog
FRC Window Proration Guard Bar+ Guard Bar- Level
N/A 80% 5 7 2

2S

Damage Guard Startup Active Recovery On-Block Invuln
26 Mid 11 9 12 -7 1~4F, 9~10F, 20~21F, 26~31F Low Profile
  • Despite the slow speed, this has a good hitbox and does decent range
  • 2S will allow Zappa to combo into 2H against crouchers. Good on counter hit due to stagger, go ahead and dash into whatever.
Gatling Options
Normals Summon
5H, 2H Naked and Dog
f.S, 5D, 2D Naked
FRC Window Proration Guard Bar+ Guard Bar- Level
N/A 10 7 3
  • Staggers on ground CH (max 49F)

2H

Damage Guard Startup Active Recovery On-Block Invuln
60 Mid 15 5 14 0

By itself, this move is nothing special, but when chained into, 2H is beastly.

  • It has an amazing hitbox, is jump cancellable, gatlings both to and from almost all of Zappa's normals, is safe on block, deals ridiculous damage, staggers, has a massive dizzy modifier and cranks the guard bar a ton.
  • Feel free to RC 2H on hit and go into another one or do some other silly combo of your choosing. *Note that the only moves that will successfully combo into this without meter are 6P, c.S, and 2S against crouchers, and 5K, 6P, c.S, and 2S on counter hit.
Gatling Options
Normals Summon
5P, 2P, 6P, 5K, 2K, c.S, f.S, 2S, 5H, 6H Naked and Dog
5D, 2D Naked
FRC Window Proration Guard Bar+ Guard Bar- Level
N/A 20 6 5
  • Dizzy modifier x2
  • Stagger on hit for max 35F

2D

Damage Guard Startup Active Recovery On-Block Invuln
30 Low 11 6 12 -4 10~20F Low Profile

Still another low profile Zappa normal.

  • Meant mostly for knockdown into Centipedes when naked, or knockdown with the Triplets.
  • Not recommended to throw out alone.
Gatling Options
Normals Summon
6H Raou
FRC Window Proration Guard Bar+ Guard Bar- Level
N/A 8 7 3

j.P

Damage Guard Startup Active Recovery On-Block Invuln
13 High/Air 6 6 9

Zappa's best air-to-air and air combo starter.

  • It's Zappa's fastest jumping normal, and combos into jK, jS, and jD easily.
  • With Triplets, jP*N > djP*N > jD becomes a staple aerial combo.
Gatling Options
Normals Summon
j.K, j.S, j.H Any
j.P Any except Naked
j.2S Triplets
j.D Any except Dog
FRC Window Proration Guard Bar+ Guard Bar- Level
N/A 3 8 1

j.K

Damage Guard Startup Active Recovery On-Block Invuln
22 High/Air 10 11 18
  • Has some of the best range of all of Zappa's jumping normals, but its speed and nature of its hitbox don't make for a particularly great aerial.
  • It hits pretty far out and combos into j.S and j.D, and back into j.P, but not being jump cancellable hurts its utility.
  • It's a bit slow and is probably naked Zappa's best jump in when properly timed, but Zappa is always better suited to summoning as soon as possible (and safely).
Gatling Options
Normals Summon
j.P, j.S Any
j.2S Triplets
j.D Raou
FRC Window Proration Guard Bar+ Guard Bar- Level
N/A 5 7 2

j.S

Damage Guard Startup Active Recovery On-Block Invuln
32 High/Air 9 3 15

More combo filler. Delegated to combos and pretty much that when Zappa is naked.

  • Has worse horizontal reach than j.K, but some height to its hitbox, and is just fast enough to work in air combos.
  • You'll mainly see it used after j.P into j.D, or after 2H air hit combos.
Gatling Options
Normals Summon
j.K, j.H Naked and Dog
j.D Naked
FRC Window Proration Guard Bar+ Guard Bar- Level
N/A 8 7 3

j.H

Damage Guard Startup Active Recovery On-Block Invuln
28 High/Air 12 2(1)2 12
  • This move will almost never hit anybody in front of you, because the hitbox is entirely behind Zappa, making this a great crossup tool.
  • This sees its use, in addition to jump in crossup setups, mostly in Dog loops to keep opponents in the Dog's range when combo'ing from midscreen.
  • Can only hit a maximum of 1 hit.
Gatling Options
Normals Summon
j.D Naked
FRC Window Proration Guard Bar+ Guard Bar- Level
N/A 8 7 3
  • Max 1 hit

j.D

Damage Guard Startup Active Recovery On-Block Invuln
44 High/Air 9 6 18+5 after landing

Wallbounces on counter hit, but sees its use mostly as an air combo ender for most of Zappa's summons, sans Dog and Raou.

FRC Window Proration Guard Bar+ Guard Bar- Level
N/A 8 7 3
  • Wall bounces on CH (untechable on ground hit for 60F)

Special Moves


Hello, Three Centipedes

236P with No Summon

Damage Guard Startup Active Recovery On-Block Invuln
20 Mid 10 4 20 -12 1~13F All
14~End Throw

The major staple of Zappa's gameplan, Centipedes are the most important tool in Zappa's arsenal. It is fully invul until past startup, removes OTG, knocks down, and grants Zappa a summon.

  • The most common usage is to knock the opponent down with xx > 2D, and then dash forward into Centipedes. Afterwards, you can link a 5P into a combo based on which summon you've been granted.
  • On hit, Zappa will gain a single orb, and a summon based on the timer and your number of orbs.
  • If the singles digit on the round's timer is:
    • 0, you get the sword.
    • 1, you get the dog.
    • 2, you get the ghosts.
    • If you have 8 orbs, you get Raou.
    • Any other number before having 8 orbs will grant a random summon.

(Note that this occurs on frame 15 of the attack).

FRC Window Proration Guard Bar+ Guard Bar- Level
N/A 6 7 2
  • Gives summon on 15F
  • Zappa is in CH state 14~29F
  • +1 Soul on hit

Normal Moves


Listed frame data is for the Dog. Data listed in [ ] is for followup version of the move.
Can cancel first attack into followup version of the move on hit or block
Zappa's 5D, 2D, and j.D are replaced with the corresponding Dog Normals; Zappa himself does not attack.
Dog is invincible while idle.
If the dog idles for 300F, it enters sleep mode, 30F to wake up dog from sleep.

Awaken Dog

D while Sleeping Dog

Damage Guard Startup Active Recovery On-Block Invuln
Total 30

The dog is an overall great summon, but is difficult to use due to its execution requirements and understanding of it.

  • When not attacking, it is invulnerable, but if it doesn't move for 6 seconds, it goes to sleep, making it vulnerable.
  • This can be a blessing in disguise, as the dog will sponge a hit for Zappa whenever it is vulnerable.
  • Waking up the dog works with any D move, but it will take 30 frames for it to wake up and attack, keeping its vulnerability. Keep this in mind when you have the Dog out.
FRC Window Proration Guard Bar+ Guard Bar- Level
N/A
  • If the dog idles for 300F it enters sleep mode
  • 30F to awaken dog

5D

Damage Guard Startup Active Recovery On-Block Invuln
20 Mid 16 8 36 [60] 1~6F, 48~50F, 54~59F Low Profile

The staple Dog move, comes out faster than most of the other dog moves, but has a very low amount of hit and blockstun.

    • However, you can use this to cover options and link combos together, making it integral to Zappa's dreaded infinites.
  • Additionally, since dog attacks can be used in blockstun, you can use this to break through pressure if used intelligently.
  • Examples in strings include using it to make Zappa safe during/after 5H or 6H, linking 2H > 5D > 2K > 5D > xx for extended combos, etc.
  • On hit, it pushes the dog back slightly, and doesn't combo into itself if you use 5D again as a followup. Regardless, this move is still one of your most reliable dog moves.
FRC Window Proration Guard Bar+ Guard Bar- Level
N/A 0 7 2
  • Can only cancel into this attack from 5D or 2D

6D

Damage Guard Startup Active Recovery On-Block Invuln
20 Mid 17 12 17 [24 after landing] 1~13F, 34F onwards Low Profile
14~33F Feet

A lunging bite which can work similarly to 5D for linking moves together and allowing Zappa to continue combos and pressure.

  • Its major difference is it has more horizontal reach than any of the dog's other moves, working for repositioning the dog, and it combos into itself. You can also use this to hit opponents that have you under pressure if the dog is behind you.
  • In addition, it places the dog airborne, allowing for 4DD, aerial 8D, or another 6D as a followup. On contact with the opponent, the dog will pop back about a third of the screen, but during this retreat animation, you can do a followup dog attack if 6D itself was not a followup. Knocks down on air hit, good after a 2D.
FRC Window Proration Guard Bar+ Guard Bar- Level
N/A 0 7 2
  • On hit or block, Dog performs rebound animation (total 61F)
  • Pulls in opponent on air hit

8D

Damage Guard Startup Active Recovery On-Block Invuln
20 All 10 [see notes] 12 31 [24 after landing] 1~4F, 44F onwards Low Profile
9~43F Feet

Great move to use when being pressured and the dog is over the opponent, allowing for a somewhat reliable "Get-off" option.

  • It will catch people airdashing in haphazardly, and can work as combo filler in jumping combos, but be careful as it generally won't hit crouching opponents.
  • After a rebounded 6D or 4DD, this can help reposition the dog against a grounded opponent, particularly in the corner, by intentionally whiffing it. Good for orbs if that's your goal.
FRC Window Proration Guard Bar+ Guard Bar- Level
N/A 0 7 3
  • +1[0] Soul on hit
  • Followup has startup of 10F when performed after 5D or 2D
  • Followup has startup of 4F when performed after 6D, 8D, or 4DD

2D

Damage Guard Startup Active Recovery On-Block Invuln
45 Mid 36 4 27 [51]
  • The only dog normal that floats on hit, 2D is best for combo enders and even has uses in pressure.
  • It grants 3 orbs on hit and 1 on block, but its range requires you to be able to position to the dog well.
  • After landing it, you can guarantee a knockdown by doing 6D as a followup.
  • In blockstrings, it has a high amount of blockstun, so use it to get back in.
  • In AC, this move was unblockable, but it still has its uses and can make life hell for your opponents.
FRC Window Proration Guard Bar+ Guard Bar- Level
N/A 10 7 3
  • Chip damage x2
  • Follow-up version can only be done from 5D or 2D
  • +3[0] Souls on hit
  • +1[0] Souls on block

4D

Damage Guard Startup Active Recovery On-Block Invuln
Total 59 [24 after landing] All
  • It is integral that you use this move, as it allows the dog to move while retaining its invincibility.
  • 4D will make the dog hop backwards, allowing for you to move it without the risk of sacrificing it.
  • You can follow up with 4DD,6D, or 8D if necessary.
  • Dog in invincible during move.
FRC Window Proration Guard Bar+ Guard Bar- Level
N/A
  • Can perform Followup Attack (4DD) between 2~43F [2~16F frames before landing]

4DD

Damage Guard Startup Active Recovery On-Block Invuln
20 High/Air 13 Until landing 40 [24 after landing] 1~12F, 37F onwards Low Profile
13~36F Above Feet

The Dog's overhead. Used in conjunction with 2K, Zappa gets an unblockable setup, and with the right combination, he can reset back into it repeatedly in the corner.

  • This is what will make Zappa's dog game terrifying, starting combos and ending them after 2D as well. Using 4DD late after a 4D or rebound can reposition the dog closer to the opponent as well by intentionally making it whiff.
  • Pre-patch, this move left the dog right in front of the opponent, but now it rebounds the dog back similarly to 6D.
  • In order to reposition the dog near the opponent, you'll want to whiff a 6D late after the rebound, or go for an 8D, usually whiffing it if the opponent is already in hitstun.
FRC Window Proration Guard Bar+ Guard Bar- Level
N/A 75% 0 7 2
  • Dog performs rebound animation on hit or block
  • Slams down opponent on air hit

Normal Moves


If Zappa doesn't have any Triplets with him when you input the move, all the frames that would normally result in a ghost attack turn into recovery (no attack).
For followup attacks input for 2nd attack allowed anytime after the 2nd frame of startup of the 1st hit. Input for 3rd attack allowed anytime after the 1st frame of startup of the 2nd hit.
Followup version of the attacks cannot gatling into non-triplet move.

c.S

Damage Guard Startup Active Recovery On-Block Invuln
20 Mid 6 2 12 0

Pretty standard punish starter. Doesn't have too much reach, but can be used sparringly as an anti-air, and to relaunch/link air combos.

  • Zappa can gatling any of his ghost normals back into each other for as many ghosts as he currently holds, meaning up to three. However, c.S bypasses this and lets you start a ghost combo before going into this chain. This makes it a premiere combo tool, especially after a 236S FRC.
  • Note that it cannot be gatling'd back into like the other ghost normals. You can end gatling strings with this too, as it's safe on block, to reset strings or set tick throws/frame traps.

Gatling Options: 6P, f.S, 2S, 6S, 5H, 2H, 5D, 2D

FRC Window Proration Guard Bar+ Guard Bar- Level
N/A 10 7 3

f.S

Version Damage Guard Startup Active Recovery On-Block Invuln
f.S 20 Mid 9 7 7 0
f.SS 20 Mid 9 7 9 -2

Has the longest horizontal reach of Zappa's grounded ghost normals. Its hitbox more or less matches the lateral range of the arm, but vertically it hits low enough to connect with most crouchers.

  • Great for zoning and stuffing a lot of things, especially when whiffing other ghost normals. You can even use backdash f.S as an emergency AA if you time it.
  • Can combo to 5H/2H for knockdown/float.

Gatling Options: f.S, 2S, 6S, 5H, 2H, 5D, 2D


  • Consecutive use of f.S will extend the range further in a chain since the ghosts will position themselves farther with each use. Loses the ability to combo to H and D, and is more suited for poking and harrassment than combo tools after a single use.
  • Pretty safe due to range and a low SD.
Version FRC Window Proration Guard Bar+ Guard Bar- Level
f.S N/A 90% 10 7 3
f.SS N/A 90% 10 7 3

f.S:

  • Staggers on CH (max 35F)

f.SS:

  • Staggers on CH (max 35F)

5H

Version Damage Guard Startup Active Recovery On-Block Invuln
5H 25 Mid 14 5 13 -4
5HH 25 Mid 14 5 15 -6

Slower normal amongst Zappa's triplets. Better for frame traps, and mostly sees use in c.S > 5H relaunches after floating with a 2H.

  • Mostly meant for damage and filler in combos. It has the same hitstun and blockstun as S normals, but generally launches the ghost out a bit farther from Zappa, making it better for combos where Zappa's been pushed away.
  • Since it has the cancel property of Zappa's ghosts, though, you can chain into 2S for mixup situations, which can create ambiguous situations when you start with this in conjunction with 6H.

Gatling Options: f.S, 2S, 6S, 5H, 2H


  • Has some good conversion properties since consecutive 5H's will reach even farther out than f.S(2,3).
  • You can then combo into 2H for ranged knockdowns, but be wary as going into this out of f.S from too close or too deep in the corner will cause this to whiff.
Version FRC Window Proration Guard Bar+ Guard Bar- Level
5H N/A 10 7 3
5HH N/A 10 7 3

5H: 5HH:

6S

Damage Guard Startup Active Recovery On-Block Invuln
28 Mid 14 6 20 -9

Generally only seen in air combos, as its startup and awkward angle don't make it particularly useful for the Anti-Air purpose you'd imagine.

  • It generally won't combo against grounded opponents either, so it's good if you want to chain into them and end with 236D for a big amount of orbs and getting them off of you with some damage.
  • Still has followup attacks like the rest.

Gatling Options: f.S, 2S, 6S, 5H, 2H, 5D

FRC Window Proration Guard Bar+ Guard Bar- Level
N/A 14 6 4

6H

Damage Guard Startup Active Recovery On-Block Invuln
30×3 High 16 5(3)5(10)5 8 +4,-11,-19

Absurdly fast overhead, especially considering its damage.

  • Will deal roughly 80 points of damage or more if you let all three hits rock. Has a great amount of range and will push back the opponent farther the more hits you allow.
  • Its animation and startup time are also eerily similar to 5H's, which can be cancelled into 2S as a low, creating a very ambiguous mixup situation.
  • If you RC the first or second hit, you'll be able to continue the combo and generally deal a knockdown. Despite that you cannot combo into this move or gatling into it from ghost normals, you can gatling into it from a 5P or 6P, the former of which self-cancels with the ghosts, and the latter gatlings to and from c.S, leading to a scary mixup when in range.
  • Fantastic tool, just note that it's unsafe on hit or block if you have fewer than 3 triplets (unless you time it with a curse item or triplet toss)
FRC Window Proration Guard Bar+ Guard Bar- Level
N/A 11×3 6×3 4
  • After Zappa turns his back all of the currently present triplets attack
  • Zappa's body has the same recovery regardless of # of triplets

2S

Version Damage Guard Startup Active Recovery On-Block Invuln
2S 18 Low 5 6 6 0
2SS 18 Low 5 6 8 -2

A short ranged low which by itself has less range than 2K, but doesn't have a prorate.

    • This is useful since although you can't gatling into Zappa's overhead, you have plenty of options to force the opponent to sit instead of trying to jump out.
  • 2S increases Zappa's number of lows to four when he has triplets, so this will make them stay honest. Gatlings into all other ghost normals (sans c.S), but will not combo into H normals.
  • Completely safe on block.

Gatling Options: f.S, 2S, 6S, 5H, 2H, 5D, 2D


Excellent to use in pressure further due to the behavior of ghosts starting normals from farther away the longer you are in a chain of them.

  • Just like 2S(1), you can't combo into other normals besides f.S or another 2S if you have one, but you can still combo into 236S and continue pressure/combos.
  • Still relatively safe on block.
Version FRC Window Proration Guard Bar+ Guard Bar- Level
2S N/A 5 7 2
2SS N/A 5 7 2

2S: 2SS:

2H

Version Damage Guard Startup Active Recovery On-Block Invuln
2H 25 All 14 9 14 +2
2HH 25 All 14 9 16 0

Knockdown and pressure tool that works best after a c.S or other short gatling before S and H.

  • It'll put them close to you and do a small amount of damage, less than 2D, but it also has frame advantage of block, making Zappa's ghost pressure scarier than it already is.
  • You can also link a c.S on hit to relaunch if you want to get a kill or just get them off of you. However, note that using 2H temporarily disables the ghost you use for longer than simply launching them, since you did just blow it up.

Gatling Options: 2H


Works just as well after f.S(1) and 5H(1,2), as well as after 2H(1).

  • Delaying your explosions can work as a frame trap, but the cost is pretty high since you'll be out of ghosts for a while, You can still link a c.S afterwards, and the knockdown will work from farther out than your standard 2D range, so keep this option in your pocket.
Version FRC Window Proration Guard Bar+ Guard Bar- Level
2H N/A 6 7 3
2HH N/A 6 7 3

2H: 2HH:

j.S

Version Damage Guard Startup Active Recovery On-Block Invuln
j.S 25 All 10 5 25

Good damage filler in aerial combos, since Zappa's air combos generally don't end in knockdown.

  • Combos from j.P and j.K, and combos into j.K and j.D for better conversion.
  • It can also work as an air to air due to its arc and relatively large hitbox. Note that like all of Zappa's air ghost normals, it is not an overhead.

Gatling Options: j.K, j.S, j.2S, j.H, j.D


  • Air followup versions will not gain the horizontal range like Zappa's grounded ghost normals.
  • Best for Air to Air and for creating some space, but Zappa generally does not want to spend much time airborne.
Version FRC Window Proration Guard Bar+ Guard Bar- Level
j.S N/A 10 7 3

j.S:

j.2S

Damage Guard Startup Active Recovery On-Block Invuln
18 All 7 6 8

Same animation as 2S in the air, more for space control and hitting people jumping up to intercept you since it's not an overhead.

  • Can be used as a jump in if properly spaced due to its disjointed nature, but again, Zappa rarely wishes to be airborne, and not being an overhead hampers this move's utility.
  • Chains into itself and j.S and j.H on hit, block, and whiff like the rest.

Gatling Options: j.S, j.2S, j.H

FRC Window Proration Guard Bar+ Guard Bar- Level
N/A 3 7 2
  • Level 1 Attack on block

j.H

Version Damage Guard Startup Active Recovery On-Block Invuln
j.H 25 All 19 9 17

Excellent tool for crossup shenanigans since the hitbox will linger in place after Zappa moves past or airdashes back in front of the opponent, creating tricky mixup situations.

  • It'll knock down and can also cover you during an aerial retreat, it just comes with the same risks as 2H.
  • It's also very vulnerable for Zappa after use, particularly if you use it with no ghosts present, so don't go too crazy with it.
  • You'll recover with enough time to airdash if done out of a super jump, so consider that, too.

Gatling Options: j.H


More or less just extensions of j.H(1) with the intent of putting more hitboxes in the way.

  • If the opponent is hit by consecutive 2H's, they'll be able to tech rather than getting a guaranteed knockdown, so be wise and wary.
Version FRC Window Proration Guard Bar+ Guard Bar- Level
j.H N/A 6 7 3

j.H:

  • Move will come out even if Zappa lands on frame 7 or later of the startup.

Special Moves


Please Don't Come Back

236P or 236K or 236S or 236H with Triplets (Air OK)

Version Damage Guard Startup Active Recovery On-Block Invuln
236P 16 All 15 see notes Total 39
236K/S/H 16 All 9 See notes Total 39 -6

A versatile move that gives the Triplets the ability to control a grand amount of the screen. Each version launches one of the ghosts near Zappa at a different arc depending on the button, and on hit, the ghost will possess the opponent if one isn't already haunting them.

  • Its FRC point at 10~11F circumvents its long recovery, and can be used to extend combos and guarantee a knockdown into another mixup situation. Just make sure a ghost is nearby when being used, or Zappa will simply go into a vulnerable animation without launching a hitbox. Extremely useful.

P version shoots a ghost straight up off screen, which then homes in on the opponent's horizontal position right over their head.

  • Great for oki immediately following a sweep, for turtling opponents, and for harrassing characters trying to play keepaway in the air.

K version drops a ghost that bounces forward a few times.

  • Great for oki, for covering a jump in (with an FRC), or for landing a ghost OTG if you feel like it.
  • Will bounce higher based on the height from which you executed the drop.

S version shoots a ghost straight ahead of Zappa, probably the most used version.

  • It goes the entirety of the field and zones the opponent completely.
    • Up close, it's great for pressure and as a combo tool when FRC'd. Lasts until it reaches the edge of the screen.

H version shoots a ghost at an upwards arc.

  • Good for close opponents trying to jump out, or far opponents trying to approach from the air.
Version FRC Window Proration Guard Bar+ Guard Bar- Level
236P 10~11F 0 7 3
236K/S/H 10~11F 0 7 3

236P:

  • Lasts for 2 bounces off the floor (78F when performed on the ground)
  • On frame 37 the ghost's horizontal position changes to match that of the opponent then drops straight down
  • For the ground version, startup of 53F to hit a standing opponent (tested on Sol)
  • Zappa is in CH state for entire duration
  • If Zappa has no ghosts, nothing is fired and has a total animation length of 49F on the ground, 41F in the air
  • FRC timing 10~11F
  • See note ※1

236K/S/H:

  • K version lasts for 3 bounces off the floor (49F for ground version)
  • H version lasts until it hits the floor (46F for ground version)
  • Zappa is in CH state during move
  • If Zappa has no ghosts, nothing is fired and has a total animation length of 49F on the ground, 41F in the air
  • See note ※1

Please Don't Come Back

236D with Triplets (Air OK)

Damage Guard Startup Active Recovery On-Block Invuln
16×3 All 11 see notes Total 52 see notes
  • Launches all ghosts Zappa currently has available, in the arcs of the K, H, and S versions of the move, with ascending priority, meaning that with only one ghost, you'll launch only in the S arc.
  • Useful if the opponent is in the air, as it has a tendency to connect all three hits and knock down the opponent if they're close enough.
  • It launches the ghosts more from the position of the last ghost used in a normal chain, meaning that they all are launched closer to the opponent. Its FRC point at 16~17F is later than the other versions, so be sure to learn that since Zappa will be without cover once he uses the move.
FRC Window Proration Guard Bar+ Guard Bar- Level
16~17F 0 7×3 3
  • Zappa is in CH state during move
  • Active frames are the same as the K, S, and H versions
  • Frame Adv varies depending on number of ghosts remaining: [3 ghosts (K,S,H): -15, 2 ghosts (S,H): -16, 1 ghost (S): -17]
  • Total length for air version: 54F
  • See note ※1

Curse Items

Automatic while haunting

Version Damage Guard Startup Active Recovery On-Block Invuln
Banana 0 Low 99
Golf Ball 30 All 38
Potted Plant 25 All 1 43

The moment an opponent gets possesed by a ghost, one of the three items will launch towards the target.

  • Each of the three has a different set of properties, but one of the three will be randomly launched at 1F, 121F, 241F, and 361F of Haunting.
    • This is extremely useful if the opponent is applying pressure but is still haunted, as items will spawn even if Zappa is blocking. Keep this in mind, and you can easily figure out how to break out of pressure.
  • All three items deal 0 chip damage.

The banana will float on hit. It will come from the upper corner of the screen behind Zappa, so it will take a short amount of time to reach the opponent. Since it knocks down, you can go into an air combo on hit if close enough. It will also ignore OTG.


The golf ball deals a good amount of damage, but bounces slowly across the floor until it makes contact. You can react very easily to this and plan your combos accordingly.


The flowerpot is the fastest item, as it will hone in on the opponent when spawned, and will plummet the opponent down on air hit. It will tack on damage pretty quickly.

Version FRC Window Proration Guard Bar+ Guard Bar- Level
Banana N/A 0 5 2
Golf Ball N/A 0 6 4
Potted Plant N/A 0 7 2

Banana:

  • Knocks down on ground hit

Golf Ball: Potted Plant:

  • Slams down opponent on air hit

I Was Lonely After All...

214P with Triplets

Damage Guard Startup Active Recovery On-Block Invuln
Total 32

This move will recall a ghost that is either attached to your opponent or is still out after you threw it using a move. If you do not have a ghost attached or out, you will go into a lengthy recovery animation without doing anything.

  • Very useful for getting lingering ghosts back to your arsenal, but it must be used cautiously due to the lengthy recovery time.
  • Zappa is in a counter hit state during use, so again, be careful.
  • Each ghost has a specific ID, which is the queue the ghosts are ordered in when you first summon them (#1 being closest to Zappa and #3 being the furthest).
    • Every time Zappa performs a ghost attack, the ghost that is used is the ghost at the front of the queue (at first, this is ghost #1, but this will change as explained later).
    • When Zappa expends a ghost, the ghost at the front of the queue is used and the other ghosts 'shift up' so that the next ghost moves to the front of the queue.
    • Whenever Zappa collects a ghost, either through 214P or manually picking them up, that ghost travels to the back of the queue. However, it keeps its ID.
    • Whenever multiple ghosts are expended, 214P will recall the ghost with the LOWEST ID. In other words, if ghosts #1 and #2 are out, 214P will first recall ghost #1. The next will recall ghost #2.
    • Keep in mind that this completely disregards the order in which you actually used the ghosts. This is especially important when the opponent is haunted.
    • For example, if ghost #1 is on the opponent, ghost #2 is floating in the field, and ghost #3 is with Zappa, then the recall will call the ghost off the opponent (ghost #1) and end the haunting. However, if ghost #2 is on the opponent and ghost #1 is floating in the field, then the recall will call the ghost floating in the field (ghost #1), leaving the haunting intact.
    • It may be important to keep track of how you have been using your ghosts in order to avoid prematurely ending a haunting on an opponent.
FRC Window Proration Guard Bar+ Guard Bar- Level
N/A
  • Triplets begin returning on 18F
  • Recalling a Haunting Triplet ends Haunting
  • Zappa is in CH state from 1~20F

Notes

  1. Knocks down opponent on ground hit. Triplet disappears after attack. Triplet disappears for 104F, after which they stay in place for 122F before returning. Collect the triplet by touching them.
  2. Haunts opponent on hit for 481F. See more here.

Normal Moves


Sword normals will push the sword farther away from Zappa with each use.
This keeps going until the sword is a little farther than half screen away.
If Zappa is farther from the opponent than this distance, the sword will not advance laterally.
On hit or block, despite the sword's position, Zappa is still pushed back.
Doing nothing with the sword for about a second will make it return to his position.

c.S

Damage Guard Startup Active Recovery On-Block Invuln
36 All 5 4 14 -4

Sword Zappa's main punish starter, due to its damage and gatling options. It has the quickest startup of all of Zappa's sword normals, but is probably one of the least used due to the nature of the sword itself.

  • Forces standing on hit allowing for Zappa's combo game to widen slightly, so keep that in mind.

Gatling Options: 6P, f.S, 2S, 5H, 2H, 6H, 5D, 2D

FRC Window Proration Guard Bar+ Guard Bar- Level
N/A 0 7 3

f.S

Damage Guard Startup Active Recovery On-Block Invuln
30 All 8 2 19 -4

A major distance poking tool which will probably see more use as a combo starter than c.S since you'll run your mixup game with the sword from a distance.

  • Pushes the sword forward about 1/8th of the screen, completely laterally, which is good for covering options without committing to raising or dropping the sword's height.
  • Although it has good gatling options, it has a high amount of recovery, so be careful.

Gatling Options: 2S, 5H, 2H, 6H, 5D, 2D

FRC Window Proration Guard Bar+ Guard Bar- Level
N/A 90% 0 6 4

5H

Damage Guard Startup Active Recovery On-Block Invuln
30×2 All 9 2(10)3 16 -2

Good damage and two hits can make this a powerful tool for ending combos into Swipe, especially when Zappa is being pushed out too far to continue any combos.

  • It reaches pretty far in neutral (about a 1/4 of the screen by the second hit), and has surprisingly little recovery, though its active frames still lend to Zappa being vulnerable.

Gatling Options: 5D, 2D

FRC Window Proration Guard Bar+ Guard Bar- Level
N/A 0 6×2 4

6H

Damage Guard Startup Active Recovery On-Block Invuln
29,15 High/Air→All, Low/Air 13 24,6 2 +4

This might be one of the weirdest moves in the game. 6H functions as a thirteen frame overhead during its first active hitbox, but becomes a low late into its active frames. This makes it a terrifying option that can come from nearly of any Zappa's normals, and it special cancels, usually into the swipe for knockdown. Keep in mind, though, that the second hit has too little hitstun to combo out of it, but it is still a good option to use occasionally.

6H will usually raise the sword a bit before dropping downwards at a 45 degree angle, towards the opponent. Keep this in mind, as if the sword is too high and the opponent is grounded, they may be able to low profile the move and escape your pressure, and it may whiff if used improperly. Its best uses are generally after a f.S, 2S, or 2H(1), leading to mixup or continuing a combo.

FRC Window Proration Guard Bar+ Guard Bar- Level
N/A 0 6,7 4,2
  • Startup to hit crouching opponent is 22F (tested on Sol)
  • Opponent must guard: High from 13~28F, All from 29~36F, Low from 37F onwards

2S

Damage Guard Startup Active Recovery On-Block Invuln
22 Low/Air [All] 9 3 15 -6

Zappa's only ranged low, but a ranged low is a blessing for anybody who gets one.

  • Will drop the sword's height on use, perfect for comboing into 2H and ensuring that your grounded sword combos connect.
  • Note that 2S does not hit low if the sword is not at its default grounded height. It still has its uses when its not, but opponents who are aware won't need to worry about Zappa's mixup as heavily.

Gatling Options: 5H, 2H, 6H, 5D, 2D

FRC Window Proration Guard Bar+ Guard Bar- Level
N/A 85% 0 7 2
  • Must only be blocked low if the Sword attack comes out at its default grounded height

2H

Damage Guard Startup Active Recovery On-Block Invuln
30×2 All 7 14,8 9 +2

Excellent Anti-Air and extremely versatile all around, 2H will propel the sword upward and out about 1/3 screen on, use, working as two hits and forcing anybody in the air to take a seat.

  • Its hitbox is very large and difficult for a lot of characters to manuever around, and will make opponents think twice about trying to get around the sword from the air.
  • In combos, 2H shows its use by being a major combo and pressure tool.
    • Its hitstun is extremely high and works in conjunction with j.S, 6H, and its jump cancel to work in a scary mixup situation. On the first hit, you can jump cancel and delay a j.S to start some of Zappa's longer sword combos, or go into 6H > Swipe on hit to knock the opponent down and gain two orbs.
    • If the opponent is airborne in your combos, 2H will generally chase them up high enough to score another Swipe for more damage. Great move all around.

Gatling Options: 6H

FRC Window Proration Guard Bar+ Guard Bar- Level
N/A 0 6×2 5
  • Zappa is in CH state during move
  • Frame Adv is -12 if 2nd hit misses opponent

j.S

Damage Guard Startup Active Recovery On-Block Invuln
26 High/Air 7 3 18

This normal is the defining feature of what propelled Zappa and the sword to the top of the tier list. With proper usage, Zappa gets access to a near full screen, 11 frame overhead, which leads to good damage and knockdown with only 25% meter.

  • Tends to see most of its use after 2H due to it being one of Zappa's few jump cancellable sword normals, but on oki, it's just as scary when used in conjunction with 2S.
  • It will put fear into your opponents, so take advantage of it.

Gatling Options: j.K, j.H, j.D

FRC Window Proration Guard Bar+ Guard Bar- Level
N/A 80% 0 7 2

j.H

Damage Guard Startup Active Recovery On-Block Invuln
32 High/Air 9 9 15

Mainly a combo tool and occasional crossup tool.

  • FRC point allows for Zappa's extended air combos and will force the opponents to think twice about when to block low if used properly.
  • If you dash over the opponent and use j.H while the sword is close to you, the delay in its placement will keep the sword behind, acting for a gimmicky crossup which you generally won't get much damage out of, but can be useful for breaking guards every now and then. You'll be using this for damage more than anything.
FRC Window Proration Guard Bar+ Guard Bar- Level
9~11F 90% 0 7 2

Special Moves


This Has Gotta Hurt

236S with Sword

Version Damage Guard Startup Active Recovery On-Block Invuln
236S 20 Mid 12 16 13 -12
236S~H 45 Mid 9 12 26 -24

Important move, as it brings the sword back to Zappa's position immediately.

  • Punishable on hit by some characters if it doesn't counterhit but the threat of the followup can make the enemy scared to go for a punish. The FRC point after making contact lets you start/continue a combo on hit or perform a 50/50 mixup on block.
  • If the move connects on its last active frame it will not have an FRC point or followup but the recovery will only be 13 frames making the move plus on block.
  • Avoid FRC'ing this move with the H button, as if you miss you'll likely get the very unsafe followup instead.
  • Note that you can hold 4 or 6 to change the distance traveled by the move.

  • The followup is only guaranteed when the first hit of 236S counter hits, or when you have meter to cancel. Otherwise, the two moves will not combo.
  • On hit, however, this move will knock down and net you three orbs. You can RC it after having it blocked to continue pressure, or throw it out occasionally against players not expecting it.
    • Be careful, as you will be punished if it is blocked.
Version FRC Window Proration Guard Bar+ Guard Bar- Level
236S 1~3F of recovery after hit or block 14 6 4
236S~H N/A 10 7 3

236S:

  • Staggers on ground CH (max 35F)
  • Zappa has 28F recovery on hit or block
  • Can cancel into Followup from 12F of recovery onwards on hit or block
  • If the attack hits really late into the active frames you cannot cancel this move into Followup
  • +1 Soul on hit

236S~H:

  • Zappa is in CH state during move
  • +3 Souls on hit

Please Fall

623H with Sword

Damage Guard Startup Active Recovery On-Block Invuln
40 All 10 9 29 -21 1~12F Upper Body, Throw

This move will return the sword to Zappa and deal a fair amount of damage.

  • The hit itself will follow the sword, meaning that if you use this move while the sword is away from Zappa, the hitbox will move from the sword towards Zappa, but will only be active for a short period of time.
  • Due to this, you should try to use its FRC point at 13~16f it to make it safe.
    • On hit, you can FRC it and continue to combo, as the sword will maintain its position from where you FRC'd it.
    • Conversely, RC'ing the move will still have the sword return to Zappa's position, so your followup combos will change, and may be more effective should you choose to burn 50% over 25%.
  • Sword 623H also has a good amount of upper body invul, so you can use it to get opponents off of you from the air if the sword is nearby. You may want to cancel into this after a short close string (2P2K2D) to get the sword back to your position without compromising your knockdown.
FRC Window Proration Guard Bar+ Guard Bar- Level
13~16F 90% 14 6 4
  • +2 Souls on hit

Come Close, and I'll Kill You

63214H with Sword

Damage Guard Startup Active Recovery On-Block Invuln
30 All 17 4 16 -3

The most used special with sword. It grants 2 orbs on hit, and knocks down opponents in the corner.

  • Swipe works after 2H and 6H(1) to knock them down and rerun the vortex, but note that when the opponent is not in the corner, they will be able to tech after the wallbounce.
  • Swipe will also move the sword slightly forward, but is good for maintaining pressure if the sword is at its max range.
  • The FRC point can be used to extend combos and make the move safer in case it whiffs, but is also useful for forcing a mixup situation in unexpected scenarios.
    • Out of the corner though, you may want to avoid ending your combos with this and simply go for resets instead.
FRC Window Proration Guard Bar+ Guard Bar- Level
17~20F 14 6 4

Coming Through

j.236H with Sword

Damage Guard Startup Active Recovery On-Block Invuln
24×N All 12 Until landing 23 after landing
  • Interesting move with a very large hitbox, that will track the sword to Zappa's position when used in the air. It does a moderate amount of damage and can be used for some silly combos, but mainly sees use as returning the sword to Zappa while airborne.
  • When used, the sword's spin will create a large hitbox that moves towards Zappa, and can catch people trying to get from the sword to you, as it is active during the entirety of Zappa's air time.
  • It is incredibly unsafe and will lose to most 6Ps, so be wary, and be ready to use its FRC point when you hit the ground.
FRC Window Proration Guard Bar+ Guard Bar- Level
1~2F after landing 6×N 4×N 3
  • Sword first hits below Zappa
  • Sword starts spinning on hit or block (1 full revolution takes 8F)

Normal Moves


c.S

Damage Guard Startup Active Recovery On-Block Invuln
40 Mid 10 11 0 +6

Powerful normal which leads into damage and pressure.

  • It is on the slower side, however, and at this range, Zappa's P and K normals do still have their place.
  • Its hitstun is high enough that you can combo into 6H against most standing characters, and its activation range is a bit deceptive.

Gatling Options: 6P, f.S, 2S, 5H, 2H, 6H, 5D, 2D

FRC Window Proration Guard Bar+ Guard Bar- Level
N/A 14 6 4

f.S

Damage Guard Startup Active Recovery On-Block Invuln
36 Mid 9 6 16 -5

Good for pokes and pressure starting. Overall a good move balancing speed and range in Raou's arsenal.

  • Can be combo'd into 2S and 5H for combo continuations and pressure.
  • Also good for tacking in a bit of damage at the end of 6H loop into Last Edguy.

Gatling Options: 2S, 5H, 2H, 5D, 2D

FRC Window Proration Guard Bar+ Guard Bar- Level
N/A 14 6 4

5H

Damage Guard Startup Active Recovery On-Block Invuln
48 Low 13 9 13 -3

Tied with 6H for Raou's longest reach, 5H is an excellent ranged low which works well to end, start, and link combos.

  • Against a good portion of the cast, you can link into a Darkness Anthem (K) followup in order to lengthen combos. Otherwise, you use it to knock down, get in, and run the train.

Gatling Options: 2H, 5D, 2D

FRC Window Proration Guard Bar+ Guard Bar- Level
N/A 15 6 5

5D

Damage Guard Startup Active Recovery On-Block Invuln
30 High 24 5 8 +4

Raou's only grounded overhead, but its speed, range, and Frame Advantage make it frightening.

  • It takes so few points from the Guard Bar that it leads to horrifying damage on hit, so this will always keep the opponent on their toes, and can still be special cancelled just like Zappa's regular 5D.
  • You can go for the usual Impossible Dust j.D and land into a longer combo usually dealing 50%+, or go for the harder Last Edguy version. Use this.
FRC Window Proration Guard Bar+ Guard Bar- Level
N/A 11 6 4

6H

Damage Guard Startup Active Recovery On-Block Invuln
76 Mid 17 6 24 -11

Pivotal combo tool.

  • Damage is comparable to Last Edguy, and causes floorslide on hit, looping into Darkness Anthem (K) followup and back.
    • This combo usually works as xx > [(dash) 6H > 236P~K] * 2-4.
  • Its vertical range can catch jump outs, but its a bit risky due to its startup, and many characters can crouch under it when used too close.
FRC Window Proration Guard Bar+ Guard Bar- Level
N/A 20 6 5
  • Attack is fully extended on 20F

2S

Damage Guard Startup Active Recovery On-Block Invuln
36 Low 7 3 11 0

Good ranged low poke that doesn't reach as far as 5H, but starts much faster and combos into 5H, or goes into 5D or another option for frame traps.

Gatling Options: 5H, 2H, 5D, 2D

FRC Window Proration Guard Bar+ Guard Bar- Level
N/A 8 7 3

2H

Damage Guard Startup Active Recovery On-Block Invuln
68 Low 19 8 12 -1

Extremely slow move meant for frame traps and jump out attempts, and occasional combo filler due to its damage.

  • Nothing combos into it due to its startup, but it has a huge verical range, and can combo into Darkness Anthem and its followups when close enough.
  • Useful against some characters as a punish starter, usually midscreen.

Gatling Options: 5D, 2D

FRC Window Proration Guard Bar+ Guard Bar- Level
N/A 15 6 5

j.S

Damage Guard Startup Active Recovery On-Block Invuln
35 High/Air 7 3 15

Excellent jump in due to its range and low hitbox.

  • You can gatling to and from j.K for airdash combos, or into j.H for a launch against an already airborne opponent.

Gatling Options: j.P, j.K, j.H, j.D

FRC Window Proration Guard Bar+ Guard Bar- Level
N/A 8 7 3

j.H

Damage Guard Startup Active Recovery On-Block Invuln
45 High/Air 16 6 13

Alternative jump in option that launches on hit and works well for punishes.

  • It leads into Darkness Anthem air loops, and 6H loops in the corner.
  • Its hitbox reaches very low to the ground, and ground bounces on air hit, lending itself to loops.
  • You can use it to cover a wide amount of vertical space in front of you, especially during an aerial backdash.

Gatling Options: j.D

FRC Window Proration Guard Bar+ Guard Bar- Level
N/A 11 6 4

Special Moves


Darkness Anthem

236S with Raou (Air OK)

Version Damage Guard Startup Active Recovery On-Block Invuln
236S 35×2 Mid 25 18 8 +7
j.236S 35×2 Mid 25 18 8 +7

Amazing. Darkness Anthem is used for combos, oki, and scaring your opponent into making the wrong decision.

  • By itself, this move deals a good amount of hitstun, is plus on block, is untechable on air hit, deals FOUR times normal chip damage, hits twice, and leads to huge damage, just like the rest of Raou's moveset.
  • Of course, this is just the base of its functionality. Darkness Anthem's strength lies heavily in its followups.

  • The air version is nearly identical to the grounded version, Air Darkness Anthem has the same followups and utility, with the main difference being its combo potential.
  • You can use air Darkness Anthem after a j.H to hold them in the air, and continue your combos. This works midscreen with dash momentum, as well as in the corner. This is extremely useful for Dust combos, or those starting with j.H or 2H.
Version FRC Window Proration Guard Bar+ Guard Bar- Level
236S N/A 14×2 6×2 5
j.236S N/A 14×2 6×2 5

236S:

  • Can cancel into Followup Attack from 24~35F
  • Darkness Anthem projectile is still active after inputting the Followup Attack
  • Chip damage x4
  • Max 2 hits
  • Projectile appears on 23F

j.236S:

  • Can cancel into Followup Attack from 2~35F
  • Followup Attack starts up on 36F
  • Projectile appears on 23F
  • Listed Frame Adv is from TKing attack (startup 28F, total 50F)

Darkness Anthem Followup

Darkness Anthem > P or K or S or H

Damage Guard Startup Active Recovery On-Block Invuln
50 Mid 15 34(2)20 Total 38 0

Darkness Anthem's followups only add ultility to the already powerful move, turning them into a nearly full screen projectile based on the input.

  • Every single version launches the opponent high on hit with enough untechable time to knock down. This usually allowing room to go into 6H loop.
    • P followup shoots the projectile straight forwards, going full screen. Great for pressure.
    • K followup shoots at a downwards angle, hitting low profile attempts, and removing OTG on hit, making it staple for 6H loop.
    • S followup shoots at an upwards angle, catching jump out attempts and resetting pressure.
    • H followup goes forwards like P, but much more slowly, making it better for close range pressure.

All air followups are the same, and can be used for similar loops.

FRC Window Proration Guard Bar+ Guard Bar- Level
N/A 20 6 4
  • Zappa is in CH state during move
  • Chip damage x0.375
  • Max 1 hit
  • Darkness Anthem Attack disappears on 13F (if it hasn't already)

Last Edguy

214S with Raou (Air OK)

Version Damage Guard Startup Active Recovery On-Block Invuln
214S 80 Mid 4 12 37 -30 1~4F All
5~7F Strike
j.214S 80 All 4 12 38+Until Landing+3 -35 1~4F All
5~7F Strike

Pants-shitting. Last Edguy is a Dragon Punch rivaling the strength and terror of Volcanic Viper.

  • 4 frame startup, enormous vertical and horizontal range, eighty base damage, and enough hitstun to usually knock down.
  • Gives Zappa a reliable wakeup option and is especially useful in combos. RC'ing it leads to even higher damage than Raou normally gets, and you can do hilarious damage with full tension by doing 5-6 of these in a single combo. Turn Zappa's terror back on them.

Air version is just as damaging, but less useful than the grounded version.

  • Works more or less the same, but will cut Zappa's air momentum on use, and is even less safe on block due to the added recovery.
  • It might be useful to end air combos if it will kill, but otherwise it's not particularly useful.
Version FRC Window Proration Guard Bar+ Guard Bar- Level
214S N/A 20 6 5
j.214S N/A 20 6 5

214S:

  • Zappa is in CH state during move
  • Chip damage x0
  • Attack is fully extended on 10F

j.214S:

  • Listed Frame Adv is from TKing attack (startup 7F)
  • Zappa is in CH state during move
  • Chip damage x0
  • Attack is fully extended on 10F

Overdrives


Bellows Malice

632146S with Raou

Damage Guard Startup Active Recovery On-Block Invuln
40×10 Mid 5+10 27 Total 37 +13 1~5F All

A terrifying overdrive which has just as much utility on block as on hit.

  • Bellows Malice hits several times for high amounts of damage, and has a low enough recovery that you can follow it up pretty easily.
    • However, it has a large deadzone in front of Zappa, so instead of a reversal, it's better used from further away, usually around 1/3 to 1/2 screen.
  • Excellent for ending Raou's longer combos if you have the meter.
  • Inversely, on block, this move absolutely tears through opponents. Each hit deals double and a half chip damage, draining opponents' health and cranking their guard bar to flashing if they don't FD, and eating more than half their tension bar if they do.
  • Use Bellows Malice wisely with Raou and he becomes even more dangerous.
FRC Window Proration Guard Bar+ Guard Bar- Level
N/A 20×10 6×10 5
  • Zappa is in CH state during move
  • Chip damage x2.5

Universal Mechanics

Ground Throw

Damage Guard Startup Active Recovery On-Block Invuln
60 45 pixels

Throws the opponent opposite of the direction your threw them in. Wallbounces and usually knocks down.

  • You can sometimes followup with OTG summon when naked, or link into various combos dependent on summon if they wallbounce.
  • Anji, Faust, Testament, Dizzy, Millia, Baiken, Bridget, Jam, Kliff, and May will wallbounce even without hitting a corner if you throw them from midscreen. This allows Raou to combo into orb loops after a throw even outside the corner with 50% meter.
FRC Window Proration Guard Bar+ Guard Bar- Level
N/A 50% 6
  • Sends opponent on opposite side of throw direction

Air Throw

Damage Guard Startup Active Recovery On-Block Invuln
60 88 pixels

A good airthrow which leads to guaranteed OTG Centipedes if you time it correctly.

  • Because you'll get j.H if you whiff, you generally want to OS with j.P+H, which is a much safer option.
  • One of your most reliable AA options due to the nature of Zappa's randomness.
FRC Window Proration Guard Bar+ Guard Bar- Level
N/A 50% 6
  • Sends opponent on opposite side of throw direction

Dead Angle Attack

Damage Guard Startup Active Recovery On-Block Invuln
25 All 15 4 15 -5 1~20F All
21~31F Throw

Using the same animation as 2H, Zappa's Dead Angle is a decent gtfo move, with a big hitbox and decent speed.

  • Unsafe at close range, but that's how it goes with most DAAs.
  • Will combo into run up 236P if it knocks down on regular hit, but not on counter hit.
FRC Window Proration Guard Bar+ Guard Bar- Level
N/A 50% 10 7 3

Force Breaks

Etiquette Starts Here

214D

Damage Guard Startup Active Recovery On-Block Invuln
30 High 16 5 11 +3

Etiquette is an incredibly useful move for mixup and for orbs. It's an extremely fast overhead, something you'd expect from Millia, is plus on block, and grants two orbs on hit.

  • It also unsummons whatever you have at the moment, which can be a godsend if the sword or dog are far from you, or your ghosts are currently out of commission. Because of this, you can OTG centipedes immediately afterwards, for a guaranteed three orbs if necessary.
  • Its range is slightly farther than 5D, and can be combo'd after 2D or S attacks, as well as thrown out in a string. Great move.
FRC Window Proration Guard Bar+ Guard Bar- Level
N/A 15 6 5
  • Slams down opponent on hit
  • Ground bounces on CH
  • Zappa is in CH state during move
  • Removes Zappa's current summon on 1F
  • +2 Soul on hit

Overdrives

Birth!!

632146H

Damage Guard Startup Active Recovery On-Block Invuln
40×4 Mid 1+11 8 30 -15 1~19F All
20~21F Strike

Excellent for damage and orbs, but very wonky as a reversal, despite its beefy invincibility, due to its incredibly slow startup after the flash.

  • You can combo into it fairly easily, mainly after 2D, and dash up with OTG Centipedes afterwards as usual. However, using this as a wakeup option, while more reliable than hoping for normal Centipedes, will only work if the opponent has committed to a lengthy oki option.
  • Note that it will also remove Zappa's current summon, including Raou. Use this move wisely.
FRC Window Proration Guard Bar+ Guard Bar- Level
N/A 14×4 6×4 4
  • Removes Zappa's current summon on 1F
  • +1 Soul per hit

Instant Kill

I'm Scared...

During IK Mode: 236236H

Damage Guard Startup Active Recovery On-Block Invuln
Fatal 30 pixels 4+2 35 10 1~5F Strike

VERY VERY FRIGHTENING

FRC Window Proration Guard Bar+ Guard Bar- Level
N/A
  • IK Mode activation: 76F

Colors

To select your color, press the corresponding button while in the designated "color set". Color sets can be toggled through by hitting the Respect button.

  1. Only selectable on the Arcade and PC-Rollback versions of the game.
  2. Available on home ports, and are selected by pressing the Rec. Enemy button on the Slash or Reload color sets, respectively. Gold characters are powered up versions, Shadow characters have infinite tension. Both are banned from tournament play.


Navigation

To edit frame data, edit values in GGACR/Zappa/Data.
Systems Pages