< HNK
Overview
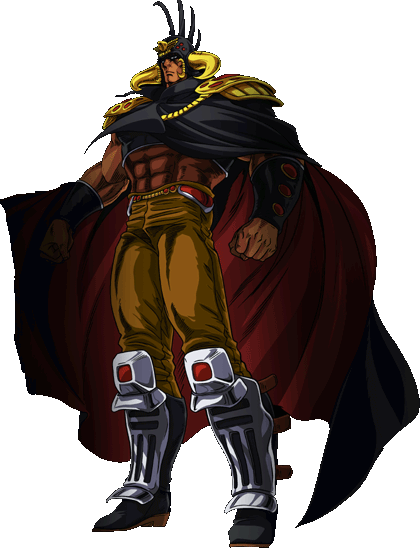
Raoh is HnK distilled to an essence. A ferocious combo-focused powerhouse, Raoh commands a terrifying presence on the battlefield with his ability to convert every hit he gets into a full Touch of Death A single combo that will defeat the opponent even from full health. combo, regardless of resources, screen position, or even starter.
Raoh's gameplan is centered around his Sai GuardAllStartup21RecoveryAdvantage- hitgrabs, which are unique moves where Raoh grabs his opponent, drags them to the floor, and shoves a Sai through both their foot and his own. Both Raoh and his opponents are pinned to the ground in Sai state, which Raoh gets just enough time to perform several 2A hits followed by a Banishing Strike, which he can then loop into another hit of his Sai. From here, Raoh can end the round with a lengthy and inescapable ToD combo as he continually routes in and out of Sai. Raoh can convert into Sai on almost every single hit he can get, giving him peerless damage potential and massive threat in neutral. He is, without question, the hardest hitting character in a game of extremely hard hitters.
Unfortunately, actually doing Raoh's combo routes are some of the most difficult executional challenges this game can offer. Not only are they quite long, but they often involve multiple difficult techniques to keep them stable. Raoh's ToDs are also character specific, requiring the player to know a vast array of potential routes in order to optimize him. While Raoh can convert every hit he gets into Sai, this requires keen reflexes and match knowledge at almost every point of the round. Simply put, Raoh requires a huge amount of executional prowess and in-game awareness to make the most of. You cannot turn you brain off while playing him at all.
Raoh's neutral and defense are similarly difficult. His neutral is sluggish thanks to his slow movement speed, though it can still demand respect thanks to the threat of Sai behind any stray hit. His defense has no upsides though, with a horrible backdash, god awful abare, mediocre reversals, and more. Mastery of system mechanics is a must to not be put in the corner and defeated repeatedly.
As the master of the Hokuto Style, Raoh demands similar levels of mastery to be played. If you're up to the challenge, then the thrill of playing him and the sheer adrenaline rush of performing his ToDs will keep you coming back for more. Even the gods will quake in fear of your fists! Raoh
 |
| Damage Taken |
| 90% |
| Jump Startup |
| 4f |
| Backdash |
| 30f |
Pros and Cons
![]() Raoh is a slow bruiser with a high skill floor that can convert almost any hit to a kill.
Raoh is a slow bruiser with a high skill floor that can convert almost any hit to a kill.
Pros
Cons
- You Are Already Dead: Roah's incredible combo structure, high base damage and exceptional use of resources allows him to kill every character in the entire game off of a single hit. If you get caught by a good Raoh, prepare to die.
- Ken-Oh Conversions: Roah's Air Sai
 GuardAll?Startup21RecoveryAdvantage- is one of the most incredible combo starters in fighting game history, allowing him to take pretty much any hit he gets and instantly maximize the return. Strong Roah players can route into this off of any random hit, making Roah's neutral surprisingly threatening despite his sluggishness.
 - Meter Advantage: Traveling Combo From Hokuto no KenHitting the opponent OTG until death after a 55 hit air combo or a ground combo ending with a Banishing Strike.s recover a large amount of Boost and Aura while granting very little to his opponent. Roah can use his meter to extend his combos or set up for Basuke loops to close out rounds.
- Star Slicer: Raoh has decent star reduction ability, and has easy 3 star combos.

- Critical Matchup Holes: Raoh has bad matchups against
 Toki and
  Rei, two of the strongest and most popular characters in the game.
 - No Backdash: Raoh's "Kliff dodge"
 GuardStartupRecoveryTotal 48Advantage- is useless and will often result in your demise if used accidentally.
 - Poor Defense: In order to escape pressure, Raoh must spend meter. He's reliant on Musou Tensei
 GuardN/AStartup4RecoveryAdvantage- parries and power–up stocks to reclaim his turn. To make matters worse, he can be crossed–up while cornered.
 - Middling Mix: Thanks to his lumbering frame and lack of jump–cancelable normals, Raoh can't incorporate F-Shiki Sometimes known as "Fuzzy Overhead". When you are in blockstun, you can switch high/low blocking, but your blocking animation and hurtbox does not change until you leave blockstun or block another attack. F-Shikis take advantage of this and use overheads that would miss on crouching characters, but not on standing characters. or left/right mixups like other top tiers can. It can be tricky to score a hit to start his combos.
- Execution: While Raoh boasts the ability to convert most any touch into a kill, doing so is very difficult even at the highest level of play - even top Raoh players will drop combos due to their reliance on character-specific routing, tight links, and more. Without Raoh's ability to threaten a kill off of the few good hits he'll be getting, his strengths diminish significantly.


Unique Mechanics
Guard Switch Lag
In Hokuto no Ken, there is guard delay when swapping from high to low block. It is not exactly well-documented, but the working theory is that your block position is locked during hitstop. For example, if Kenshiro does 236A and boosts into a 2B, the 2B is unblockable if you stand block the 236A. This is a problem for Raoh especially, as he is taller than most characters crouching, making him more susceptible to instant overheads.
 GuardStartup27Recovery43 totalAdvantage- grants Raoh one stock, up to a maximum of three. These power–up several of Raoh's normal and special moves. Having stocks for enhanced moves available opens up many combo options, and also forces your opponent to adjust their play as well.
Normals
c.A
c.A


| Guard | Damage | Startup | Active | Recovery | On-Block | Star Damage |
|---|---|---|---|---|---|---|
| All | 7 | 6 | -4 |
A short elbow jab. Very poor reach, but still can be used as an anti-air sometimes.
| On-Hit | Boost Gain | Aura Gain | GC | Level |
|---|---|---|---|---|
c.B
c.B


| Guard | Damage | Startup | Active | Recovery | On-Block | Star Damage |
|---|---|---|---|---|---|---|
| All | 8 | 7 | -5 |
A kick to the shin. Can cancel into itself. Mostly used as a combo part.
| On-Hit | Boost Gain | Aura Gain | GC | Level |
|---|---|---|---|---|
c.C
c.C


| Guard | Damage | Startup | Active | Recovery | On-Block | Star Damage |
|---|---|---|---|---|---|---|
| High | 11 | 2 | -10 |
- Chargeable with a Powerup Charge.
A strong overhead punch. Doesn't hit crouching opponents. Used mostly in combos to connect to a Banishing Strike. Holding C with a powerup stock available grants Super Armor and makes it unblockable.
| On-Hit | Boost Gain | Aura Gain | GC | Level |
|---|---|---|---|---|
c.D
c.D


| Guard | Damage | Startup | Active | Recovery | On-Block | Star Damage |
|---|---|---|---|---|---|---|
| All,Low | 9 | 4()10 | -11 |
A knee followed by a drop kick. Both hits are cancelable, and the second hits low. The first hit can be a good spot to cancel into 6B as the startup animation looks the same as the second hit.
| On-Hit | Boost Gain | Aura Gain | GC | Level |
|---|---|---|---|---|
f.A
f.A


| Guard | Damage | Startup | Active | Recovery | On-Block | Star Damage |
|---|---|---|---|---|---|---|
| All | 7 | 6 | -6 |
A quick jab while advancing forward. Mostly used in Traveling/Basuke combos. Can be used as an anti-air sometimes.
| On-Hit | Boost Gain | Aura Gain | GC | Level |
|---|---|---|---|---|
f.B
f.B


| Guard | Damage | Startup | Active | Recovery | On-Block | Star Damage |
|---|---|---|---|---|---|---|
| All | 8 | 7 | -5 |
A light kick. Fairly fast execution and good range. Good for zoning and as an anti-air.
| On-Hit | Boost Gain | Aura Gain | GC | Level |
|---|---|---|---|---|
f.C
f.C


| Guard | Damage | Startup | Active | Recovery | On-Block | Star Damage |
|---|---|---|---|---|---|---|
| All | 18 | 4 | -13 |
- Chargeable with a Powerup Charge.
A two-handed punch. Identical to Kenshiro's far C, but due to Raoh's height it does not hit crouching opponents and is much less useful. Holding C with a powerup stock available grants Super Armor and makes it unblockable.
| On-Hit | Boost Gain | Aura Gain | GC | Level |
|---|---|---|---|---|
| Launch |
- Chargeable with a Powerup Charge
f.D
f.D


| Guard | Damage | Startup | Active | Recovery | On-Block | Star Damage |
|---|---|---|---|---|---|---|
| All | 11 | 6 | -13 |
A sidekick. Its long range makes it good for zoning, but it has very long recovery. Can chain into a Banishing Strike by canceling the startup of 2D(input as D > 2CDCD or D > delay 2CD), making it a key move in combos.
| On-Hit | Boost Gain | Aura Gain | GC | Level |
|---|---|---|---|---|
2A
2A


| Guard | Damage | Startup | Active | Recovery | On-Block | Star Damage |
|---|---|---|---|---|---|---|
| All | 6 | 5 | 6 | 6 | -4 | 0 |
A crouching punch. 5 frame startup - this is Raoh's fastest ground normal and is the only move capable of following up after an air Sai. Can be used to get out of pressure and even as an anti-air in some cases.
| On-Hit | Boost Gain | Aura Gain | GC | Level |
|---|---|---|---|---|
| 1 |
2B
2B


| Guard | Damage | Startup | Active | Recovery | On-Block | Star Damage |
|---|---|---|---|---|---|---|
| low | 7 | 5 | -3 |
A crouching kick. Fairly decent range, good for zoning. Startup too slow to use to get out of pressure. As it is only a level 2 attack it can be hard to hit confirm Boost into a combo.
| On-Hit | Boost Gain | Aura Gain | GC | Level |
|---|---|---|---|---|
2C
2C


| Guard | Damage | Startup | Active | Recovery | On-Block | Star Damage |
|---|---|---|---|---|---|---|
| All | 18 | 4 | -17 |
- Jump cancelable.
- Chargable with a Powerup Charge.
A strong punch to the ground. Causes opponent to bounce into the air even on normal hit, but if the total hits in the combo is over ~20 at the time of it connecting, the opponent will instantly be knocked down. Holding C with a powerup charge available makes the move become unblockable and gain Super Armor, and the opponent is launched high into the air on hit (must high jump after connecting to follow up).
| On-Hit | Boost Gain | Aura Gain | GC | Level |
|---|---|---|---|---|
| Launch |
- Jump cancellable, chargeable with a Powerup Charge
2D
2D


| Guard | Damage | Startup | Active | Recovery | On-Block | Star Damage |
|---|---|---|---|---|---|---|
| Low | 12 | 4 | -22 |
- Chargable with a Powerup Charge.
A low sweep kick. Very long range, can follow up with Insatsu, or a Grave Shoot in some situations. Like far D it is dangerous to miss with, but slightly safer as you can cancel the recovery into a Grave Shoot or Banishing Strike. Holding D with a powerup stock available makes the move unblockable and launches the opponent into the air.
| On-Hit | Boost Gain | Aura Gain | GC | Level |
|---|---|---|---|---|
| Launch |
- Chargeable with a Powerup Charge
j.A
j.A


| Guard | Damage | Startup | Active | Recovery | On-Block | Star Damage |
|---|---|---|---|---|---|---|
| High | 3 | 8 |
A jumping jab. 3 frame startup. Used mostly for getting out of pressure.
| On-Hit | Boost Gain | Aura Gain | GC | Level |
|---|---|---|---|---|
j.B
j.B


| Guard | Damage | Startup | Active | Recovery | On-Block | Star Damage |
|---|---|---|---|---|---|---|
| High | 8 | 8 |
A jumping kick. Decent range. Used mostly for cross ups and in combos.
| On-Hit | Boost Gain | Aura Gain | GC | Level |
|---|---|---|---|---|
j.C
j.C


| Guard | Damage | Startup | Active | Recovery | On-Block | Star Damage |
|---|---|---|---|---|---|---|
| High | 11 | 8 |
- Chargeable with a Powerup Charge.
A strong air punch. Can cancel into itself. Has no landing recovery, making it the only normal Raoh can bait a Guard Cancel with. Holding C with a powerup stock available stalls your momentum, makes the move unblockable, and causes wall bounce.
| On-Hit | Boost Gain | Aura Gain | GC | Level |
|---|---|---|---|---|
- Chargeable with Powerup Charge
j.D
j.D


- HNK Raoh jD Hitbox-2.png
- HNK Raoh jD Hitbox-3.png
- HNK Raoh jD Hitbox-4.png

| Guard | Damage | Startup | Active | Recovery | On-Block | Star Damage |
|---|---|---|---|---|---|---|
| High | 11 | 4,4,4,3 |
A 4-hit kick. The last hit is almost behind Raoh, making it good for cross ups from normal and high jumps.
| On-Hit | Boost Gain | Aura Gain | GC | Level |
|---|---|---|---|---|
Command Normals
6A
6A


| Guard | Damage | Startup | Active | Recovery | On-Block | Star Damage |
|---|---|---|---|---|---|---|
| All | 29 | 10 | -24 |
A charging punch. Mostly useless except in certain Banishing Strike combos. This move will likely be the cause of your demise many times as it loves to randomly come out when you try to input a reversal chop.
| On-Hit | Boost Gain | Aura Gain | GC | Level |
|---|---|---|---|---|
6B
6B


| Guard | Damage | Startup | Active | Recovery | On-Block | Star Damage |
|---|---|---|---|---|---|---|
| High | 27 | 4 | -14 |
A drop kick. Hits overhead. Extremely hard to block when followed up with Boost 2B. There is no reason to ever use it without Boost or Aura as it is not cancelable and does not give advantage even on hit.
| On-Hit | Boost Gain | Aura Gain | GC | Level |
|---|---|---|---|---|
Universal Mechanics
Throw
6C or 4C

| Guard | Damage | Startup | Active | Recovery | On-Block | Star Damage |
|---|---|---|---|---|---|---|
| Throw | 4 | 4 |
Raoh lifts up the opponent and throws them away. Follow up possible with Boost. Cannot cancel into Musou Insatsu. Great if you have enough Boost to follow up, otherwise not worth using.
| On-Hit | Boost Gain | Aura Gain | GC | Level |
|---|---|---|---|---|
| Launch |
Kick Throw
B+D


| Guard | Damage | Startup | Active | Recovery | On-Block | Star Damage |
|---|---|---|---|---|---|---|
| Throw | 9 | 4 |
Raoh grabs the opponent by the face and smashes them to the ground. Follow up possible with Boost. Cannot cancel into Musou Insatsu. Generally only ever used to finish off a dizzied opponent.
| On-Hit | Boost Gain | Aura Gain | GC | Level |
|---|---|---|---|---|
| Launch |
- whiffs on crouch
Grave Shoot
A+C


| Guard | Damage | Startup | Active | Recovery | On-Block | Star Damage |
|---|---|---|---|---|---|---|
| All | 15 | 4 | -5 |
Raoh throws up his arms, launching his opponent into the air. Short range to the sides, but extends high into the air. Aside from its use as a combo part, it also functions as an early anti-air, but suffers from long recovery. Use with caution.
| On-Hit | Boost Gain | Aura Gain | GC | Level |
|---|---|---|---|---|
| Grave Launch |
Heavy Strike
A+B


| Guard | Damage | Startup | Active | Recovery | On-Block | Star Damage |
|---|---|---|---|---|---|---|
| Unblockable | 41 | 2 |
A backhand punch. Range is short and misses on all crouching characters except Heart and Raoh. Fairly bad as far as Heavy Strikes go but still useful in some situations.
| On-Hit | Boost Gain | Aura Gain | GC | Level |
|---|---|---|---|---|
| Stagger |
Banishing Strike
C+D


| Guard | Damage | Startup | Active | Recovery | On-Block | Star Damage |
|---|---|---|---|---|---|---|
| All | 19-39 | 4 | -6 |
A painful looking body shot. Extremely important move used in pretty much all of Raoh's combos.
| On-Hit | Boost Gain | Aura Gain | GC | Level |
|---|---|---|---|---|
| Banishing Launch |
Special Moves
Hokuto Donryuu Kohou
214A

| Guard | Damage | Startup | Active | Recovery | On-Block | Star Damage |
|---|---|---|---|---|---|---|
| 27 | 43 total |
A powerup move. Allows for storing up to three powerup charges, which appear as globes above the Boost gauge. These powerups are used to strengthen several of Raoh's normal and special moves. Having powerup charges available opens up many combo options, and also forces your opponent to adjust their play as well, as they have to worry about the devastating powerup chop. As it has fairly long startup and recovery, Kohou should only be used at a distance. Even then, it is almost never safe to powerup when your opponent has Boost.
| On-Hit | Boost Gain | Aura Gain | GC | Level |
|---|---|---|---|---|
Hokuto Goushouha
236C


| Guard | Damage | Startup | Active | Recovery | On-Block | Star Damage |
|---|---|---|---|---|---|---|
| All | 43 |
- Gains a hit and starts up faster with a Powerup Charge.
A fireball move. Done on the ground, it is a 3-hit beam-type projectile capable of nullifying other projectiles. Mostly useless due to its large startup and recovery. Takes off one star on counter hit. Despite the improvements with charge, the ground version remains useless for the most part.
| On-Hit | Boost Gain | Aura Gain | GC | Level |
|---|---|---|---|---|
- air OK
Air Hokuto Goushouha
j.236C

- HNK Raoh j236C Hitbox.png
| Guard | Damage | Startup | Active | Recovery | On-Block | Star Damage |
|---|---|---|---|---|---|---|
| All | 17 |
- Wall bounces on Counter Hit with a Powerup Charge.
The air version is a more traditional looking fireball that travels downward at a 45 degree angle. While much more useful than the land version, after shooting off the fireball you do not recover until landing, so it is necessary to exercise caution when using this move. Takes off one star on counter hit.
| On-Hit | Boost Gain | Aura Gain | GC | Level |
|---|---|---|---|---|
Hokuto Tenshou Raigeki
623A


Enhanced Version Only


| Version | Guard | Damage | Startup | Active | Recovery | On-Block | Star Damage |
|---|---|---|---|---|---|---|---|
| Hokuto Tenshou Raigeki | All | 20 | |||||
| Hokuto Tenshou Raigeki (Enhanced) | All | 14 |
AKA Chop. Raoh winds up and then releases a delayed chop. The startup is invincible, but it wears out 9 frames before the move actually executes, making it hard to use as a reversal. On counter hit the opponent loses one star and is launched high into the air, and it is possible to follow up with a special homing jump, similar to a Grave Shoot. This move is exceptional at dealing with Guard Cancels.
The powerup version gains a second hit during the wind-up animation, making the execution much faster (8F), and is fully invulnerable. This move is a legitimate dragon punch and can be used very effectively as a reversal. Both hits can be canceled into a jump on counter hit. While much better than the normal version in almost all areas, due to its fast execution the powerup version is not suited to baiting Guard Cancels.
| Version | On-Hit | Boost Gain | Aura Gain | GC | Level |
|---|---|---|---|---|---|
| 623A | Launch (Grave Launch on CH) | ||||
| 623A | Launch |
- 623A
- 623A (notes: jump cancellable on counterhit)
Hokuto Raretsuken
623C


- HNK Raoh 623C Hitbox-2.png

| Version | Guard | Damage | Startup | Active | Recovery | On-Block | Star Damage |
|---|---|---|---|---|---|---|---|
| Hokuto Raretsuken | All | 14 | |||||
| Hokuto Raretsuken (Enhanced) | All | 14 |
Raoh rushes forward, punching 3 times and finishing with an uppercut. It executes very quickly and nets you a ton of meter on hit or guard. Often clashes with fireball moves and does quite a bit of chip and Guard Crush damage as well - it is especially useful against characters like Thouther and Mamiya. Takes one star and causes wall bounce on counter hit. It is only -6 on guard, but the final hit will sometimes miss if your opponent uses Aura Guard, which will allow them to punish you.
The powerup version gains 4 hits, to a total of 7, and the final uppercut takes one star. Aside from its increased chip and Guard Crush damage as well as meter building abilities, this move is a very important part of Raoh's Dribble combos.
| Version | On-Hit | Boost Gain | Aura Gain | GC | Level |
|---|---|---|---|---|---|
| 623C | Launch (Banishing Launch on CH) | ||||
| 623C | Launch |
- 623C
- 623C
Sai
214D

character defining move

Enhanced character defining move


| Version | Guard | Damage | Startup | Active | Recovery | On-Block | Star Damage |
|---|---|---|---|---|---|---|---|
| Sai | All | 21 | |||||
| Sai (Enhanced) | All | 21 |
Raoh stabs himself and his opponent through the foot, pinning them both to the ground. The opponent and Raoh stay stuck together on the ground for a certain amount of time, during which neither fighter can move (except to crouch) or use Boost.
The land version takes one star on hit, and due to its slow execution can only be comboed into using Hitstop Cancel(except vs crouching Rei). Also possesses Super Armor versus weak attacks, but you will never use it this way since this move has no real use outside of a combo. Larger window to follow up with 2A than the air version.
Only the land version can be powered up - it takes two stars on hit and becomes easier to use in wall bounce combos. The Super Armor is also improved but it remains useless. When following up with 2A the timing is slightly different than the normal land version - it is easy to mess up your combo if you use Sai without realizing you have a powerup charge, so it is important to keep this in mind.
| Version | On-Hit | Boost Gain | Aura Gain | GC | Level |
|---|---|---|---|---|---|
| 214D | Restand | ||||
| 214D | Restand |
- 214D (notes: air OK)
- 214D (notes: air OK)
Air Sai
j.214D


| Guard | Damage | Startup | Active | Recovery | On-Block | Star Damage |
|---|---|---|---|---|---|---|
| All? | 21 |
When performed in the air, Raoh first catches the opponent with a kick and brings them to the ground, where he then stabs them. This is without a doubt Raoh's most important move, as it plays a central role in all of his combos. Can be followed up with 2A only(2 frame window). Also it has a minimum height limitation, meaning that if you try to tiger knee it too low, you will only get a high jump air D.
| On-Hit | Boost Gain | Aura Gain | GC | Level |
|---|---|---|---|---|
| Restand |
- Minimum Height Restriction
Super Moves
Musou Insatsu
41236D during recovery of another move


| Guard | Damage | Startup | Active | Recovery | On-Block | Star Damage |
|---|---|---|---|---|---|---|
| All | 3 |
- Uses 1 bar of Aura.
- Jump cancelable.
A unique move that allows Raoh to cancel the recovery of almost any move into a powerful kick, at the cost of one bar of Aura. With a very quick startup at only 3 frames and Super Armor, Musou Insatsu is extremely useful and causes your opponent to have to approach you very cautiously when you have meter. This can allow you to get away with a lot - for example Kohou is usually unsafe to use in most situations, but fear of an Insatsu into a potential death combo will often keep your opponent from taking advantage of this and attacking you.
Musou Insatsu can be jump canceled on guard or hit. It is also possible to Boost both the startup and recovery of it. On normal hit the opponent is launched into the air, and you will want to follow up with a normal forward jump. A counter hit will take a star and cause wall bounce, and is best followed up with an air dash B.
| On-Hit | Boost Gain | Aura Gain | GC | Level |
|---|---|---|---|---|
- Input during move recovery
Hikou Shinkesshuu
214214A


| Guard | Damage | Startup | Active | Recovery | On-Block | Star Damage |
|---|---|---|---|---|---|---|
| Air Unblockable | 4 |
- Uses 1 bar of Aura.
An anti-air super. Raoh throws his cape into the air, catching any opponent within range. This move is completely unblockable - if your opponent is in the air and in range they will be caught. Can be extremely useful to get out of pressure, but will likely result in your death if you miss. Takes off one star on normal hit and two on counter hit.
| On-Hit | Boost Gain | Aura Gain | GC | Level |
|---|---|---|---|---|
Musou Tensei
214214B
| Guard | Damage | Startup | Active | Recovery | On-Block | Star Damage |
|---|---|---|---|---|---|---|
| N/A | 4 |
Uses 1 bar of Aura. A 'charge' super, that after executing(left picture) grants the ability to use the special defensive maneuver Musou Tensei(middle and right pictures) up to 7 times. While active, pressing 6(for mid/high attacks) or 2(for low attacks) in time with his opponent's attack hitting will cause Raoh to teleport behind them. Specifically, the time frame for Musou activating is 5 frames within inputing the forward or downward direction. However, if the lever is returned to neutral within 5 frames of the input, the total time is extended to 11 frames. There is a roughly 15 frame window after attempting to Musou in which it is not possible to try again, which prevents continuous Musou attempts.
Musou charges carry over rounds, so it is advantageous to try to get off the super as soon as possible.
| On-Hit | Boost Gain | Aura Gain | GC | Level |
|---|---|---|---|---|
Tenshou Honretsu
214214C


- HNK Raoh 214214C Hitbox.png
| Guard | Damage | Startup | Active | Recovery | On-Block | Star Damage |
|---|---|---|---|---|---|---|
| All | 30+11 |
- Uses 1 bar of Aura.
An invincible charging super. Takes two stars on normal hit, three on counter. Its slow startup makes it pretty much useless as a reversal and it is not really suited for combos either. It does have some rare uses, which are covered in the Matchups section.
| On-Hit | Boost Gain | Aura Gain | GC | Level |
|---|---|---|---|---|
Fatal K.O
Hokuto Mettenha
236C+D when opponent has 0 stars


- HNK Raoh FKO Hitbox.png
| Guard | Damage | Startup | Active | Recovery | On-Block | Star Damage |
|---|---|---|---|---|---|---|
| All | FATAL KO | 12+5 |
A deadly punch to the skull, from the final fight between Raoh and Kenshiro. A very good FKO, as it locks on the opponent and cannot miss as long as the first hit connects. Also possesses Super Armor, although it is mostly useless except as a gimmick.
| On-Hit | Boost Gain | Aura Gain | GC | Level |
|---|---|---|---|---|
Colors

A

B

C
1984 TV series
D

E
Toki


To edit frame data, edit values in HNK/Raoh/Data.