

"Excellence is doing ordinary things extraordinarily well."
< GGACR
mNo edit summary |
|||
| Line 458: | Line 458: | ||
<gallery widths="210px" heights="210px" mode="nolines"> | <gallery widths="210px" heights="210px" mode="nolines"> | ||
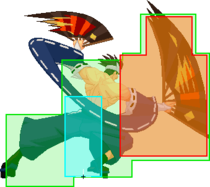
GGXXACPR_Anji_3S-1-Hitbox.png|Frames 28-33 | GGXXACPR_Anji_3S-1-Hitbox.png|Frames 28-33 | ||
GGXXACPR_Anji_3S-2-Hitbox.png| | GGXXACPR_Anji_3S-2-Hitbox.png| | ||
GGXXACPR_Anji_3S-3-Hitbox.png| | |||
</gallery> | </gallery> | ||
</tabber> | </tabber> | ||
Revision as of 02:49, 6 August 2022
Overview
Anji is an all-rounder character who specializes in hard reads. Anji's main mechanic is his autoguard, which allows him to block during portions of some of his normal attacks. Strong use of Autoguard normals allows Anji to punch through his opponents offense quite easily or bait them into frametraps. Helping this along is Anji's signature Fuujin GuardMidStartup20Recovery27Advantage-16, a fast lariat that can be followed up with a number of options. Fuujin is useful for anything from pressure to mixups to neutral, making it an excellent move to rely on throughout a match. After Anji gets a hard knockdown, he can perform Shitsu
 GuardAllStartup21RecoveryTotal 48Advantage-7 to keep his opponent blocking while he runs up to perform a mixup or engage in pressure. Fuujin, Autoguard, Butterfly Oki, Late-Cancelling and 3S Cancelling (the latter two of which are explained below) come together to make Anji very tricky to deal with as a defender, and his extensive mixup game with a variety of lows, overheads, and throws makes his offensive reward quite high overall.
While Anji has good answers to everything his opponents can do, he has a notable vulnerability to moves with low-profile properties. While Anji can call out high and mid attacks with plenty of autoguard moves, his only autoguard low normals are 3K, 3S and 2H, all of which are committal. While Anji can often autoguard mids and highs on reaction, autoguarding lows tends to be done as a read on the opponent, making it inherently more risky to do. Failure to pick the right option will put Anji into a precarious situation, so familiarize yourself with his kit very well. Unaware opponents can be run over by him quite soundly, while experienced foes will force Anji to mix up which autoguard he uses with his other tools to greater effect. As well, while Fuujin is very useful, enemies who can stuff Fuujin consistently will force Anji to rely on other options for winning the match.
Anji's low execution, strong fundamentals and accessible toolkit make him a great pick for both new players and veterans. Players who enjoy hard reads, strong offense and solid defense will love Anji and his fanciful fighting style.
![]() Anji Mito
Anji Mito ![]() Anji Mito is an all-rounder character who revolves around countering his opponents offense with autoguard and the infamous Fuujin.
Anji Mito is an all-rounder character who revolves around countering his opponents offense with autoguard and the infamous Fuujin.
Pros
Cons
- Well-Rounded: Anji has a tool for almost every situation, and many of them are quite good. His wide variety of options lets him tackle most situations and matchups.
- Fuujin: Has access to a partly invincible rekka starter that covers lots of horizontal space, and leads to damage and setplay on hit and mixups on block.
- Potent Okizeme: When given a butterfly setup, Anji gets access to strong mixup and an unblockable setup with meter. Many of Anji's combos end with On
 GuardUnblockableStartup11Recovery20+6 after landingAdvantage-, which drops opponents at the perfect spacing for butterfly oki.
 - Tricky Mixup Tools: A fast overhead in 3P, a standing low in 3K, Fuujin followups, and his oki setups give Anji great tools for opening up targets.
- Autoguard: Several normals allow Anji to proceed unimpeded through abare attempts, and cancel his blocks into even stronger options.
- Strong Aerial Mobility: Air stalls, On, and a unique super jump give Anji some good aerial tools.
- High Guts Rating: Despite an average defense modifier, his guts level lets Anji survive longer than expected.
- Fuujin isn't Foolproof: Spamming Fuujin can be turned around on Anji due to its vulnerability in its later frames. All the followups have weaknesses and counters, so a good opponent will take advantage of careless attacks.
- Shut Down by Butterfly Oki Counters: Characters with means of disrespecting butterfly oki give Anji a hard time. He will have to rely on other options, like Meaty Attack Hitting an opponent to cover the moment as they lose invincibility. The most common one is performing an attack early on okizeme to gain frame advantage and bait reversals.s, to keep his opponent blocking on wakeup.
- Low Profile Vulnerability: Anji struggles with finding meaningful answers to low-profile moves. Opponents with access to strong low-profile tools like
 Sol can make it difficult for Anji to stop their approach against him.
 | |
| Damage Received Mod | |
| ×1.06 | |
| Guts Rating | |
| 5/5 | |
| Gravity Mod | |
| ×1 | |
| Stun Resistance | |
| 65 | |
| Prejump | |
| 3F | |
| Backdash | |
| 16F (1~9F Strike Invuln) | |
| Wakeup Timing | |
| 25F (Face Up)/ 21F (Face Down) | |
| Number of Jumps: | |
| 2 | |
| Number of Air Dashes: | |
| 1 | |
| Fastest Attack | |
| Reversals | |
| Fastest Ground Abare:This character's fastest attacks for mashing or scrambles. Excludes universal throws. | 5P (4F) |
| Reversal Attacks:Any reversal-esque moves this character has. Excludes universal options. | None |
Guilty Bits Character Intro
StartupThe time before an attack is active. Written startup values include the first active frame, so the startup on a frame chart will display one less square than the written value. Frames
Active The active frames of an attack refers to the amount of time an attack can hit the opponent. Frames
InactiveFrames in the middle of multi-hit attacks which cannot hit the opponent, but are after the move has become active at least once. Frames
Recovery The recovery of an attack refers to the amount of time an attacker must wait before they may perform another action, even blocking. Frames
Special RecoveryThe recovery of an attack refers to the amount of time an attacker must wait before they may perform another action.Recovery frames which happen under abnormal conditions, such as after landing. Frames
ProjectileIndicates an entity that exists separately from the character has become active. Usually something like a Fireball A projectile which usually travels slowly across the screen in a horizontal path above the ground.. Active
CancelA window in which to cancel a move. Can be varied in usage. Window
Normal Moves
See note about autoguard ※1 here.
5P


Total: 14
Anji's 5P is an amazing jab, coming out fast while also having a large hitbox in front of Anji.
- Is a great anti-air that can catch a lot of approaches.
- Can be crouched under.
- Has limited options for gatlings.
Gatling Options: 6P, 3P, 6K, 3S, 5H, 6H, 5D, 2D
Additional Frame Data: Untechable for 16F.
5K

"A jack of all trades, a master of none, but better than a master of one."


Frames 5-6

Frames 7-9


Total: 15
A great general poke that has many options to followup on.
- Has great gatling options such as 3P, 2S, and 6K.
- Great at keeping the opponent in Anji's butterfly oki.
- Extends Anji's hurtbox.
Gatling Options: 6P, 3P, 6K, 5S, 6S, 2S, 5H, 2H, 6H, 5D, 2D
5S

"In times of change learners inherit the earth; while the learned find themselves beautifully equipped to deal with a world that no longer exists."


Total: 23
Fast poke that covers good range without extending Anji's hurtbox while also being good combo filler.
- Cranks the guard bar well.
- Has good gatling options such as 3P, 2S, and 3S.
Note: Anji does not have a f.S. 5S will activate at any range. However, 5S will automatically gatling into 6S if S is pressed again on contact.
Gatling Options: 6P, 3P, 6S, 2S, 3S, 5H, 2H, 6H, 5D, 2D
Additional Frame Data: Raises GB+ 14 on first hit, GB+ is decreased on additional 5Ses in the same string.
5H

"The world is a book, and those who do not travel read only a page."


Frames 15-16

Frames 17-18


Total: 39
5H works as a good move to stuff approaches and as a great combo tool.
- Combos into 236H on normal hit leading to big damage.
- Generally what you want to combo into after a mixup.
- Has hitboxes on both sides of Anji.
- Knockdowns airborne opponents.
Gatling Options: 6P, 6K, 3S, 6H, 5D, 2D
Additional Frame Data: Forces opponent into crouching state on ground hit. Slams down and knocks down opponent on air hit.
5D

“There is only one kind of shock worse than the totally unexpected: the expected for which one has refused to prepare.”


Frames 27-29

Frames 30-32


Total: 58
Anji's 5D on paper is a subpar dust, but due to its autoguard properties, it can become a very potent tool.
- Can be special cancelled to make it safe.
- Has a lot of autoguard frames.
- 5D into autoguard P or D can be a strong anti air option.
6P

"A wise man can learn more from a foolish question than a fool can learn from a wise answer."


Total: 37
Great all around anti air, especially against airdashes.
- Anji leans back during the animation allowing him dodge certain things.
- Has a great disjoint like most 6P's.
- Can go into 236H on normal hit or chain into 5H before 236H for extra damage, but can be inconsistent depending on range.
- Good for frame traps.
Gatling Options: 3P, 6K, 3K, 5S, 6S, 2S, 3S, 5H, 2H, 6H, 5D, 2D
Additional Frame Data: Staggers opponent on ground CH (max 49F). Hitstun 21F. Initial prorate 90%.
3P

"A dream becomes a goal when action is taken toward its achievement."


Total: 33
A great standing overhead to mixup opponents. Comes out just fast enough to be unreactable. Does not gatling into anything else, meaning this move is for mixup attempts only and must be covered with either RC or butterfly oki to prevent a reversal. Can be combo'd with RC or the second part of Shitsu.
- Bounces opponent on counterhit, allowing for a followup.
Additional Frame Data: Ground bounces opponent on CH (untechable for 90F).
6K

"Always seek out the seed of triumph in every adversity."


Total: 34
A fast frame trap with early autoguard frames. Has autoguard on frame 1, meaning instant access to Anji's autoguard moves. Potentially unsafe to throw out if left uncancelled. Good to use in butterfly oki to check for reversal-happy opponents.
Has no true gatlings besides 3P which acts as a frame trap to discourage punishment when 6K is not cancelled. Can be late cancelled into 5K on hit, block or whiff during the final 10 frames. A 5F gap on block between 6K and 5K provides another frame trap discourage mashing.
- FRC or RC can be used to further make 6K safe with FRC leading to good combos or the ability to continue your pressure.
Gatling Options: 3P
Additional Frame Data: Staggers opponent on ground CH (max 37F). FRC timing 11~12F. Can be late cancelled into 5K from 24F onwards.
3K

"The state of minds vary according to the angle under which one examines them."


Frames 19-20

Frames 21-22


Total: 36
A very big poke covering a large portion of the screen in front of Anji.
- Has a good autoguard point while also potentially leaving Anji at a safe distance.
- It being a low can catch inexperienced opponents off guard.
Additional Frame Data: Initial prorate 80%. Wallbounces opponent on CH (untechable for 56F).
6S

“A vision is best presented as a story that people can relate to.”


Frames 13-14

Frames 15-16


Total: 33
An extremely far poke covering a large portion of the screen in front of Anji.
- Can catch people jumping in or out, trying to approach, trying to poke, and potentially airdashing while still having a good autoguard just in case.
- Unfortunately, 6S's hitbox is deceptive and only hits on the ends of the fans. This makes using 6S up close a risky option.
- Has many gatling options.
Note: Anji does not have a f.S. 5S will activate at any range. However, 5S will automatically gatling into 6S if S is pressed again on contact.
Gatling Options: 3P, 6K, 3K, 2S, 5H, 2H, 5D, 2D
3S

"History is a vast early warning system."


Frames 28-33


Total: 49
3S is an autoguard machine, and also is Level 6 on block.
- One of Anji's few low autoguard and lasts up until the active frames start, on a move with a very long start up.
- Has many ways to gatling into it.
- Allows Anji to use 3S cancel, a very strong technique for blockstrings and combos.
- Oddly, is jump cancellable.
Gatling Options: 3P
Additional Frame Data: Cancelable into 5S or 5H 6~8F. Blockstun 22F.
6H

“Prosperity is no just scale; adversity is the only balance to weigh friends.”


Frames 21-23

Frames 24-26


Total: 51
6H, once an iconic multi-hitting attack now nerfed to a single hit, is still a powerful tool with a variety of uses.
- Can work as a good frame trap and goes into 236H on counterhit.
- Using its FRC point allows for a strike throw mix up.
- Is throw invincible for a portion.
- Has many ways to gatling into it.
Additional Frame Data: Initial prorate 80%. Floats opponent on hit (untechable for 19F). FRC timing 17~20F.
2P

“Whatever you do will be insignificant, but it is very important that you do it.”


Frames 5-6

Frames 7-8


Total: 14
Anji's 2P is a fast and close ranged pressure tool.
- Can gatling into 2K for a frame trap or be used for a tick throw.
- Can go under certain moves.
- Decent gatlings.
Gatling Options: 5P, 2P, 6P, 5K, 2K, 5S, 6S, 2S, 3S, 5H, 2H, 6H, 5D, 2D
Additional Frame Data: Initial prorate 80%.
2K

“The best of knowledge and righteous acts are those hidden to the people.”


Total: 15
2K is an amazing tool for poking and pressure.
- Leaves Anji at a MASSIVE +6 on block. Allows it to be a great mixup tool even with limited gatlings.
- 2S and j.214P allow for a high/low mixup.
- Can be used to restart pressure.
Gatling Options: 6P, 3K, 6S, 2S, 2H, 6H, 5D, 2D
Additional Frame Data: Initial prorate 70%.
2S

"Gratitude makes sense of the past, brings peace for today, and creates a vision for tomorrow."


Frames 8-10

Frames 11-13


Total: 27
2S is a great low poke and mixup option.
- While it has limited gatlings, 2S makes up for that by gatling into 3S which allow 3S cancels.
- Out of its limited gatlings it can go into 5H on counter hit and also works during butterfly oki, making it a strong tool to get into Anji's strongest combo options.
- Can go under a lot of things.
Gatling Options: 3S, 5H, 2H, 6H, 5D, 2D
2H

“Where utility ends and decoration begins is perfection.”


Total: 39
2H is a situational move, but is very strong when used. Level 6 move on block.
- Works great as a frame trap, lending itself well with its good amount of low autoguard frames.
- Can be late cancelled into 6P on hit, block or whiff.
- Can gatling into 5H for massive damage.
Gatling Options: 3K, 5H, 6H, 5D, 2D
Additional Frame Data: Blockstun 22F. Can be late cancelled into 6P from 28F onwards.
2D

"Perfect tranquility within consists in the good ordering of the mind, the realm of your own."


Total: 34
Anji's 2D is a very strong move that can be very punishable if misused.
- Can be gatlinged into from many of Anji's common moves.
- Can low profile for a large portion of the move.
- Has a very big hitbox, even extending slightly in front of Anji's body.
- Very punishable on whiff.
j.P

"It cannot be found by seeking, but only seekers shall find it."


Total: 13
j.P is a fast and decently ranged air option for Anji.
- Works in combos, air dash pressure, and as an air-to-air.
Gatling Options: j.P, j.K, j.S, j.H, j.D
j.K

"Over every mountain there is a path, although it may not be seen from the valley."


Total: 21
j.K is a really good all-around aerial for Anji.
- Hits right in front of Anji.
- Great for use in SJC combos.
- Works great for a air-to-air.
Gatling Options: j.P, j.S, j.D
j.S

"Harmony makes small things grow, lack of it makes great things decay."


Frames 7-10

Frames 11-15


Total: 33
j.S is a pretty good move for most aerial scenarios.
- Hits a good bit in front of Anji.
- Great for SJC combos.
- Can be used as an air-to-air or as a jump-in.
- Frames 3-4 of start-up are affected by a unique bug with the following properties:
- When done low enough to the ground, these frames will gain high autoguard.
- Even when not done low to the ground, Anji will still get hit normally during those frames, but the subsequent on hit effects will treat Anji as if he blocked the attack.
- The primary effect of being hit at a higher height is that Anji no longer is in counter hit state from frames 3-4, but it also leads to strange interactions such as:
- No meter gain on Gold Burst.
- No burst refill on Blue Burst.
- No level up from Johnny's coin.
- No follow-up animation from cinematic supers and instant kills.
Gatling Options: j.P, j.H, j.D
Additional Frame Data: High autoguard 3~4F when low close to the ground. This is a bug. See notes on bug above.
j.H

"Success is often achieved by those unaware that failure is inevitable."


Frames 13-15

Frames 16-18


Total: 33
j.H is a go-to combo ender for Anji.
- Knocks down on air hit leading to butterfly oki.
- Can be used as a cross up in some scenarios.
Gatling Options: j.D
Additional Frame Data: Slams down opponent on air hit.
j.D

“A river is easier to channel than to stop.”


Frames 10-11

Frames 12-15


Total: 35
j.D is a powerful button with a few uses.
- Can stop Anji's aerial momentum.
- Can be used as a good air to air.
- A pretty decent combo ender, especially in the corner where Anji can go into j.214P for a knockdown.
- Blows back opponent on hit.
Additional Frame Data: Initial prorate 90%. Blows back opponent on hit (untechable for 30F). Wallsticks opponent on CH (untechable for 84F, wallstick for 30F). Can be canceled into any jump attack except another j.D 22F onwards.
Universal Mechanics
Ground Throw

"The logic of the world is prior to all truth and falsehood."

Pretty normal throw, but guarantees great Butterfly oki midscreen.
Additional Frame Data: Knocks down opponent on hit. Forced prorate 50%.
Air Throw

"If the doors of perception were cleansed, everything would appear to man as it is: infinite."

A basic air throw.
- Can combo into 5P > On from anywhere on screen.
Additional Frame Data: Floats opponent on hit (untechable for 60F). Forced prorate 50%.
Dead Angle Attack
"He who conquers others is strong. He who conquers himself is all powerful."
Total: 29
A great reversal tool for tight situations where Fuujin would fail and autoguards become tricky to time.
Additional Frame Data: Knocks down opponent on ground hit. Initial prorate 50%.
Special Moves
Shitsu
236P

"Elegance is elimination."
"Rapidness"

Butterfly

Hawk


A slow moving projectile that serves as one of Anji's most important specials. Upon input, Anji sends out a butterfly at about leg height. If it comes in contact with the opponent or a projectile, the butterfly transforms into a hawk before leaping into the sky and falling to the ground. The hawk projectile hits twice on the way down, both of them as Mids.
Shitsu has two purposes. The first is in neutral as a high committal zoning option for a grounded approach. While the projectile is slow, if enemies interact with it at all then they will have to deal with the hawk followup. While not amazing, using Shitsu to gain space can be a decent way for Anji to make his way in against opponents who like to stay on the ground.
Shitsu's second purpose, and its more important one, is in okizeme. Upon getting hard knockdown on his opponent, Anji can throw out Shitsu and guarantee a 50/50 mixup attempt. Many of Anji's single-hit mixup moves, like 3P or 3K, can be thrown out inbetween the butterfly hitting the opponent and the hawk falling onto them, which will allow a full combo with good timing. Shitsu forms the backbone of Anji's mixup game and is an extremely important move to utilize nearly every chance you can get.
Shitsu has a few weaknesses. Not only is it slow, but the projectile also disappears if Anji is hit. Thus, Anji players will have to correctly space and time their butterfly oki to the best of their ability to avoid a reversal attempt. 6K can help with checking for reversal attempts in butterfly oki.
- Disappears if it travels the max distance before touching something.
- Can be used as a risky, but powerful, pressure reset in the middle of blockstrings.
Additional Frame Data: Projectile disappears immediately if Anji gets hit. Falling butterfly has Chip damage x2. Falling butterfly: Startup of 1F after original projectile hits or is blocked, or 20F after nullifying a projectile.
Fuujin
236S or 236H

"Culture is a way of coping with the world by defining it in detail."
"Wind God"

Total: 44
Total: 49
Anji's most important tool and arguably the defining feature of his kit. A fast, forward-leaning and high-damage dashpunch that helps Anji control lots of horizontal space. Fuujin comes in two variants, each with their own uses.
S Fuujin is Anjis's main way to get into his Fuujin followups in pressure. This variant also has important use in Anji's corner combos as an extension off of 2D. Otherwise, the H variant is superior in every way.
- Used in combos especially for 236S > FB Rin extensions.
Additional Frame Data: Slides opponent on air hit (untechable for 40F, slide for 20F). Can cancel into followup attacks 27F onwards.
H Fuujin is a very powerful move to utilize in neutral. Strike invul for the first 12 frames allows Anji to go through some projectiles and moves, but can be extremely risky as the invul ends before the move is active. Highly vulnerable to sweeps.
Following up with Rin allows Anji to catch some counterpoke attempts. It is also very useful for whiff punishing, blowing through projectiles, and comboing into high-damage routes. Much like his other tools, overusing H Fuujin is a surefire way to get punished, so weave it in with Anji's other approach options.
- Launch on hit allows for most of his routes, typically using 236H > FB Rin.
Additional Frame Data: Initial prorate 80%. Wallbounces opponent on hit (untechable for 38F). On CH untechable for 120F. Can cancel into followup attacks 32F onwards.
Shin: Ichishiki
Fuujin > P

"The high road is always respected. Honesty and integrity are always rewarded."
"Needle: Method One"


The somewhat safe/pressure reset option out of Fuujin. Anji leaps into the air and throws down several fans in a cone below him. Can be airdashed out of, which allows Anji to back off or press forward depending on the situation.
This move is the best option for establishing a safe gameplan as Anji. Opponents will likely be too stunned to move the first few times you use it out of Fuujin, which can net a full pressure reset. Don't become overly reliant on it, however. The entire cast can punish Anji for using it by anti-airing or air-to-airing his ascent. Using the FRC point makes the move completely safe, which is useful for baiting reversal attempts.
Ichishiki can help you figure out the blocking habits of your opponents if you use it wisely. Make sure to mix it in with the other followups to keep your offense fresh.
Additional Frame Data: Anji is airborne 4F onwards. FRC timing 6~8F. Auto Jump Install. Listed Frame Adv is for a standing opponent in the corner (Tested on Sol).
Issokutobi
Fuujin > K

"A guilty conscience feels continual fear."
"One-Legged Jump"


Later part of hop

The throw/anti-low option out of Fuujin. Anji leaps a great distance forwards before landing in neutral. Often puts Anji at just the right space for a throw, which can lead into solid butterfly oki. Anji can potentially cross up depending on spacing.
This move is great for getting into your opponents head. The threat of a throw or crossup makes this move very useful in butterfly oki mixups or even general Fuujin pressure. The leap going over lows allows Anji to punish opponents who are trying to fuzzy low his other followups.
The move's biggest downside is that it puts Anji in counterhit state until he lands. Be careful with using this move, but don't be afraid to use it if you want to wear on the opponent's mental stack.
Additional Frame Data: Can pass through opponent 7~24F.
Nagiha
Fuujin > S

"Wonder, rather than doubt, is the root of all knowledge."
"Calm Edge"


Frames 10-12

Frames 13-15


Total: 42
The low/frametrap option out of Fuujin. Anji sweeps his fan outwards, knocking the opponent off their feet. Useful in combos for guaranteeing hard knockdown and forms one half of Fuujin's high/low mixup. If delayed, Nagiha acts as a nasty frametrap which can be continued into a combo with meter.
Nagiha's FRC is also one of Anji's most useful tools for maintaining pressure, as using it makes Nagiha fully safe. You can net a good pressure reset, throw attempt, or even a butterfly oki attempt if your opponent is conditioned to sit still. You can even combo off of Nagiha's FRC for decently high damage and meter gain. Overall, Nagiha's FRC is one of Anji's best FRC points, and one of his most important for new players to learn.
Additional Frame Data: Floats opponent on ground hit (untechable for 35F). FRC timing 23~25F.
Rin
Fuujin > H

"Simplicity is the glory of expression."
"Confront"


Frames 27-28

Frames 29-30
Frames 31-32

Frames 33-34


Total: 50
The overhead/autoguard option out of Fuujin. Anji opens his fans and swings them downward in a shoulder check. Level 6 on block and the second half of Fuujin's high/low mixup. Unfortunately, the move is slow enough that actually getting your opponent to take the hit can be difficult. Useful for ending Fuujin pressure if you have no meter, but can be beaten on reaction with lows and slashbacked to be made unsafe. Delaying Rin gives it some frametrap potential. Also useful as a combo ender.
Rin has the notable feature of having tons of autoguard frames. Using this move in neutral can be a good way to push through your opponents pokes and punish them with an autoguard follow-up. The move is also fully throw invulnerable, so opponents need to know exactly how to beat the move in order to push back against Rin.
Like all of Fuujin's followups, Rin must be used considerately. The risk/reward for using the move is very high, but conditioning opponents into sitting still long enough to hit them can be a difficult task. If you can land the hit however, there's nothing quite like a Rin counterhit to brighten up your day.
Additional Frame Data: Slams down and knocks down opponent on hit. Groundbounces on CH (untechable for 90F). Listed Frame Adv is when opponent blocks standing (tested on Sol). Startup to hit a crouching opponent is 31F. Blockstun 21F.
Kou
P during Autoguard

"Flying starts from the ground.
The more grounded you are,
the higher you fly."
"Crimson"


1st-2nd hits (Frames 4-9)

3rd hit (Frames 10-13)

4th hit (Frames 14-17)

5th hit (Frames 18-21)

6th hit (Frames 22-25)

7th hit (Frames 26-29)

8th hit (Frames 30-41)


Total: 60
Good followup when autoguarding an aerial attack.
- Builds a lot of meter.
- NOT safe if it is blocked.
Additional Frame Data: 1st-7th hits float opponent (untechable for 20F). 8th hit blows opponent back on hit (untechable for 60F). Anji is in CH state until landing. 2nd-7th hits have hitstop 5F. Kou can only be used during the hitstop of an autoguarded move.
Sou
K during Autoguard

"Freedom is never given;
it is won."
"Pale"


1st hit (Frames 11-14)

2nd hit (Frames 15-18)

3rd hit (Frames 19-21)

4th hit (Frames 26-30)


Total: 44
Your go-to autoguard vs grounded attacks and projectiles.
- Plus on block.
- Can be linked into 5P/5K.
Additional Frame Data: 1st-3rd hits have hitstop 6F. 4th hit has 23F hitstun. Anji is in CH state during move. Sou can only be used during the hitstop of an autoguarded move. FRC timing 26~28F.
On
623H

"One of life's greatest blessings
is the freedom to
pursue one's goals."
"Yin/Shade"


Total: 54
One of Anji's main combo enders. Anji leaps into the air before grabbing his opponent, switching sides, and dropping them to the floor with a lightning strike. Despite the sideswitch, many of Anji's corner combos end with the opponent bouncing out of the corner before On catches them and forces them back into it.
The high damage of On makes it a great way to end combos, even ones with high proration. On's best feature is that it gives great spacing for butterfly oki, allowing Anji to easily time a Shitsu followup and begin a mixup attempt. On can also catch opponents trying to jump out of Anji's pressure, which can make for a great callout.
- Has a useful option select with its FRC to bait bursts. Here's an example.
Additional Frame Data: Anji is airborne from 9F onwards. Knocks down opponent on hit (untechable for 120F). FRC timing 11~13F.
Kai
214P or 214K

"The only way to make sense out of change is to plunge into it, move with it, and join the dance."
"Commandment"


P

K


Total: 39
Total: 49
A short range overhead that can crossup.
- Is slightly plus on block, but the number of frames depend on opponents height.
- Can be airthrown if they predict it.
Additional Frame Data: Anji is airborne 4~27F. Feet invincible 22~27F. Knocks down opponent on hit.
Less safe and easier to react to since Anji jumps higher.
- FRC leads to much stronger and more unpredictable mixups and is safer.
Additional Frame Data: Anji is airborne 9F onwards. Groundbounces opponent on hit (untechable for 40F). FRC timing 22~30F. Listed Frame Adv is for a standing block (tested on Sol). Auto Jump Install. Anji automatically turns to face the opponent after FRC.
Shin: Nishiki
j.214P

"On life's vast ocean diversely
we sail. Reasons the card,
but passion the gale."
"Needle: Method Two"


Frame 14

Frames 15-16

Frames 17-18

Frames 19-20


Total: 64
A common air combo ender.
- Can be tiger knee'd and RCed to combo after.
- Extremely unsafe if blocked.
- Will give knockdown if at the right height.
Additional Frame Data: Ground bounces opponent on hit (untechable for 60F). High groundbounce on CH (untechable for 210F). Anji is in CH state 1~48F. Hitstop 6F. Fastest possible TK Shin: Nishiki has startup: 17F, Frame Adv: -29F.
Force Breaks
FB Shitsu
236D

"The brighter you are, the more you have to learn."

Butterfly
Hawk
An upgraded version of Shitsu with far better properties. Not only is the projectile now much faster, it also travels nearly fullscreen and can beat certain projectiles. The hawk followup now also hits high, which can lead to unblockable setups with a properly timed 2S.
- Has more recovery, more range, and travels faster compared to normal Shitsu.
- The increased range and speed make it a situationally useful move to control space.
Additional Frame Data: The falling part has Chip Damage x2. Projectile disappears instantly if Anji gets hit. Goes through other projectiles. Falling butterfly startup is 1F after hit or blocked, or 20F after nullifying a projectile.
FB Rin
Fuujin > D
"Simplicity is prerequisite for reliability."
Frames 21-22
Frames 23-24

Frames 25-26
Frames 28-29

Total: 36
Anji's main use of meter. An important piece of combo filler, as it ground bounces, OTGs, and leads into H Fuujin for further followups. Many of Anji's corner and midscreen combos rely on FB Rin to be accessible in order to perform them, so try and keep at least 25% meter if you can help it.
- Effectively fully throw invul since they will likely still be in block stun from the Fuujin before the followup.
- Can be used for mix ups but the FB flash will likely give away what you're doing to an opponent who knows Anji's options.
Additional Frame Data: Ground bounces opponent on hit (untechable for 60F). Listed Frame Adv is for standing block (tested on Sol). Startup is 25F to hit a crouching opponent (tested on Sol).
FB Kou
D during Autoguard

“Let your plans be dark and impenetrable as night, and when you move, fall like a thunderbolt.”


1st hit (Frames 4-5)

2nd hit (Frame 6)

2nd hit (Frames 7-9)
3rd hit (Frames 10-13)
4th hit (Frames 14-17)
5th hit (Frames 18-21)
6th hit (Frames 22-25)
7th hit (Frames 26-29)

8th hit (Frame 54)
8th hit (Frame 55)
8th hit (Frame 56)
8th hit (Frame 57)


Total: 104
Like the normal version, it is used as a response to an anti-air autoguard.
- Trades meter build for damage and for it to be safe on block since you can air dash out.
Additional Frame Data: 1st-7th hits float opponent. 2nd-7th hits have hitstop 5F. 8th hit slams down opponent and fully untechable. Anji is in CH state until landing. FB Kou can only be used during the hitstop of an autoguarded attack.
FB On
623D
“Dwell on the beauty of life. Watch the stars, and see yourself running with them.”

Total: 79
Like normal On, but with much faster startup and much higher vertical reach. Situationally useful when your opponent likes to stall on the top of the screen or as a callout against carless airdashing.
- Its start up makes it hard to combo into compared to normal On. Not a viable alternative to normal On as a combo ender.
- FRC works similar to normal On, but at 50 tension this can be difficult to justify.
Additional Frame Data: Knocks down opponent on hit (untechable for 120F). Anji is in crouching state during landing recovery. FRC timing 19~20F. Anji can move before landing on hit or FRC.
Overdrives
Issei Ougi: Sai
632146H

"What the ancients called a clever fighter is one who not only wins, but excels in winning with ease."
"Lifetime Secret Skill: Coloring"


Each lasts for 2 frames

Finishing attack


Anji pulls out a large fan, before spinning it multiple times and closing it on the opponent and forcing hard knockdown. A great way to squeeze out a little bit more damage at the end of a combo, as it works after On.
- Has some slight invincibility but not enough to make using it as a reversal worthwhile. Can result in weird interactions, especially around command grabs.
- FRC allows you to combo out of it for some more damage.
- If you are hit after the very start the move will still come out but you can move and follow up for free.
Additional Frame Data: Anji is in CH state during move. Dizzy modifier x0. Can pass through projectiles. FRC timing 66~70F. Projectile guranteed to activate after 10F. Giant fan will activate on 53F if the 11th hit hits (not blocked).
Tenjinkyaku
[2]8K

"The art of war is the art of deception."
"Sky God Legs"


Total: 47
A powered-up version of Kai. Anji leaps midscreen and performs a fast, multi-hit stomp on his way down. This super is somewhat mediocre, as Anji has better uses for meter and better ways to move about the screen. It can at least be an unconventional way to get out of the corner.
- It's unreactable after the super flash, meaning the opponent would already have to be blocking or invincible before it starts, but it takes a while for the flash to start.
- Can do some ambiguous cross ups but the steep meter cost makes it not worthwhile.
- Has some invincibility, but other moves are more useful for that.
Additional Frame Data: Opponent cannot input anything from after super flash until the 3rd active frame. Listed Frame Adv is for standing block (tested on Sol). For the follow up strikes after the knockdown (1st hit), if the opponent was ground bounced, the spin will hit them in the air, else they'll take the hits on the ground.
Kachoufuugetsu
63214S during Autoguard

"He will win who, prepared himself, waits to take the enemy unprepared."
"Flower Bird Wind Moon"


1st hit (Frames 7-11)

2nd hit (Frames 28-32)

3rd hit (Frames 45-49)

4th hit (Frames 70-74)


An unburstable, high-damage followup from an autoguard. Can make Anji very threatening in neutral, as this super does a surprisingly high amount of average damage thanks to the near guarantee it will be a counterhit. Plus, it looks really cool!
- Guaranteed to connect after the first hit.
- Can FRC before the last hit to get some extra damage, though if it's not going to kill, taking the knockdown would be better in most cases.
- Can be special cancelled into if an attack with autoguard connects provided autoguard itself was triggered.
Additional Frame Data: 1st-3rd hits stagger opponent on hit (max 65F). Opponent's inputs are frozen until the 2nd active frame of the 1st hit. Anji is in CH state during move. Dizzy modifier x1.5. FRC timing 63~65F.
Instant Kill
Zetsu
During IK Mode: 236236H

"Since all life is futility, then the decision to exist must be the most irrational of all."
"Suppress"


Yes, he is grounded during move

I guess you could just throw out all that utility and use this instead. Like most IKs, extremely situational and rarely used. Can still be used against ABA though.
- Has a 50/50 after an air throw, but requires being in IK mode before the air throw.
Additional Frame Data: IK mode activation time 54F.
Colors

Default P

Default K

Default S

Default H

Default D

EX P

EX K

EX S

EX H

EX D

Slash P

Slash K

Slash S

Slash H

Slash D1

Reload P

Reload K

Reload S

Reload H

Reload D1


Gold2

Shadow2


To select your color, press the corresponding button while in the designated "color set". Color sets can be toggled through by hitting the Respect button.
- Only selectable on the Arcade and PC-Rollback versions of the game.
- Available on home ports, and are selected by pressing the Rec. Enemy button on the Slash or Reload color sets, respectively. Gold characters are powered up versions, Shadow characters have infinite tension. Both are banned from tournament play.
External References
To edit frame data, edit values in GGACR/Anji Mito/Data.
A.B.A
Anji
Axl
Baiken
Bridget
Chipp
Dizzy
Eddie
Faust
I-No
Jam
Johnny
Justice
Kliff
Ky
May
Millia
Order-Sol
Potemkin
Robo-Ky
Slayer
Sol
Testament
Venom
Zappa
Systems Pages