(→Priority of Strike vs Throw vs Command Throw: Adding that strikes beat command throws on the same frame) |
|||
| (124 intermediate revisions by 10 users not shown) | |||
| Line 1: | Line 1: | ||
{{ | {{note|This page assumes that you are already familiar with [[Notation|Numpad Notation]].}} | ||
| | |||
This page | |||
}} | |||
==Guard== | ==Guard== | ||
Guarding, commonly known as Blocking, is the fundamental form of defense in fighting games. | Guarding, commonly known as Blocking, is the fundamental form of defense in fighting games. | ||
| Line 11: | Line 6: | ||
Most special moves also inflict a small percentage of their damage through guard. This is known as {{Keyword|chip damage}}. When a player guards, they are put into a state known as {{keyword|blockstun}} during which their ability to act is mostly taken away. Some abilities can be used during blockstun. Such abilities include [[GGACR/Mechanics#Dead Angle|Dead Angle]], [[GGACR/Mechanics#Burst|Burst]], and character specific options such as {{CLabel|GGACR|Baiken}}'s {{MMC|chara=Baiken|input=Guard > 412P|label=guard cancel attacks}}. | Most special moves also inflict a small percentage of their damage through guard. This is known as {{Keyword|chip damage}}. When a player guards, they are put into a state known as {{keyword|blockstun}} during which their ability to act is mostly taken away. Some abilities can be used during blockstun. Such abilities include [[GGACR/Mechanics#Dead Angle|Dead Angle]], [[GGACR/Mechanics#Burst|Burst]], and character specific options such as {{CLabel|GGACR|Baiken}}'s {{MMC|chara=Baiken|input=Guard > 412P|label=guard cancel attacks}}. | ||
Some attacks cannot be guarded against. These generally fall into two categories: throws and unblockables. Throws are proximity based attacks which | Some attacks cannot be guarded against. These generally fall into two categories: throws and unblockables. Throws are proximity based attacks which cannot be guarded against. Unblockables are special strikes which hit opponents even if they guard. Unblockables, such as {{CLabel|GGACR|Axl}}'s {{MMC|chara=Axl Low|input=[4]6H |label={{clr|H|[4]6H}}}}, must be avoided in some way other than guarding. | ||
In +R, the more a player blocks the more their [[GGACR/Mechanics#Guard Bar|Guard Bar]] fills. The effects of this bar are explained in the section below. | In +R, the more a player blocks the more their [[GGACR/Mechanics#Guard Bar|Guard Bar]] fills. The effects of this bar are explained in the section below. | ||
| Line 20: | Line 15: | ||
Most strikes—attacks which are neither throws nor projectiles—are generally blocked in one of three ways: {{MockCodeBlock|high}}, {{MockCodeBlock|mid}}, and {{MockCodeBlock|low}}. High strikes must be guarded while standing. Low strikes must be guarded crouching. Mid strikes can be guarded in either the standing or crouching state. This blocking scheme does not apply to [[GGACR/Mechanics#Airborne Guard|Airborne Guarding]]. | Most strikes—attacks which are neither throws nor projectiles—are generally blocked in one of three ways: {{MockCodeBlock|high}}, {{MockCodeBlock|mid}}, and {{MockCodeBlock|low}}. High strikes must be guarded while standing. Low strikes must be guarded crouching. Mid strikes can be guarded in either the standing or crouching state. This blocking scheme does not apply to [[GGACR/Mechanics#Airborne Guard|Airborne Guarding]]. | ||
<gallery widths="200px" heights="200px" mode=" | <gallery widths="200px" heights="200px" mode="packed"> | ||
GGACR_System_High_Guard.png|Ky guarding a high strike | GGACR_System_High_Guard.png|Ky guarding a high strike | ||
GGACR_System_Low_Guard.png|Ky guarding a low strike | GGACR_System_Low_Guard.png|Ky guarding a low strike | ||
| Line 27: | Line 22: | ||
====Deceptive Animations==== | ====Deceptive Animations==== | ||
Some attacks have animations which do not make it immediately obvious how the defending player should guard against them. For moves of this nature, player must simply learn to recognize these abnormal animations and remember how to properly guard against them. | Some attacks have animations which do not make it immediately obvious how the defending player should guard against them. For moves of this nature, player must simply learn to recognize these abnormal animations and remember how to properly guard against them. | ||
<gallery widths="200px" heights="200px" mode=" | <gallery widths="200px" heights="200px" mode="packed"> | ||
GGACR_System_Deceptive_High_Strike.png|Venom guarding Testament's high {{clr|D|5D}} | GGACR_System_Deceptive_High_Strike.png|Venom guarding Testament's high {{clr|D|5D}} | ||
GGACR_System_Deceptive_Low_Strike.png|Venom guarding Kliff's low {{clr|H|2H}} | GGACR_System_Deceptive_Low_Strike.png|Venom guarding Kliff's low {{clr|H|2H}} | ||
| Line 36: | Line 31: | ||
Most grounded moves cannot be blocked while in the air, but if the move can be blocked while airborne then the move will be denoted as {{MockCodeBlock|all}} in the move's guard column. Using [[GGACR/Mechanics#Faultless Defense|Faultless Defense]] in the air will allow most grounded attacks to be guarded against. Only a few moves are except from this rule, such as {{CLabel|GGACR|Potemkin}}'s {{MMC|chara=Potemkin|input=623H|label=Heat Knuckle}}. | Most grounded moves cannot be blocked while in the air, but if the move can be blocked while airborne then the move will be denoted as {{MockCodeBlock|all}} in the move's guard column. Using [[GGACR/Mechanics#Faultless Defense|Faultless Defense]] in the air will allow most grounded attacks to be guarded against. Only a few moves are except from this rule, such as {{CLabel|GGACR|Potemkin}}'s {{MMC|chara=Potemkin|input=623H|label=Heat Knuckle}}. | ||
==Instant Block== | ==Instant Block== | ||
{{InputBadge|Any Backwards Direction Within 8 Frames of An Attack Connecting}} | {{InputBadge|Any Backwards Direction Within 8 Frames of An Attack Connecting}} | ||
Also known as Just Defense and IB—Instant block is an alternative type of guard which reduces the {{keyword|blockstun}} the user experiences. | Also known as Just Defense and IB—Instant block is an alternative type of guard which reduces the {{keyword|blockstun}} the user experiences, and reduces pushback between attack and defender. | ||
The amount that IB reduces blockstun by is dependent on whether the IB was performed while grouned or airborne, and also what level of attack IB was used against. | The amount that IB reduces blockstun by is dependent on whether the IB was performed while grouned or airborne, and also what level of attack IB was used against. The table below illustrates how Instant Block reduces the blockstun of an attack based on its Attack Level. | ||
{| class="wikitable stripe" style="margin: 0 auto;" | |||
|- | |||
|+ IB Blockstun Reduction | |||
|- | |||
! Attack Level | |||
! Lv 1 | |||
! Lv 2 | |||
! Lv 3 | |||
! Lv 4 | |||
! Lv 5 | |||
|- | |||
! Grounded IB | |||
| -2 | |||
| -3 | |||
| -3 | |||
| -4 | |||
| -4 | |||
|- | |||
! Airborne IB | |||
| -6 | |||
| -6 | |||
| -6 | |||
| -7 | |||
| -8 | |||
|- | |||
|} | |||
For a full view of blockstun values, see [[GGACR/Frame Data#Attack Level|this table]]. | |||
Instant block has a few other benefits as well. Successuflly performing an IB rewards the player with 0.5% more [[GGACR/Mechanics#Tension|Tension]] than standard Guard would. Instant Blocking also increases the user's [[GGACR/Mechanics#Tension Pulse|Tension Pulse]], which makes them gain Tension at an increased rate. Because the player character will automatically continue blocking mids so long as a blockstring remains gapless, the defending player can input Instant Block in the middle of the opponent's pressure sequence. Finally, when performed in the air, Instant Block will eliminate the user's momentum, and restore their air options. | Instant block has a few other benefits as well. Successuflly performing an IB rewards the player with 0.5% more [[GGACR/Mechanics#Tension|Tension]] than standard Guard would. Instant Blocking also increases the user's [[GGACR/Mechanics#Tension Pulse|Tension Pulse]], which makes them gain Tension at an increased rate. Because the player character will automatically continue blocking mids so long as a blockstring remains gapless, the defending player can input Instant Block in the middle of the opponent's pressure sequence. Finally, when performed in the air, Instant Block will eliminate the user's momentum, and restore their air options. | ||
| Line 63: | Line 74: | ||
The defending player must intelligently choose between Instant Block, [[GGACR/Mechanics#Faultless Defense|Faultless Defense]], and standard [[GGACR/Mechanics#Guard|Guard]]. | The defending player must intelligently choose between Instant Block, [[GGACR/Mechanics#Faultless Defense|Faultless Defense]], and standard [[GGACR/Mechanics#Guard|Guard]]. | ||
<gallery widths="200px" heights="200px" mode=" | <gallery widths="200px" heights="200px" mode="packed"> | ||
GGACR_System_Instant_Block.png|Potemkin Instant Blocking on the ground | GGACR_System_Instant_Block.png|Potemkin Instant Blocking on the ground | ||
GGACR_System_Air_Instant_Block.png|Potemkin Instant Blocking in the air | GGACR_System_Air_Instant_Block.png|Potemkin Instant Blocking in the air | ||
</gallery> | </gallery> | ||
{{ReturnToTop}} | |||
==Faultless Defense== | ==Faultless Defense== | ||
| Line 75: | Line 86: | ||
FD is an enhanced version of blocking which costs {{Keyword|Tension}} to perform. Compared to standard Guard, FD offers a number of advantages. FD increases the {{Keyword|pushback}} the opponent experiences when landing a non-projectile attack. This enables the user to disrupt the opponent's pressure sequence by pushing them out of range of their attacks. Faultless Defense also allows the user to guard while airborne against most attacks which would normally be air unblockable. FD also allows the user to guard immediately after running, which cannot be done with standard Guard—this is known as [[GGACR/Tech#FD Brake|FD Brake]]. Finally, FD prevents the defending player's [[GGACR/Mechanics#Guard Bar|Guard Bar]] from filling, and negates {{Keyword|Chip Damage}}. Furthermore, FD causes the user to drop to the ground after blocking an attack more quickly than standard guard. This allows the user to adjust their position using this mechanic. Finally, FD uses a different hurtbox than standard guard, which can be useful for shifting one's hurtbox out of harm's way while airborne. | FD is an enhanced version of blocking which costs {{Keyword|Tension}} to perform. Compared to standard Guard, FD offers a number of advantages. FD increases the {{Keyword|pushback}} the opponent experiences when landing a non-projectile attack. This enables the user to disrupt the opponent's pressure sequence by pushing them out of range of their attacks. Faultless Defense also allows the user to guard while airborne against most attacks which would normally be air unblockable. FD also allows the user to guard immediately after running, which cannot be done with standard Guard—this is known as [[GGACR/Tech#FD Brake|FD Brake]]. Finally, FD prevents the defending player's [[GGACR/Mechanics#Guard Bar|Guard Bar]] from filling, and negates {{Keyword|Chip Damage}}. Furthermore, FD causes the user to drop to the ground after blocking an attack more quickly than standard guard. This allows the user to adjust their position using this mechanic. Finally, FD uses a different hurtbox than standard guard, which can be useful for shifting one's hurtbox out of harm's way while airborne. | ||
Faultless Defense is not a strict upgrade, however. FD causes the defending player to experience additional {{keyword|blockstun}}—[[GGACR/Frame Data# | Faultless Defense is not a strict upgrade, however. FD causes the defending player to experience additional {{keyword|blockstun}}—[[GGACR/Frame Data#Attack Level|based on the level]] of the attack. This means that the opponent will have more frame advantage to work with in the case that the increase pushback does not immediately end their sequence. The other drawbacks of FD are as follows: | ||
* consumes Tension over time. | * consumes Tension over time. | ||
* consumes additional Tension when guarding attacks. | * consumes additional Tension when guarding attacks. | ||
| Line 84: | Line 95: | ||
Faultless Defense is also used to perform advanced techniques such as [[GGACR/Tech#FD Jump|FD Jump]], [[GGACR/Tech#Impossible Dust|Impossible Dust]], and [[GGACR/Tech#FD Cancel|FD Cancel]]. | Faultless Defense is also used to perform advanced techniques such as [[GGACR/Tech#FD Jump|FD Jump]], [[GGACR/Tech#Impossible Dust|Impossible Dust]], and [[GGACR/Tech#FD Cancel|FD Cancel]]. | ||
[[GGACR/Mechanics#Slashback|Slashback]] has | [[GGACR/Mechanics#Slashback|Slashback]] has input priority over Faultless Defense (FD). Therefore, pressing 4{{clr|S|S}}+{{clr|H|H}} will perform Slashback instead of FD. | ||
<gallery widths="200px" heights="200px" mode=" | <gallery widths="200px" heights="200px" mode="packed"> | ||
GGACR_System_FD.png|Sol's Grounded FD | GGACR_System_FD.png|Sol's Grounded FD | ||
GGACR_System_Air_FD.png|Sol's Airborne FD | GGACR_System_Air_FD.png|Sol's Airborne FD | ||
</gallery> | </gallery> | ||
{{ReturnToTop}} | |||
{{ | |||
==Cancels== | |||
In ACPR, moves can be {{keyword|cancel}}ed when certain conditions are met. This happens when the player inputs another move during their current move. Usually, but not always, cancels require that the first move make contact with the opponent or reach a specific point in their animation before they can be canceled. Additionally, each move has a limited set of moves that they are able to cancel into. The rules for these vary on a case-by-case basis, but usually moves of a similar type follow somewhat consistent rules among each other. | |||
When a move is canceled, the remainder of that move will no longer happen, and the character will immediately proceed into the startup of the move they canceled into.<br> | |||
<u>Type of cancels include:</u> | |||
* [[GGACR/Mechanics#Gatlings|Gatlings]] | |||
* [[GGACR/Mechanics#Special Cancels|Special Cancels]] | |||
* [[GGACR/Mechanics#Jump Cancels|Jump Cancels]] | |||
* [[GGACR/Mechanics#Roman Cancel|Roman Cancels]] | |||
There are also many special cases within the topic of cancels. Some moves, for example {{CLabel|GGACR|Sol}}'s {{clr|P|j.P}}, can be canceled on whiff. Furthermore, some special moves, like {{CLabel|GGACR|Venom}}'s 421X, can be canceled into a specific list of other special moves—something most special moves cannot do. It is important to familiarize yourself with the cancel options your character has. | |||
===Gatlings=== | |||
Gatlings are a type of cancel in which one normal attack cancels into another normal attack on hit or on block during their active frames. | |||
At the absolute most basic level, Gatlings follow a "tree" structure. That is to say, "weaker" attacks usually cancel into "stronger" attacks, or attacks of similar "strength"—like so {{MCB| {{clr|P|P}} > {{clr|K|K}} > {{clr|S|S}} > {{clr|H|H}} > {{clr|D|D}} }}. For example: {{CLabel|GGACR|Sol}}'s {{clr|S|f.S}} can cancel into {{clr|3|2S}}, {{clr|4|5H}}, {{clr|4|2H}}, {{clr|4|6H}}, {{clr|5|5D}}, and {{clr|5|2D}}.<br> | |||
This rule is by no means universal. Some normals can go through the tree in reverse, and there is generally a large number of exceptions to this rule. Every player should study their character's Gatling options. | |||
The full list of normals that a given normal attack can cancel into is included at the bottom of that normal's move card on their respective character page. To view a full table of all Gatling options, view the character's '''Frame Data sub-page'''. | |||
====Special Gatling Rules==== | |||
Most Gatling cancels are only available on hit/block and only during their active frames, but others are available on whiff and can be delayed. | |||
Gatlings which are denoted {{color|green|'''Like This<sup>[+]</sup>'''}} on their respective character's Frame Data page are available on whiff, and can be canceled at any point after their active frames, instead of only during actives. | |||
=== | ===Special Cancels=== | ||
Most normal moves can be canceled into Special moves. These cancels are conceptually similar to other types of cancels, like [[GGACR/Mechanics#Gatlings|Gatlings]], but instead go from normal move to special move instead of from normal move to normal move. | |||
===Jump Cancels=== | |||
Jump Cancels are a simple form of cancel in which a move is canceled into a [[GGACR/Mechanics#Jumping|Jump]] on hit or on block. Like all other forms of cancels, a jump cancel eliminates the remainder of the canceled move's animation, and immediately begins a jump in place of that eliminated animation. | |||
Not all moves are jump cancelable. Check the Gatling Table on a given character's '''Frame Data sub-page''' to see which of their normal attacks are jump cancelable. | |||
{{ReturnToTop}} | |||
==Grounded Movement== | ==Grounded Movement== | ||
| Line 225: | Line 173: | ||
====Run Skid==== | ====Run Skid==== | ||
The run skid animation is a state characters enter when their run is ended without canceling into another action | The run skid animation is a state characters enter when their run is ended without canceling into another action.<br> | ||
This state is cancelable into most actions, but has a major restriction. During the run skid animation, the player cannot guard. This limitation can be avoided by using a technique known as [[GGACR/Tech#FD Brake|FD Brake]]. FD Brake cancels the run skid animation by using {{keyword|Faultless Defense}} for a short period of time. | This state is cancelable into most actions, but has a major restriction. During the run skid animation, the player cannot guard. This limitation can be avoided by using a technique known as [[GGACR/Tech#FD Brake|FD Brake]]. FD Brake cancels the run skid animation by using {{keyword|Faultless Defense}} for a short period of time. | ||
<gallery widths="200px" heights="200px" mode=" | <gallery widths="200px" heights="200px" mode="packed"> | ||
GGACR_System_Running.png|Baiken Running | GGACR_System_Running.png|Baiken Running | ||
GGACR_System_Run Skid.png|Baiken's Run-Skid Animation | GGACR_System_Run Skid.png|Baiken's Run-Skid Animation | ||
| Line 241: | Line 189: | ||
Backdashes travel a fixed distance at a set speed, are not cancelable—except for {{CLabel|GGACR|Slayer}}—and are completely vulnerable for some period in the latter portion of their animation. For these reasons, they are not always preferable to backwards [[#Walking|walking]]. | Backdashes travel a fixed distance at a set speed, are not cancelable—except for {{CLabel|GGACR|Slayer}}—and are completely vulnerable for some period in the latter portion of their animation. For these reasons, they are not always preferable to backwards [[#Walking|walking]]. | ||
<gallery widths="200px" heights="200px" mode=" | <gallery widths="200px" heights="200px" mode="packed"> | ||
GGACR_Potemkin_Backdash.png|Potemkin's Backdash Animation | GGACR_Potemkin_Backdash.png|Potemkin's Backdash Animation | ||
GGACR_Zappa_Backdash.png|Zappa's Backdash Animation | GGACR_Zappa_Backdash.png|Zappa's Backdash Animation | ||
| Line 247: | Line 195: | ||
</gallery> | </gallery> | ||
{{ReturnToTop}} | |||
==Aerial Movement== | ==Aerial Movement== | ||
| Line 260: | Line 208: | ||
{{InputBadge|Any Downward Direction > Any Upward Direction while on the ground}} | {{InputBadge|Any Downward Direction > Any Upward Direction while on the ground}} | ||
Also known as ''super jump'', | Also known as ''super jump'', High Jumps are alternative grounded jumps which travel further upwards than a normal jump, but consume the user's air jumps in exchange. Some characters have notably different High Jump arcs, such as {{CLabel|GGACR|Anji}} and {{CLabel|GGACR|Axl}}. | ||
High Jumps have a few quirks in how they read inputs.<br> | |||
In order to input a High Jump, the player must have some non-down input before the start of the down > up input of the High Jump. The game also checks for a fresh down input within a few frames before the jump, which can affect how the user must input a High Jump Cancel. Additionally, the down input for a High Jump is only stored for a small window of time, and as such the player should account for this in their inputs. | |||
====Prejump==== | ====Prejump==== | ||
| Line 276: | Line 227: | ||
To air dash as soon as possible from a grounded state, players use a technique known as [[GGACR/Tech#Instant Air Dash|Instant Air Dash]]. | To air dash as soon as possible from a grounded state, players use a technique known as [[GGACR/Tech#Instant Air Dash|Instant Air Dash]]. | ||
<gallery widths="200px" heights="200px" mode=" | <gallery widths="200px" heights="200px" mode="packed"> | ||
GGACR_System_Air_Dash_Forward.png|Forwards Airdash | GGACR_System_Air_Dash_Forward.png|Forwards Airdash | ||
GGACR_System_Air_Dash_Backward.png|Backwards Airdash | GGACR_System_Air_Dash_Backward.png|Backwards Airdash | ||
| Line 302: | Line 253: | ||
====Standard Landing Recovery==== | ====Standard Landing Recovery==== | ||
Whenever the player lands from being in the air, they experience | Whenever the player lands from being in the air, they experience landing recovery.<br> | ||
For all characters, there is {{clr|S|1}} frame after landing where the player's only valid action is [[#Guard|guarding]]. Then, there is a character-specific {{clr|P|recovery period}} in which they are not able to [[#Walking|walk]], [[#Jumping|jump]], or [[#backdashing|Backdash]]. Below are the landing {{clr|P|recovery period}} durations, with the universal 1 frame of landing recovery shown as an addition. | |||
{| class="wikitable" style="margin: 0 auto;" | |||
! Characters !! Recovery Period Duration | |||
|- | |||
| {{CLabel|GGACR|Ky}}<br>{{CLabel|GGACR|Robo-Ky}}<br>{{CLabel|GGACR|Order-Sol}} || style="text-align: center;" | {{clr|S|1}} + {{clr|P|4}} = 5 | |||
|- | |||
| {{CLabel|GGACR|Anji}}<br>{{CLabel|GGACR|Axl}}<br>{{CLabel|GGACR|Slayer}} || style="text-align: center;" | {{clr|S|1}} + {{clr|P|3}} = 4 | |||
|- | |||
| Everyone Else || style="text-align: center;" | {{clr|S|1}} + {{clr|P|2}} = 3 | |||
|} | |||
To help visualize this time frame, we can plot a character's landing recovery on a chart—in this case {{CLabel|GGACR|Anji}}. The first frame after landing is marked in {{clr|S|green}}, and the recovery period is marked in {{clr|P|pink}}. | |||
<div style="width: fit-content; margin: 0 auto; border: 1px solid var(--border-color-base); background-color: var(--color-surface-1); padding: 0.8em;"> | |||
{{#invoke:FrameChart|drawFrameData|startupIsFirstActive = false | |||
|startup = 1 | |||
|specialRecovery = 3 | |||
}} | |||
</div> | |||
During these landing recovery frames, the player retains their remaining [[#Air Options|Air Options]] from when they were airborne. This has the effect of an automatic [[GGACR/Tech#Jump Install|Jump Install]]—meaning that they can use their remaining air jumps, and air dashes when they otherwise might not be able to. | During these landing recovery frames, the player retains their remaining [[#Air Options|Air Options]] from when they were airborne. This has the effect of an automatic [[GGACR/Tech#Jump Install|Jump Install]]—meaning that they can use their remaining air jumps, and air dashes when they otherwise might not be able to. Furthermore, the characters with 5 frames of landing recovery count as crouching state. For further reading on this, check the [[#Crouching Landing Recovery|esoterica page]]. | ||
====Special Landing Recovery==== | ====Special Landing Recovery==== | ||
Some airborne moves, such as {{clr|D|j.D}} attacks, have unique, unactionable landing recovery which overrides the standard landing recovery. | Some airborne moves, such as {{clr|D|j.D}} attacks, have unique, unactionable landing recovery which overrides the standard landing recovery. Can be removed by entering blockstun or jumping mid air. | ||
{{ReturnToTop}} | |||
==Dead Angle== | |||
{{InputBadge|6 + Any 2 Attack Buttons Except For {{clr|D|D}}}} | |||
Dead Angles are universal {{keyword|guard cancel}} attacks which cost 50% of the user's [[GGACR/Mechanics#Tension|Tension Gauge]] to use. Although the mechanic itself is universal, the frame data, hitboxes, and animations are character specific. Dead Angles usually have full invulnerability through their startup, and then throw invulnerability through most of their recovery. Dead Angles typically cannot be canceled out of, except through Red Roman Cancel, which costs a further 50% Tension. | |||
Dead Angles can be recognized by the white flash that plays at the start of their animation, and the accomponying audio queue. Because these attacks can only be performed during blockstun, require 50% Tension, and cannot be canceled, attentive players can bait these attacks and punish them for a great return. | |||
<gallery widths="200px" heights="200px" mode="packed"> | |||
GGAC_Venom_5K.png|Venom's Dead Angle re-uses his 5K's animation | |||
GGAC_Baiken_6P.png|Baiken's Dead Angle re-uses her 6P's animation | |||
</gallery> | |||
Dead Angles generally re-use animations from other attacks. Identify dead angles through their white flash and audio queue. | |||
{{ReturnToTop}} | |||
==Burst== | |||
Bursts are special moves which are performed when the [[GGACR/Frame_Data#Burst Gauge|Burst Gauge]] is full. Bursts are invulnerable to strikes and create hitboxes around the user's character which launch the opponent far away if they are hit by the blast. When the move is input, the user lifts up into the air by a small amount, and then falls to the ground after the active frames end. | |||
<u>The Burst Gauge fills in 2 ways:</u> | |||
* When the character is hit | |||
* Over Time | |||
The lower the character's health, the faster their Burst Gauge passively refills over time. Similarly, the bigger the combo, the faster the victim's Burst Gauge will refill. For further detail, see the [[GGACR/Frame_Data#Burst Gauge|Burst Gauge]] section. | |||
Despite being vulnerable to Air Throws, Bursts cannot be thrown by "[[#Unblockable vs Special Command Throw|command throws]]" such as {{CLabel|GGACR|Potemkin}}'s {{MMC|chara=Potemkin|input=623H|label=Heat Knuckle}}, and {{CLabel|GGACR|Anji}}'s {{MMC|chara=Anji Mito|input=623H|label=On}}. | |||
== | Because Bursts are attacks with {{MMC|chara=A.B.A|input=D+X|label=hitboxes|hitboxMode=true}} they need to hit the opponent in order to successfully free the player from danger. By this same rule, Bursts can be countered by blocking them, making them miss, or by air throwing the bursting character before their {{keyword|startup}} completes. If a Blue Burst successfully connects with the opponent, then 30% of the gauge will be refunded. If the Burst misses or is blocked, however, then the gauge will be emptied completely. | ||
===Blue Burst=== | |||
{{InputBadge|Any Attack Button + {{clr|D|D}} While In A Hurt State\Any Attack Button + {{clr|D|D}} While Guarding}} | |||
Blue Bursts act as combo-breakers and pressure disruptors. They can be used while being combo'ed, and while guarding attacks. If the Blue Burst connects, then the opponent will be launched away with great speed. | |||
<u>Blue Bursts are disabled under the following circumstances:</u> | |||
* The character is being thrown | |||
* The character is being hit by an {{Keyword|Overdrive|gameSpecifier=GGACR}} or Instant Kill attack | |||
* The character is {{Keyword|stun}}ned | |||
<gallery widths="200px" heights="200px" mode="packed"> | |||
GGACR_ABA_Blue_Burst.png| | |||
GGACR_Justice_Blue_Burst.png| | |||
</gallery> | |||
====Unique Blue Bursts==== | |||
{{MCC|chara=A.B.A|label={{CLabel|GGACR|A.B.A}}}} and {{MCC|chara=Justice|label={{CLabel|GGACR|Justice}}}} have unique Blue Bursts. | |||
*A.B.A's {{MMC|chara=A.B.A|input=D+X|label=Blue Burst}} has 2f faster startup and 3f shorter recovery than normal. | |||
*Justice's {{MMC|chara=Justice|input=D+X|label=Blue Burst}} has 6f more invulnerability than normal. | |||
====OTG Burst==== | |||
If a player uses Blue Burst while in the knocked down state then the Burst will retain the {{Keyword|OTG}} state. This also applies to ground bounce portion of certain attacks. | |||
OTG Burst presents some major advantages over normal Blue Bursts. Firstly, they cannot be thrown. This is because characters cannot be thrown while in the OTG state. Secondly, they are harder to punish than normal Bursts by retaining this state during the recovery period. This is because the OTG state dramatically reduces how effectively an opposing player can combo, because the burster will be in a state that limits options for punishment. | |||
===Gold Burst=== | |||
{{InputBadge|Any Attack Button + {{clr|D|D}} While Not In A Hurt State}} | |||
{{MMC|chara=A.B.A|input=D+X gold|label=Gold Bursts}} act as the offensive counterpart to Blue Burst. They can be used when not in the hitstun, blockstun, or untechable state required by Blue Burst. | |||
If a Gold Burst hits the opponent character, then the user's [[GGACR/System_Data#Tension|Tension Gauge]] will be filled to 100%. Gold burst usually cannot be combo'ed into, but they can be used as combo starters, especially when they land as counter-hits. This is generally not optimal for most characters, however, due to the heavy {{Keyword|Proration}} Bursts apply. Compared to Blue Bursts, Gold Bursts possess more invulnerability, and are harder to punish. They will also always refund 30% of the Burst Gauge, unlike their Blue counterparts. | |||
<gallery widths="200px" heights="200px" mode="packed"> | |||
GGACR_ABA_Gold_Burst.png| | |||
GGACR_Justice_Gold_Burst.png| | |||
</gallery> | |||
{{ReturnToTop}} | |||
==Throws== | |||
{{InputBadge|{{Clr|H|4H}} or {{Clr|H|6H}} Within close proximity of an opponent}} | |||
Throws are proximity based attacks which the opponent cannot [[#Guard|guard]] against.<br> | |||
In order to throw an opponent, a few conditions must be met: | |||
* The players must be in a similar grounded or airborne state. | |||
** To throw a grounded opponent, the attacker must also be grounded. | |||
** To throw an airborne opponent, the attacker must also be airborne. | |||
* The defender must not be in hitstun or blockstun, nor have throw invulnerability. | |||
* The players must be within the throw's activation range of each other. | |||
If all of the conditions are met, then the attacker can hit the opponent with a throw. Throws are active on the first frame after they are input, and disable the opponent's ability to [[#Blue Burst|burst]] during their animation. The range of a throw is [[GGACR/Frame_Data#Throw_Range|specific to each character and their grounded/airborne state]]. The horizontal range of throws is measured from the edge of the attacker's collision box. The vertical range is measured from the origin of the attacker's collision box, which is at the bottom-center of the box. | |||
<gallery widths="200px" heights="200px" mode="packed"> | |||
GGAC Potemkin throw.png|Potemkin throwing Axl | |||
GGAC Venom throw.png|Venom throwing Eddie | |||
</gallery> | |||
It is possible to throw an opponent who is in the [[#Stagger|Staggered]] state. | |||
===Throw Invulnerability=== | |||
Opponents cannot always be thrown. Below is a list of situations when the opponent cannot be thrown: | |||
*While the opponent is in hitstun + 6 frames after. Basically this means that after an attack strikes the opponent, even if you RC or FRC the move, they will be invulnerable to throws for an additional 6 frames from when they left hitstun. | |||
*While the opponent is in blockstun + 5 frames after blockstun ends. | |||
*While the opponent is knocked down + 9 frames after. | |||
*Ground throws will miss versus airborne opponents and vice versa. | |||
*Some attacks are throw invulnerable, such as Baiken's {{clr|K|6K}}. Attacks like this are often good for Wakeup pressure because they are immune to reversal throws. Some attacks also discretely count as being in the air, such as Slayer's {{clr|K|6K}}. These moves can't be ground thrown, but CAN be air thrown! | |||
====Throw Invulnerability on Wakeup and Command Throws==== | |||
Command throws can actually grab you out of your wakeup super if your wakeup super is only <b>strike invulnerable</b>. It seems that the wakeup protection frames may actually count down during the superflash, so even a character like Bridget who should go active with reversal Loop the Loop on frame 6 can get grabbed out of her reversal super. | |||
===Priority of Strike vs Throw vs Command Throw=== | |||
When two strikes hit each other, either a clash happens or both characters get hit, but what happens when throws are added to the mix? | |||
*'''Throw vs Strike:''' The throw will always win. This is the reason why wakeup throw works in Guilty Gear. Since throws are instant, a throw can beat an opponent performing a meaty on you! | |||
*'''Command Throw vs. Strike:''' The strike will always win. | |||
*'''Normal Throw vs. Normal Throw:''' A [[GGACR/Defense#Throw Break|Throw Break]] occurs. | |||
*'''Normal Throw vs. Command Throw:''' The Command Throw will always win. | |||
*'''Command Throw vs. Command Throw:''' Winner is decided randomly. | |||
Throws will also beat jumps and invulnerable moves if input on the same frame. This indicates that throws are likely detected based upon the state of the game in the frame '''before''' the throw was input. | |||
<br style="clear:both;"/> | |||
===Throw Break=== | |||
{{InputBadge|{{Clr|H|4H}} or {{Clr|H|6H}} Within 1 Frame of Being Thrown}} | |||
A player can negate being thrown by inputting a throw of their own within 1 frame of being thrown.<br> | |||
When a player breaks a throw, both characters will bounce off of each other, emitting a purple flash, and the attacker will be left at a slight advantage. If both players throw on the same frame, then the two characters will reset to a neutral position, as opposed to one player having advantage. This is known as a ''Throw Clash''. | |||
<gallery widths="200px" heights="200px" mode="packed"> | |||
GGACR System Throw Break.png|Venom performing a Throw Break | |||
GGACR System Throw Clash.png|Throw Clash | |||
</gallery> | |||
===Command Throws=== | |||
Some characters have moves which function similarly to [[#Throws|throws]], but use a special move input and sometimes have unique effects.<br> | |||
Generally speaking, command throws follow the same rules that normal throws follow. Examples of command throws include {{CLabel|GGACR|Potemkin}}'s {{MMC|chara=Potemkin|input=632146P|label=Potemkin Buster}}, {{CLabel|GGACR|Slayer}}'s {{MMC|chara=Slayer|input=236H|label=Blood Sucking Universe}}, and {{CLabel|GGACR|Robo-Ky}}'s {{MMC|chara=Robo-Ky|input=63214K|label=S-KY-Line}}. The range of a command throw is specific to itself. | |||
===Unblockable Strikes=== | |||
There are some moves which appear to be command throws, but do not follow the rules of a throw. These moves use hitboxes instead of distance checks, and they can sometimes hit opponents who are in hitstun, or in a different airborne/grounded state from the attacker. Some examples of these moves can be found below. | |||
{| class="wikitable" style="margin: 0 auto;" | |||
! Character !! Move !! Special Rules | |||
|- | |||
| rowspan="2" | {{CLabel|GGACR|Potemkin}} | |||
| {{MMC|chara=Potemkin|input=623H|label=Heat Knuckle}} | |||
| Can hit airborne opponents from the ground<br>Can hit opponents in hitstun<br>Can be [[#Slashback|Slashbacked]] | |||
|- | |||
| {{MMC|chara=Potemkin|input=j.632146D|label=Air Potemkin Buster}} | |||
| Can hit opponents in hitstun<br>Can be [[#Faultless Defense|FD'ed]] | |||
|- | |||
| rowspan="2" | {{CLabel|GGACR|Anji}} || {{MMC|chara=Anji Mito|input=623H|label=On}} || rowspan="2" | Can hit opponenets in hitstun<br>Can be [[#Slashback|Slashbacked]] | |||
|- | |||
| {{MMC|chara=Anji Mito|input=623D|label=Force Break On}} | |||
|} | |||
{{ReturnToTop}} | |||
==Air Teching== | |||
{{InputBadge|Any Direction + Any Attack Button After Leaving Untechable State}} | {{InputBadge|Any Direction + Any Attack Button After Leaving Untechable State}} | ||
Known in game as ''Recovery'', and by the community as''Techs'', or ''Ukemi''—Air Teching is the act of pressing an attack button to escape a combo after the untechable period has ended. | |||
+R uses what is known in the FGC as ''Mash-to-Tech''. This means that the player must press an attack button after the untechable time has elapsed, but before they get hit again. The button cannot be "buffered", meaning that the button cannot be pressed or held in advance. Early presses will result in the player character not teching. Late presses will result in the player character getting hit with an invalid combo (also known as a Black-Beat Combo). | +R uses what is known in the FGC as ''Mash-to-Tech''. This means that the player must press an attack button after the untechable time has elapsed, but before they get hit again. The button cannot be "buffered", meaning that the button cannot be pressed or held in advance. Early presses will result in the player character not teching. Late presses will result in the player character getting hit with an invalid combo (also known as a Black-Beat Combo). | ||
| Line 332: | Line 439: | ||
In order to make teching more consistent and safe, players will usually opt for techniques such as [[GGACR/Tech#Tech FD|Tech FD]] and [[GGACR/Tech#Tech Buttons|Tech Buttons]]. | In order to make teching more consistent and safe, players will usually opt for techniques such as [[GGACR/Tech#Tech FD|Tech FD]] and [[GGACR/Tech#Tech Buttons|Tech Buttons]]. | ||
<gallery widths="200px" heights="200px" mode=" | <gallery widths="200px" heights="200px" mode="packed"> | ||
GGACR_System_Recovery.png|Anji teching after being hit in the air | GGACR_System_Recovery.png|Anji teching after being hit in the air | ||
</gallery> | </gallery> | ||
===Non-Standard | ===Non-Standard Air Tech Cancels=== | ||
Some characters must wait longer to cancel their air techs than others. | Some characters must wait longer to cancel their air techs than others. | ||
*Cancelable on frame 11: {{CLabel|GGACR|Axl}}, {{CLabel|GGACR|Justice}}, {{CLabel|GGACR|Kliff}}, {{CLabel|GGACR|Ky}}, {{CLabel|GGACR|May}}, {{CLabel|GGACR|Robo-Ky}}. | *Cancelable on frame 11: {{CLabel|GGACR|Axl}}, {{CLabel|GGACR|Justice}}, {{CLabel|GGACR|Kliff}}, {{CLabel|GGACR|Ky}}, {{CLabel|GGACR|May}}, {{CLabel|GGACR|Robo-Ky}}. | ||
| Line 343: | Line 450: | ||
Teching has some quirks which can be learned about on the [[GGACR/Esoterica#Teching|Esoterica]] page. | Teching has some quirks which can be learned about on the [[GGACR/Esoterica#Teching|Esoterica]] page. | ||
< | {{ReturnToTop}} | ||
==Tension== | |||
Tension, commonly known by the nickname ''meter'', is the universal resource used by several other mechanics.<br> | |||
: The following cost Tension to use: [[#Faultless Defense|Faultless Defense]], [[#Roman Cancel|Roman Cancel]], {{Keyword|Force Break}}s, {{keyword|Overdrive|gameSpecifier=GGACR}}s, and [[#Slashback|Slashback]]. | |||
: The following actions generate Tension: [[#Walking|Walking]]/[[#Running|Running]]/[[#Jumping|Jumping]] forwards, Hitting the opponent with Normal Attacks, Using Special Moves, and getting hit. | |||
The amount of Tension a player gains is a function of a few factors. Normally, these are the Tension Gain value for the move/character, the distance between player characters, and the player's [[#Tension Pulse|Tension Pulse]]. The Tension cost of a given action costs is specific to that action. The most common costs are 25%, 50%, and ~2%. The color of the Tension Gauge changes as it fills past 25% increments—pictured below. The Tension Gauge cannot be filled past 100%, requiring a player with full Tension to spend meter before they can gain more. | |||
<gallery widths="200px" heights="200px" mode="nolines"> | |||
GGACR_System_Tension 25.png|25% | |||
GGACR_System_Tension 50.png|50% | |||
GGACR_System_Tension 75.png|75% | |||
GGACR_System_Tension 100.png|100% | |||
</gallery> | |||
{{CLabel|GGACR|Robo-Ky}} has a unique Tension Gauge alternative. | |||
<gallery widths="150px" heights="150px" mode="nolines"> | |||
GGACR Robo-Ky Meter.png|Robo-Ky's unique Tension alternative | |||
</gallery> | |||
===Tension Pulse=== | |||
Tension Pulse is a mechanic which acts as a modifier on the amount of tension a player gains.<br> | |||
Actions have a base tension gain listed in their frame data, and tension pulse modifies that number. A player's Tension Pulse is indicated by a small pulse effect which ripples through their Tension Gauge. The faster the pulse, the greater their Tension Pulse. Tension Pulse can be increased and decreased by performing certain actions. | |||
{| class="wikitable" style="margin: 0 auto;" | |||
! Actions Which Increase Tension Pulse !! Actions Which Decrease Tension Pulse | |||
|- | |||
| [[#Running|Running Forwards]] || [[#Backdash|Backdashing]] | |||
|- | |||
| [[#Air Dash|Air Dashing Forwards]] || [[#Air Dash|Air Dashing Backwards]] | |||
|- | |||
| [[#Walking|Walking Forwards]] || [[#Walking|Walking Backwards]] | |||
|- | |||
| Hitting the opponent || Standing Still | |||
|- | |||
| Touching {{CLabel|GGACR|Faust}}'s {{MMC|chara=Faust|input=Chikuwa}} | |||
|} | |||
<div style="margin: 0 0 1em; display: flex;flex-direction: row;flex-wrap: wrap;justify-content: center;align-items: flex-end;align-content: flex-end; width: 100%; overflow: hidden;"> | |||
<div style="text-align: center;">[[File:GGACR_System_High Tension Pulse.webm|autoplay|loop|muted]]<br><div style="margin-top: -66px;">High Tension Pulse</div></div> | |||
<div style="text-align: center;">[[File:GGACR_System_Low Tension Pulse.webm|autoplay|loop|muted]]<br><div style="margin-top: -66px;">Low Tension Pulse</div></div> | |||
</div> | |||
== | Tension Pulse ranges between {{Clr|H|-25000}} and {{Clr|S|25000}}, but its effects apply in breakpoints. Below is a table of the Tension Gain Modifiers that relate to the breakpoints of Tension Pulse. | ||
{{ | {| class="wikitable" style="text-align: center; margin: 0 auto;" | ||
|+Tension Gain Modifier | |||
|- | |||
! Tension Pulse !! Tension Gain | |||
|- | |||
| ≤ {{Clr|H|-12500}} || 25% | |||
|- | |||
| {{Clr|H|-7500}} || 50% | |||
|- | |||
| {{Clr|H|-3750}} || 75% | |||
|- | |||
| {{Clr|H|-1250}} || 90% | |||
|- | |||
| Default || 100% | |||
|- | |||
| {{Clr|S|1250}} || 125% | |||
|- | |||
| ≥ {{Clr|S|5000}} || 150% | |||
|- | |||
|} | |||
Actions which reduce Tension Pulse also contribute towards [[#Negative Penalty|Negative Penalty]]. | |||
===Tension Penalty=== | |||
Some actions reduce tension gain independently of Tension Pulse. | |||
* [[#Faultless Defense|Faultless Defense]] reduces Tension gain by 80% for 1 second (59f). | |||
* [[#Roman Cancel|Roman Cancel]], [[#Roman Cancel|Force Roman Cancel]] and [[#Force Breaks|Force Breaks]] reduce Tension gain by 80% for 4 seconds (240f). | |||
* [[#Negative_Penalty|Negative Penalty]] reduces Tension gain by 80% for 10 seconds (600f). | |||
* Exiting Sol's {{MMC|chara=Sol Badguy|input=214214S|label=Dragon Install}} by letting the timer run out, or activating {{MMC|chara=Sol Badguy|input=214214214214PH|label=Dragon Install 2nd}} reduces Tension gain by 80% for 10 seconds (600f). | |||
<gallery widths="200px" heights="200px" mode=" | ===Negative Penalty=== | ||
Negative Penalty punishes players for certain actions by completely emptying their Tension gauge.<br> | |||
As mentioned in the [[#Tension Pulse|Tension Pulse]] section, actions which negatively impact the user's Tension Pulse contribute towards Negative Penalty. If the player uses too many of these actions in succession, then Negative penalty will activate. | |||
{{ReturnToTop}} | |||
==Roman Cancel== | |||
{{InputBadge|3 Attack Buttons, Except for {{Clr|D|D}}, After an Attack Connects}} | |||
Roman Cancel, known from this point forwards as ''RC'', is a mechanic which allows a player to spend 50% of their max [[#Tension|Tension]] in order to instantly {{Keyword|cancel}} their current action.<br> | |||
This means that, once an RC has been input, the player character will instantly end whatever action they are currently performing and return to their default state. This is used for many applications. For instructions on how to use this mechanic to your advantage, reference the [[GGACR/Start Here#Using Roman Cancels|starter guide]]. | |||
===Force Roman Cancel=== | |||
{{InputBadge|3 Attack Buttons, Except for {{Clr|D|D}}, During Valid FRC Window}} | |||
Known most commonly as ''FRC''—is a variant of RC which only applies to specific moves for specific time windows.<br> | |||
FRCs cost half as much as a normal RC, but require the the user to press the 3 attack buttons within the move's FRC window. This window is specific to each move, and some moves may not have an FRC window at all. The wiki lists the FRC window for each move in the "stats for nerds" section for that move on a character's overview. Furthermore, the frame chart highlights the FRC windows by adding a yellow underline to frame which can be FRC'ed. | |||
FRCs have the added benefit that they do not require the move hit the opponent. FRCs have a blue visual effect, compared to the red effect of a normal RC. | |||
Note, FRC window will not shift or extend due to hitstops; the window will always be static after the move is initiated. | |||
<gallery widths="200px" heights="200px" mode="packed"> | |||
GGACR_System_Roman Cancel.png|Testament using RC | |||
GGACR_System_Force Roman Cancel.png|Testament using FRC | |||
</gallery> | |||
{{ReturnToTop}} | |||
==Force Breaks== | |||
Force breaks are special moves which cost 25% of the user's max [[#Tension|Tension]] to perform.<br> | |||
Force breaks usually are more powerful than normal special moves, or have unique properties. They are also usually input using the {{Clr|D|D}} button and a special move input. | |||
Using a Force Break reduces the user's Tension Gain by 80% for 4 seconds. | |||
{{ReturnToTop}} | |||
==Stagger== | |||
Stagger is a state in which the afflicted character is left defenseless until it ends, until they [[#Slip Recovery|escape]], or until they are hit by the opposing player.<br> | |||
Certain moves apply the stagger state under varying circumstances. Some moves apply the state on counter hit, and others apply it on any grounded hit. Furthermore, the duration for which the stagger state lasts varies on a case-by-case basis.<br> | |||
It is possible for the attacking player to '''combo into throws''' against a staggered opponent. | |||
===Slip Recovery=== | |||
{{InputBadge|Alternate Between Forwards and Backwards While In The Staggered State}} | |||
Most commonly known as ''Stagger Recovery''—Slip Recovery is how the defending player escapes the stagger state early.<br> | |||
In the simplest words, a player escapes stagger by mashing the backwards and forwards inputs. Slip recovery can be conceptualized as reducing an invisible counter with one's inputs. | |||
* Backwards inputs decrement the slip counter by {{Clr|H|1}}. | |||
* Forwards inputs decrement the slip counter by {{Clr|S|2}}. | |||
''Forwards inputs'' refers to the directions {{MCB|6}}, {{MCB|3}}, and {{MCB|9}}. ''Backwards inputs'' refers to the directions {{MCB|4}}, {{MCB|1}}, and {{MCB|7}}. Forwards and Backwards inputs must be separated by an input that is not of the same directionality as the previous. It is not necessary to perform a neutral input. For example: {{MCB|64646}} and {{MCB|31313}} are both valid inputs. The method the player chooses to mash these directions depends on their personal preferences, but they should ensure that they are hitting as many forwards and backwards directions as possible. | |||
<gallery widths="200px" heights="200px" mode="packed"> | |||
GGACR_System_Slip_Recovery.png|Potemkin in the Staggered state after being hit by {{clr|H|236H}} | GGACR_System_Slip_Recovery.png|Potemkin in the Staggered state after being hit by {{clr|H|236H}} | ||
</gallery> | </gallery> | ||
{{ReturnToTop}} | |||
==Stun== | ==Stun== | ||
Also known as | Also known as ''Dizzy''—Stun is a state in which the afflicted character is rendered defenseless until the state ends, they [[#Stun Recovery|escape]], or they are hit by the opposing player.<br> | ||
There is, conceptually, an invisible stun gauge that fills when a character gets hit. The amount the gauge fills by is determined by plugging in a value specific to each attack into the [[GGACR/Damage Data#Stun|stun formula]]. Each character has a unique [[GGACR/Damage Data#Stun Resistance|Stun Resistance]] stat. When a player is close to being stunned, their character icon in the HUD will flash red. The angels circling a stunned player's head act as a visual indicator of the remaining stun time. Once all of the angels are gone, the player will recover from the stunned state. | |||
<gallery widths="200px" heights="200px" mode=" | The stunned state will end early the next time the stunned player is hit after the hit or combo that inflicts the stun. This means that the attacking player can stun the opponent part-way through their current combo, and then utilize the stun to get a "free combo" after the current combo ends. | ||
<gallery widths="200px" heights="200px" mode="packed"> | |||
GGACR_System_Stun_Warning.png|Dizzy's Icon on the verge of being stunned | GGACR_System_Stun_Warning.png|Dizzy's Icon on the verge of being stunned | ||
GGACR_System_Stun.png|Dizzy in Stunned state | GGACR_System_Stun.png|Dizzy in Stunned state | ||
| Line 365: | Line 592: | ||
===Stun Recovery=== | ===Stun Recovery=== | ||
{{InputBadge|Any Direction And Attack Button Other Than {{Clr|D|D}}}} | {{InputBadge|Any Direction, other than 2 and 8, And Attack Button, Other Than {{Clr|D|D}}}} | ||
The defending player can speed up the stun timer by inputting directions, and by pressing attack buttons—excluding {{Clr|D|D}}.<br> | |||
{{ReturnToTop}} | |||
==Hitboxes and Hurtboxes== | |||
The game determines when a player gets hit by an attack using invisible boxes called "hitboxes" and "hurtboxes".<br> | |||
The {{clr|H|hitboxes}} are rectangles which defines where an attack can hit the opponent. {{clr|S|Hurtboxes}} define where a character can get hit. On this wiki, those boxes are shown using {{clr|H|red}} and {{clr|S|green}} rectangles. If an attack's hitboxes do not touch the opponent's hurtboxes, then the attack will miss. Hitboxes and hurtboxes ''do not always match the character's body''. | |||
Below are examples of how hitboxes and hurtboxes interact.<br> | |||
In the first example, {{CLabel|GGACR|Sol}} uses his {{MMC|chara=Sol Badguy|input=2D|label={{clr|D|2D}}|hitboxMode=true}} and {{CLabel|GGACR|Ky}} uses his {{MMC|chara=Ky Kiske|input=f.S|label={{clr|S|f.S}}|hitboxMode=true}}. Because neither character touches each other's hurtbox (green) with their hitbox (red), their attacks both miss. | |||
<gallery widths="200" heights="200" mode="packed"> | |||
GGACR System Hitboxes-1.png|Sol and Ky missing each with their attacks | |||
</gallery> | |||
In the second example, {{CLabel|GGACR|Sol}} uses his {{MMC|chara=Sol Badguy|input=f.S|label={{clr|S|f.S}}|hitboxMode=true}} and successfully hits {{CLabel|GGACR|Ky}}. This is because his hitbox (red) overlaps Ky's hurtbox (green). Sol's hurtbox is made darker just to help tell the two characters apart. | |||
<gallery widths="200" heights="200" mode="packed"> | |||
GGACR System Hitboxes-2.png|Sol hits ky | |||
</gallery> | |||
Some moves have either partial or full invulnerability to strikes—attacks which use hitboxes. The way this works is that the character's hurtboxes shrinks or goes away entirely. Remember, attacks must make their hitbox overlap the opponent's hurtboxes in order to hit. Therefore, shrinking or removing a character's hurtbox can make attacks "miss" them. Below are some examples of moves which shrink or remove the user's hurtboxes. | |||
<gallery widths="200" heights="200" mode="traditional"> | |||
GGXXACPR Sol 6P-Hitbox.png|Sol's upper body is invulnerable to strikes | |||
GGXXACPR Sol 623S-1-Hitbox.png|Sol's entire body is invulnerable to strikes | |||
GGXXACPR Slayer 2H-Hitbox.png|Slayer's feet and shins are invulnerable to strikes | |||
</gallery> | |||
===Collision Boxes=== | |||
Also known as ''Pushboxes''—collision boxes determine where the player character "is" within the space of the game world. These collision boxes are shown as {{clr|cyan|cyan}} rectangles in hitbox images.<br> | |||
Two characters cannot move through each other normally. This is because their collision boxes "push up against each other. It may sound confusing, but think of it like this: You and your friend cannot walk through each other. Once you get close enough to touch each other, you cannot push through each other. The pushboxes for characters in game are the same way. | |||
{{ReturnToTop}} | |||
==Defense== | |||
More accurately labeled as ''Damage Received Modifier''—Defense is a stat which modifies how much damage a character receives.<br> | |||
At a simple level, this stat acts as a multiplier on any incoming damage. This means that the lower the number, the lower the damage that character receives. | |||
<u>For example:</u><br> | |||
{{MCC|chara=Potemkin|label={{CLabel|GGACR|Potemkin}}}} has a Damage Received Modifier of {{clr|S|0.87}}. {{MCC|chara=Chipp Zanuff|label={{CLabel|GGACR|Chipp}}}} has a Damage Received Modifier of {{clr|H|1.3}}. This means that Potemkin takes dramatically less damage from the same hit than Chipp does. If a hit has {{MCB|100}} base damage, then that hit would deal {{MCB|87}} damage to Potemkin. Likewise, that same hit would do {{MCB|130}} damage to Chipp. This stat is only one part of the damage equation, though. Other factors, such as [[#Guts|Guts]] and [[GGACR/Damage_Data#Combo Scaling|combo scaling]], also influence the amount of damage a character receives. | |||
For a full, detailed explanation of Damage Received Modifiers and their precise numbers, check the [[GGACR/Damage_Data#Damage Received Modifier|Damage Data]] page. | |||
{{ReturnToTop}} | |||
==Guts== | |||
As a character's health goes down, they also take less damage.<br> | |||
Each character has their own Guts Rating, which is a score from {{Clr|H|0}} to {{Clr|S|5}}, which determines how much damage is reduced by as their health depletes. The greater the Guts Rating number, the greater the damage reduction Guts provides. | |||
<u>For example:</u><br> | |||
{{MCC|chara=May|label={{CLabel|GGACR|May}}}} and {{MCC|chara=Venom|label={{CLabel|GGACR|Venom}}}} both have the same [[#Damage Received Modifier|Damage Received Modifier]]. As a result, they both take the same amount of damage when their HP is near full. As their health gets lower, May will take less and less damage than Venom does. This is because May has a Guts Rating of {{clr|S|3}}, whereas Venom has a Guts Rating of {{clr|H|1}}. | |||
For a full, detailed explanation of Guts and its precise numbers, check the [[GGACR/Damage_Data#Guts|Damage Data]] page.<br> | |||
For an explanation of the Guts Spike glitch, check the [[GGACR/Esoterica#Guts Spike|esoterica]] page. | |||
{{ReturnToTop}} | |||
==Guard Bar== | |||
The Guard Bar visualizes [[GGACR/Damage Data#Guard Bar Damage Scaling|combo scaling]] and rewards players for making the opponent block.<br> | |||
The guard bar is a small, pink bar which appears below the player's life bar, and adjacent to their [[#Burst|Burst]] gauge. The Guard Bar starts at its resting value of 0—exactly in the middle of the gauge. The gauge fills towards the outer edges of the screen, and empties towards the center of the screen. | |||
Whenever a player gets hit, their own guard bar depletes. When that player stops getting hit, the guard bar will briefly pause in place, and then reset back to its resting value at the center of the gauge.<br> | |||
Whenever a player blocks an attack, their guard bar fills. Under this circumstance, the guard bar will slowly deplete back to its resting position so long as they do not continue blocking attacks. If that player gets hit, then the first rule takes precedent—the guard bar will reset back to its resting position. | |||
So long as the Guard Bar is filled beyond its resting position, then [[GGACR/Damage Data#Guard Bar Damage Scaling|combo scaling]] does not apply. As the Guard Bar depletes into the negatives, then the combo will experience increasing scaling. This means that each hit will deal less and less damage as the Guard Bar depletes. | |||
The amount that each move increases and decreases the Guard Bar by is specific to that move. These values are known as GB+ and GB-. A greater number means a greater increase or decrease of the Guard Bar. | |||
<gallery mode="nolines" widths="200" heights="200"> | |||
GGACR System Guard Bar.png|the Guard Bar at resting value (0) | |||
</gallery> | |||
===Guard Balance and Guard Recovery=== | |||
Each character has a stat, known as ''Guard Balance'', which modifies the rate at which their Guard Bar fills.<br> | |||
Guard Balance acts as a simple multiplier, meaning that the greater the Guard Balance, the faster that character's Guard Bar fills. | |||
Additionally, each character has the ''Guard Recovery'' stat which determines how quickly their Guard Bar empties in a neutral state.<br> | |||
The Guard Recovery state is measured as a function of time. A Guard Recovery of {{MCB|1/5F}} means that the Guard Bar drains by 1 for every 5 frames. | |||
{| class="mw-collapsible mw-collapsed wikitable sortable stripe" style="margin: 0 auto;" | |||
! colspan="3" | Guard Balances By Character | |||
|- | |||
! Characters !! Guard Balance !! Guard Recovery | |||
|- | |||
| {{CLabel|GGACR|Anji}} || rowspan="3" | ×{{clr|H|1.25}} || {{clr|H|1/6F}} | |||
|- | |||
| {{CLabel|GGACR|Millia}} || {{clr|H|1/6F}} | |||
|- | |||
| {{CLabel|GGACR|Robo-Ky}} || 1/5F | |||
|- | |||
| {{CLabel|GGACR|Chipp}} || ×{{clr|H|1.125}} || 1/5F | |||
|- | |||
| {{CLabel|GGACR|A.B.A}} || rowspan="16" | ×1.00 || 1/5F | |||
|- | |||
| {{CLabel|GGACR|Axl}} || 1/5F | |||
|- | |||
| {{CLabel|GGACR|Baiken}} || 1/5F | |||
|- | |||
| {{CLabel|GGACR|Bridget}} || 1/5F | |||
|- | |||
| {{CLabel|GGACR|Eddie}} || 1/5F | |||
|- | |||
| {{CLabel|GGACR|I-No}} || 1/5F | |||
|- | |||
| {{CLabel|GGACR|Jam}} || 1/5F | |||
|- | |||
| {{CLabel|GGACR|Kliff}} || {{clr|S|1/4F}} | |||
|- | |||
| {{CLabel|GGACR|Ky}} || 1/5F | |||
|- | |||
| {{CLabel|GGACR|May}} || 1/5F | |||
|- | |||
| {{CLabel|GGACR|Order-Sol}} || 1/5F | |||
|- | |||
| {{CLabel|GGACR|Potemkin}} || {{clr|S|1/4F}} | |||
|- | |||
| {{CLabel|GGACR|Sol}} || 1/5F | |||
|- | |||
| {{CLabel|GGACR|Testament}} || {{clr|H|1/6F}} | |||
|- | |||
| {{CLabel|GGACR|Venom}} || 1/5F | |||
|- | |||
| {{CLabel|GGACR|Zappa}} || 1/5F | |||
|- | |||
| {{CLabel|GGACR|Dizzy}} || rowspan="3" | ×{{clr|S|0.875}} || 1/5F | |||
|- | |||
| {{CLabel|GGACR|Johnny}} || 1/5F | |||
|- | |||
| {{CLabel|GGACR|Slayer}} || 1/5F | |||
|- | |||
| {{CLabel|GGACR|Justice}} || ×{{clr|S|0.85}} || 1/5F | |||
|- | |||
| {{CLabel|GGACR|Faust}} || ×{{clr|S|0.8125}} || {{clr|H|1/6F}} | |||
|} | |||
{{ReturnToTop}} | |||
==Slashback== | |||
{{InputBadge|Any Backwards Direction + {{clr|S|S}}+{{clr|H|H}}}} | |||
{{note|Slashback is an advanced mechanic. This section will contain a large amount of technical data.|level=medium}} | |||
Slashback is a {{keyword|parry}} which dramatically reduces the {{keyword|blockstun}} the user experiences. | |||
===Performing Slashback=== | |||
In order to Slashback (SB) an attack, the user must input SB within 2 frames of the attack connecting. Slashback costs 2% Tension up front to input. In order to succeed, Slashback must be performed with the correct direction as if the player were blocking an attack with standard [[GGACR/Mechanics#Guard|Guard]]. Slashback is not available for the first 10 frames after a character's {{keyword|wake up}} animation.<br> | |||
If the player succeeds in SB'ing an attack, then window for Slashback will be widened to 6 frames for the next 45 frames of time. Slashbacks disable the user's standard Guard whether they are successful or not. After a successful SB, standard Guard is disabled for 15 frames. After a failed SB, standard Guard is disabled for 30 frames. | |||
Slashback has a number of advanced input techniques. They can be found on the [[GGACR/Tech#Slashback Input Tricks|tech page]]. | |||
<gallery widths="200px" heights="200px" mode=" | <gallery widths="200px" heights="200px" mode="packed"> | ||
GGACR_System_Slashback.png|A.B.A Slashbacking on the ground | |||
GGACR_System_Air_Slashback.png|A.B.A Slashbacking in the air | |||
</gallery> | </gallery> | ||
==Attack Attributes== | |||
{{Note|These attributes and mechanics require an understanding of frame data and several system mechanics.}} | |||
Attacks have many properties which can be valuable to learn beyond their basic frame data. Below is a short directory to help find the sections on these properties. | |||
* [[GGACR/Frame_Data#Attack_Level|Attack Levels]] | |||
* [[GGACR/Damage_Data#Stun|Stun Damage]] | |||
* [[GGACR/Damage_Data#Initial_Proration_and_Forced_Proration|Proration]] | |||
* [[GGACR/Damage_Data#Chip_Damage|Chip Damage]] | |||
If the data you are looking for cannot be found on this page, please check the [[GGACR/Damage_Data|Damage Data]] and [[GGACR/Frame_Data|Frame Data]] pages. | |||
===The Effects Of Slashback=== | |||
Slashback sets the blockstun experienced by the user to a flat value—1 frame for airborne blockstun, and 3 frames for grounded blockstun. Additionally, a successful Slashback combines several traits of [[GGACR/Mechanics#Faultless Defense|FD]] and [[GGACR/Mechanics#Instant Block|IB]]. | |||
* Grants the user a large amount of tension | |||
* Increases [[GGACR/Mechanics#Tension Pulse|Tension Pulse]] by 1000 | |||
* Negates {{keyword|chip damage}} | |||
* Prevents the user's Guard Bar from filling | |||
* Allows the user to defend out of a run | |||
A successful air Slashback will eliminate the user's air momentum and restore their air options. Furthermore, slashback can be used to defend against attacks which are otherwise completely unblockable<br> | |||
for example: {{CLabel|GGACR|Potemkin}}'s {{MMC|input=623H|chara=Potemkin|label=Heat Kuckle}}. | |||
This list of upsides makes Slashback incredibly potent. It is limited primarily by the extreme difficulty of performing it, and the punishment for failure. Use to your own risk. | |||
{{ReturnToTop}} | |||
==Wakeup Animations== | |||
Whenever a character is knocked down, they go through an animation where they stand up. This is known as "wakeup". | |||
Wakeup animations consist of 3 parts: | |||
{{ | * Ground Bounce Time (Context-Specific) | ||
* {{keyword|OTG}} State (11F) | |||
* Character-Specific Invuln. Wakeup Animation | |||
The duration of the Ground Bounce is determined by a number of factors. These include the move used to knock down, the airborne/grounded state of the victim, and more.<br> | |||
Therefore, {{MCB|Wakeup Time <nowiki>=</nowiki> Ground Bounce + 11 + Invuln. Anim.}} | |||
<div style="width: fit-content; margin: 0 auto;"> | |||
{{#cargo_query:tables=ggacrCharacters | |||
|fields=CONCAT('[[file:', icon, '|24px|link=]] ', name)=Character,CONCAT(wakeupFaceDown,"F")=Face Down,CONCAT(wakeupFaceUp,"F")=Face Up | |||
|where=name NOT IN("A.B.A \(Moroha\)", "A.B.A \(Goku Moroha\)", "Justice \(Omega Shift\)") | |||
|format=table | |||
}} | |||
</div> | |||
{{ReturnToTop}} | |||
==Wake-Up Buffer== | ==Wake-Up Buffer== | ||
The game will buffer/repeat actions | The game will buffer/repeat certain actions for {{clr|S|1}} frame if they are input 1 frame before the character wakes up.<br> | ||
<u>These actions include</u>: | |||
* Normal moves | |||
* Special moves | |||
* {{Keyword|Overdrive|gameSpecifier=GGACR}}s | |||
* Instant Kill attacks | |||
There are also some actions which the game ''will not'' buffer on wakeup.<br> | |||
<u>These actions include</u>: | |||
* [[#Backdash|Backdash]] | |||
* [[#Running|Run]] | |||
* special moves input using {{Keyword|negative edge}} | |||
{{ReturnToTop}} | |||
==Cross-up Protection== | |||
In situations where your character is facing with their back to the opponent the game will accept both 4/6 as a valid input for blocking.<br> | |||
Unforunately it's not without exceptions but the general idea is that: | |||
* Holding 4 will only grant you cross-up protection for 1 frame as it immediately turns you around otherwise. | |||
* Holding 1 will grant you cross-up protection for 9 frames. | |||
* While holding 4 in the air you have infinite cross-up protection as long as your character is facing away from the opponent. | |||
* Performing grounded-FD will immediately turn you around and remove all cross-up protection. The air version will only turn you around the moment it's pressed. | |||
'''Please note that all the directional inputs are assuming you were holding the direction before you got crossed up.''' | |||
{{ReturnToTop}} | |||
==Taunt and Respect== | |||
Assigned to a separate Respect button ({{Prompt|GGACR|R}}), Taunt and Respect are fluff mechanics with little practical use on most characters. A character can have 1 or 2 of either Taunt or Respect. Respect button is also used to rotate between color sets on character select screen. | |||
===Taunt=== | |||
{{InputBadge|{{clr|6|R}}}} | |||
Taunt is the more committal option between Taunt and Respect. Taunts cannot be canceled until 62F and grant opponent 10% Tension Gauge. Unlike Respect, taunt can be special cancelled into. | |||
Taunts are not entirley without uses. {{CLabel|GGACR|Kliff}}'s taunt fires a unique, powerful projectile. Additionally, {{CLabel|GGACR|Testament}} has very [[GGACR/Testament#Curse_Attacks|niche]] uses for it. | |||
Taunting after winning a round triggers effect known as "'''Rakusyo'''" and gives the opponent 50% Tension at the start of the next round. | |||
<gallery widths="200px" heights="200px" mode="packed"> | |||
GGAC_Kliff_taunt.png|Kliff's Taunt is a strong neutral and pressure tool | |||
GGAC_Dizzy_Respect.png|Dizzy's Taunt is a knowledge check unblockable | |||
</gallery> | |||
===Respect=== | |||
{{InputBadge|{{clr|6|6R}}}} | |||
Respect is simple communication tool between players with almost zero practical use. Cancellable from 18F. | |||
<gallery widths="200px" heights="200px" mode="packed"> | |||
GGACR_System_Respect.png|Anji's Respect can be used to fake his {{clr|1|3P}} overhead and perform a low isntead | |||
</gallery> | |||
==Navigation== | ==Navigation== | ||
{{ | {{GGACR/Navigation}} | ||
<!-- | <!-- | ||
Search Engine Optimization Data. | Search Engine Optimization Data. | ||
Latest revision as of 11:20, 14 April 2024
Guard
Guarding, commonly known as Blocking, is the fundamental form of defense in fighting games.
Most special moves also inflict a small percentage of their damage through guard. This is known as chip damage Damage incurred when blocking an attack. Typically, only Special Attacks and Super Attacks have chip damage, but there are exceptions.. When a player guards, they are put into a state known as blockstun When a character successfully blocks an attack while standing or crouching, the defender is forced into a stun animation for a set period of time where they are incapable of acting. This period of time is called blockstun. during which their ability to act is mostly taken away. Some abilities can be used during blockstun. Such abilities include Dead Angle, Burst, and character specific options such as ![]() Baiken's guard cancel attacks
Baiken's guard cancel attacks GuardAllStartup9Recovery32Advantage-.
Some attacks cannot be guarded against. These generally fall into two categories: throws and unblockables. Throws are proximity based attacks which cannot be guarded against. Unblockables are special strikes which hit opponents even if they guard. Unblockables, such as ![]() Axl's [4]6H
Axl's [4]6H GuardUnblockableStartup27Recovery34Advantage-, must be avoided in some way other than guarding.
In +R, the more a player blocks the more their Guard Bar fills. The effects of this bar are explained in the section below.
Grounded Guard
Hold 4 or 1
Most strikes—attacks which are neither throws nor projectiles—are generally blocked in one of three ways: high, mid, and low. High strikes must be guarded while standing. Low strikes must be guarded crouching. Mid strikes can be guarded in either the standing or crouching state. This blocking scheme does not apply to Airborne Guarding.

Ky guarding a high strike

Ky guarding a low strike


Deceptive Animations
Some attacks have animations which do not make it immediately obvious how the defending player should guard against them. For moves of this nature, player must simply learn to recognize these abnormal animations and remember how to properly guard against them.

Venom guarding Testament's high 5D

Venom guarding Kliff's low 2H


Airborne Guard
Hold Any Backwards Direction
Most grounded moves cannot be blocked while in the air, but if the move can be blocked while airborne then the move will be denoted as all in the move's guard column. Using Faultless Defense in the air will allow most grounded attacks to be guarded against. Only a few moves are except from this rule, such as ![]() Potemkin's Heat Knuckle
Potemkin's Heat Knuckle GuardUnblockable, FD×3Startup14Recovery22Advantage-.
Instant Block
Any Backwards Direction Within 8 Frames of An Attack Connecting
Also known as Just Defense and IB—Instant block is an alternative type of guard which reduces the blockstun When a character successfully blocks an attack while standing or crouching, the defender is forced into a stun animation for a set period of time where they are incapable of acting. This period of time is called blockstun. the user experiences, and reduces pushback between attack and defender.
The amount that IB reduces blockstun by is dependent on whether the IB was performed while grouned or airborne, and also what level of attack IB was used against. The table below illustrates how Instant Block reduces the blockstun of an attack based on its Attack Level.
| Attack Level | Lv 1 | Lv 2 | Lv 3 | Lv 4 | Lv 5 |
|---|---|---|---|---|---|
| Grounded IB | -2 | -3 | -3 | -4 | -4 |
| Airborne IB | -6 | -6 | -6 | -7 | -8 |
For a full view of blockstun values, see this table.
Instant block has a few other benefits as well. Successuflly performing an IB rewards the player with 0.5% more Tension than standard Guard would. Instant Blocking also increases the user's Tension Pulse, which makes them gain Tension at an increased rate. Because the player character will automatically continue blocking mids so long as a blockstring remains gapless, the defending player can input Instant Block in the middle of the opponent's pressure sequence. Finally, when performed in the air, Instant Block will eliminate the user's momentum, and restore their air options.
If a player misses the timing for IB, then they will be unable to instant block for 30 frames. The other main weakpoint of Instant Block is the effect on Guard Bar. Normally, Guard Bar gain is halved during gapless blockstrings. IB can create gaps in the block string, which can cause the user's Guard Bar to fill more more quickly in practice.
One effect of IB that is contextually positive or negative is that IB reduces the pushback When an attacking player hits their opponent, they are pushed backwards by a small amount. This is the most common form of infinite combo/blockstring prevention system. between the attacker and defender. This can be incredibly beneficial for the defender—allowing them to punish moves which are usually safe using a throw. It can also be a reason to not use Instant Block, because the reduced pushback can let the opponent use their shorter ranged options to continue their offense.
The defending player must intelligently choose between Instant Block, Faultless Defense, and standard Guard.

Potemkin Instant Blocking on the ground

Potemkin Instant Blocking in the air


Faultless Defense
Any Backwards Direction + Any 2 Attack Buttons Except D—And Cannot Use S+H
FD is an enhanced version of blocking which costs Tension The name for the main resource meter in the Guilty Gear SeriesTension can be spent on Faultless Defense, Overdrives, and more. to perform. Compared to standard Guard, FD offers a number of advantages. FD increases the pushback When an attacking player hits their opponent, they are pushed backwards by a small amount. This is the most common form of infinite combo/blockstring prevention system. the opponent experiences when landing a non-projectile attack. This enables the user to disrupt the opponent's pressure sequence by pushing them out of range of their attacks. Faultless Defense also allows the user to guard while airborne against most attacks which would normally be air unblockable. FD also allows the user to guard immediately after running, which cannot be done with standard Guard—this is known as FD Brake. Finally, FD prevents the defending player's Guard Bar from filling, and negates Chip Damage Damage incurred when blocking an attack. Typically, only Special Attacks and Super Attacks have chip damage, but there are exceptions.. Furthermore, FD causes the user to drop to the ground after blocking an attack more quickly than standard guard. This allows the user to adjust their position using this mechanic. Finally, FD uses a different hurtbox than standard guard, which can be useful for shifting one's hurtbox out of harm's way while airborne.
Faultless Defense is not a strict upgrade, however. FD causes the defending player to experience additional blockstun When a character successfully blocks an attack while standing or crouching, the defender is forced into a stun animation for a set period of time where they are incapable of acting. This period of time is called blockstun.—based on the level of the attack. This means that the opponent will have more frame advantage to work with in the case that the increase pushback does not immediately end their sequence. The other drawbacks of FD are as follows:
- consumes Tension over time.
- consumes additional Tension when guarding attacks.
- reduces the user's Tension gain by 80% for 1 second.
- disables the user's Crossup Attacking your opponent after changing which horizontal side you are on, typically by jumping over them. protection.
As such, players should choose an appropriate time to use FD in order to preserve their meter economy and maximize the positive effects. For further reading on the specific details of how FD consumed tension, reference FD Meter Consumption.
Faultless Defense is also used to perform advanced techniques such as FD Jump, Impossible Dust, and FD Cancel.
Slashback has input priority over Faultless Defense (FD). Therefore, pressing 4S+H will perform Slashback instead of FD.

Sol's Grounded FD

Sol's Airborne FD


Cancels
In ACPR, moves can be cancel To bypass the remaining time or frames in an action by proceeding directly into another action.ed when certain conditions are met. This happens when the player inputs another move during their current move. Usually, but not always, cancels require that the first move make contact with the opponent or reach a specific point in their animation before they can be canceled. Additionally, each move has a limited set of moves that they are able to cancel into. The rules for these vary on a case-by-case basis, but usually moves of a similar type follow somewhat consistent rules among each other.
When a move is canceled, the remainder of that move will no longer happen, and the character will immediately proceed into the startup of the move they canceled into.
Type of cancels include:
There are also many special cases within the topic of cancels. Some moves, for example ![]() Sol's j.P, can be canceled on whiff. Furthermore, some special moves, like
Sol's j.P, can be canceled on whiff. Furthermore, some special moves, like ![]() Venom's 421X, can be canceled into a specific list of other special moves—something most special moves cannot do. It is important to familiarize yourself with the cancel options your character has.
Venom's 421X, can be canceled into a specific list of other special moves—something most special moves cannot do. It is important to familiarize yourself with the cancel options your character has.
Gatlings
Gatlings are a type of cancel in which one normal attack cancels into another normal attack on hit or on block during their active frames.
At the absolute most basic level, Gatlings follow a "tree" structure. That is to say, "weaker" attacks usually cancel into "stronger" attacks, or attacks of similar "strength"—like so P > K > S > H > D . For example: ![]() Sol's f.S can cancel into 2S, 5H, 2H, 6H, 5D, and 2D.
Sol's f.S can cancel into 2S, 5H, 2H, 6H, 5D, and 2D.
This rule is by no means universal. Some normals can go through the tree in reverse, and there is generally a large number of exceptions to this rule. Every player should study their character's Gatling options.
The full list of normals that a given normal attack can cancel into is included at the bottom of that normal's move card on their respective character page. To view a full table of all Gatling options, view the character's Frame Data sub-page.
Special Gatling Rules
Most Gatling cancels are only available on hit/block and only during their active frames, but others are available on whiff and can be delayed.
Gatlings which are denoted Like This[+] on their respective character's Frame Data page are available on whiff, and can be canceled at any point after their active frames, instead of only during actives.
Special Cancels
Most normal moves can be canceled into Special moves. These cancels are conceptually similar to other types of cancels, like Gatlings, but instead go from normal move to special move instead of from normal move to normal move.
Jump Cancels
Jump Cancels are a simple form of cancel in which a move is canceled into a Jump on hit or on block. Like all other forms of cancels, a jump cancel eliminates the remainder of the canceled move's animation, and immediately begins a jump in place of that eliminated animation.
Not all moves are jump cancelable. Check the Gatling Table on a given character's Frame Data sub-page to see which of their normal attacks are jump cancelable.
Grounded Movement
Walking
[4] or [6] while on the ground
Walking is the most basic form of ground-based movement.
When a character walks, they will move forwards or backwards at a speed specific to them. The character will continue to walk so long as their player holds down the directional input. 1 and 3 are not valid walk inputs. Walking can be canceled into any action immediately.
One of the main advantages to walking is that it provides fine grain control over one's positioning. By contrast, jumps lock the player into a fixed arc, and runs maintain momentum for a time after the player releases their input. Because walks can be canceled immediately, they allow the user to block freely after forwards movement, which running on its own does not allow. Another advantage is that walks are usually silent. Without an associated audio queue, walks can be hard to react to.
Running
6[6] while on the ground
Running is conceptually similar to walking, but faster and with some negative trade-offs.
Akin to walking, each character has their own running speed and acceleration. Some characters—such as ![]() Potemkin—cannot run at all. Other characters have special alternatives to running. A list of these special cases can be found below.
Potemkin—cannot run at all. Other characters have special alternatives to running. A list of these special cases can be found below.
Although running requires two consecutive 6 inputs, the player can shift their forwards input into a 3 input so long as they maintain a constant forwards input. The player character will continue to run so long as a valid run input is held. If the player releases the run input and does not cancel the run into another action, they will perform a run skid animation.
Runs will sometimes maintain momentum when canceled into another action, and other times can have their momentum negated. This varies on a case-by-base basis.
| Character | Run Type |
|---|---|
| Step Dash | |
| Hover Dash | |
| Teleport Step Dash | |
| Cannot Run | |
Cannot Run, except during Omega Shift GuardStartup5+0RecoveryTotal 5Advantage- GuardStartup5+0RecoveryTotal 5Advantage-
|
Run Skid
The run skid animation is a state characters enter when their run is ended without canceling into another action.
This state is cancelable into most actions, but has a major restriction. During the run skid animation, the player cannot guard. This limitation can be avoided by using a technique known as FD Brake. FD Brake cancels the run skid animation by using Faultless Defense A special type of blocking in Guilty Gear that negates chip damage and pushes the opponent back further than usual. This type of blocking comes at the cost of a resource. for a short period of time.
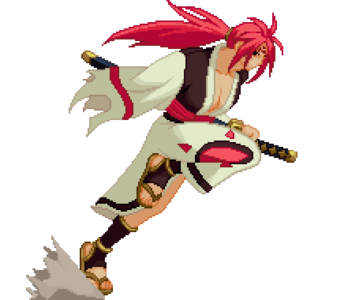
Baiken Running

Baiken's Run-Skid Animation


Backdash
44 while on the ground
Backdashes are movement options which provide a quick burst of backwards movement with some strike invulnerability.
Each character's backdash has its own frame data and physics. With the exception of ![]() Slayer, all backdash animations are airborne for their entire duration. The strike invulnerability for backdashes begins on the first frame of their animation. This means that backdashes can be used to avoid strikes and projectiles with good timing, but are still vulnerable to air throws.
Slayer, all backdash animations are airborne for their entire duration. The strike invulnerability for backdashes begins on the first frame of their animation. This means that backdashes can be used to avoid strikes and projectiles with good timing, but are still vulnerable to air throws.
Backdashes travel a fixed distance at a set speed, are not cancelable—except for ![]() Slayer—and are completely vulnerable for some period in the latter portion of their animation. For these reasons, they are not always preferable to backwards walking.
Slayer—and are completely vulnerable for some period in the latter portion of their animation. For these reasons, they are not always preferable to backwards walking.

Potemkin's Backdash Animation

Zappa's Backdash Animation
Slayer's Backdash Animation


Aerial Movement
Jumping
Any Upward Direction
Jumping is the most basic way to put one's player character into the air.
Players can jump while on the ground, or while in the air. When a character jumps, they are locked into a fixed arc which is determined by the direction of the jump input combined with any momentum they have at the time of the jump. Each character has their own jump physics. These determine the speed, height, and duration of their jumps. Before the character becomes airborne, there is a short Prejump Animation with some limitations, explained in its respective section. After a player jumps, they take on the airborne property, which affects what moves they can use, as well as how they receive incoming hit effects.
Most characters can jump two times before returning to the ground under normal circumstances.
High Jump
Any Downward Direction > Any Upward Direction while on the ground
Also known as super jump, High Jumps are alternative grounded jumps which travel further upwards than a normal jump, but consume the user's air jumps in exchange. Some characters have notably different High Jump arcs, such as ![]() Anji and
Anji and ![]() Axl.
Axl.
High Jumps have a few quirks in how they read inputs.
In order to input a High Jump, the player must have some non-down input before the start of the down > up input of the High Jump. The game also checks for a fresh down input within a few frames before the jump, which can affect how the user must input a High Jump Cancel. Additionally, the down input for a High Jump is only stored for a small window of time, and as such the player should account for this in their inputs.
Prejump
Each character has an animation which plays before they jump off of the ground. This is known as their prejump animation, or simply prejump for short. The prejump animation also applies to the character's high-jump animation.
If a player is hit during their prejump animation, it counts as if they got hit while standing on the ground. During a character's prejump animation, they are invulnerable to throws. After the player's prejump animation ends, and they have become airborne, they cannot execute normal attacks for 1 frame.
The prejump animation can be canceled into certain actions, such as special moves, and Overdrive The name for Super Moves in the Guilty Gear Series. Overdrives cost 50% tension and perform a variety of functions depending on the characters.
Air Dash
44 or 66 while on in the air
Air Dashes are the near universal burst movement option while airborne. Most characters can air dash one time before returning to the ground. Other characters cannot air dash at all. For a breakdown of these rules, see the air options explanation. When a character air dashes, they travel at a speed specific to them for a time period specific to them. Each character's air dash has their own startup time. The player character is not actionable for a period of time after the air dash begins.
To air dash as soon as possible from a grounded state, players use a technique known as Instant Air Dash.

Forwards Airdash

Backwards Airdash


Air Options
Air Options conceptually represent the amount of times a character can jump or dash while in the air without returning to the ground. Certain moves, and states restore a player's Air Options. Generally speaking, exiting air blockstun and air hitstun restores the victim's Air Options.
| Character | Air Options |
|---|---|
| Can air dash 2 times | |
| Can jump 3 times | |
| Cannot air dash | |
| *Can jump and air dash 3 times during Omega ShiftGuardStartup5+0RecoveryTotal 5Advantage-
|
Landing Recovery
Landing from the air has recovery. This recovery comes in 2 kinds.
Standard Landing Recovery
Whenever the player lands from being in the air, they experience landing recovery.
For all characters, there is 1 frame after landing where the player's only valid action is guarding. Then, there is a character-specific recovery period in which they are not able to walk, jump, or Backdash. Below are the landing recovery period durations, with the universal 1 frame of landing recovery shown as an addition.
| Characters | Recovery Period Duration |
|---|---|
| 1 + 4 = 5 | |
| 1 + 3 = 4 | |
| Everyone Else | 1 + 2 = 3 |
To help visualize this time frame, we can plot a character's landing recovery on a chart—in this case ![]() Anji. The first frame after landing is marked in green, and the recovery period is marked in pink.
Anji. The first frame after landing is marked in green, and the recovery period is marked in pink.
During these landing recovery frames, the player retains their remaining Air Options from when they were airborne. This has the effect of an automatic Jump Install—meaning that they can use their remaining air jumps, and air dashes when they otherwise might not be able to. Furthermore, the characters with 5 frames of landing recovery count as crouching state. For further reading on this, check the esoterica page.
Special Landing Recovery
Some airborne moves, such as j.D attacks, have unique, unactionable landing recovery which overrides the standard landing recovery. Can be removed by entering blockstun or jumping mid air.
Dead Angle
6 + Any 2 Attack Buttons Except For D
Dead Angles are universal guard cancel An attack which can be performed while the user is in blockstun. attacks which cost 50% of the user's Tension Gauge to use. Although the mechanic itself is universal, the frame data, hitboxes, and animations are character specific. Dead Angles usually have full invulnerability through their startup, and then throw invulnerability through most of their recovery. Dead Angles typically cannot be canceled out of, except through Red Roman Cancel, which costs a further 50% Tension.
Dead Angles can be recognized by the white flash that plays at the start of their animation, and the accomponying audio queue. Because these attacks can only be performed during blockstun, require 50% Tension, and cannot be canceled, attentive players can bait these attacks and punish them for a great return.

Venom's Dead Angle re-uses his 5K's animation

Baiken's Dead Angle re-uses her 6P's animation


Dead Angles generally re-use animations from other attacks. Identify dead angles through their white flash and audio queue.
Burst
Bursts are special moves which are performed when the Burst Gauge is full. Bursts are invulnerable to strikes and create hitboxes around the user's character which launch the opponent far away if they are hit by the blast. When the move is input, the user lifts up into the air by a small amount, and then falls to the ground after the active frames end.
The Burst Gauge fills in 2 ways:
- When the character is hit
- Over Time
The lower the character's health, the faster their Burst Gauge passively refills over time. Similarly, the bigger the combo, the faster the victim's Burst Gauge will refill. For further detail, see the Burst Gauge section.
Despite being vulnerable to Air Throws, Bursts cannot be thrown by "command throws" such as ![]() Potemkin's Heat KnuckleGuardUnblockable, FD×3Startup14Recovery22Advantage-, and
Potemkin's Heat KnuckleGuardUnblockable, FD×3Startup14Recovery22Advantage-, and ![]() Anji's On
Anji's On GuardUnblockableStartup11Recovery20+6 after landingAdvantage-.
Because Bursts are attacks with hitboxes GuardAllStartup17Recovery24Advantage-12 they need to hit the opponent in order to successfully free the player from danger. By this same rule, Bursts can be countered by blocking them, making them miss, or by air throwing the bursting character before their startup The time before an attack is active including the first active frame. For example, an attack with 10F startup means the attack will do nothing for 9 frames, then hit the opponent on the 10th frame. completes. If a Blue Burst successfully connects with the opponent, then 30% of the gauge will be refunded. If the Burst misses or is blocked, however, then the gauge will be emptied completely.
Blue Burst
Any Attack Button + D While In A Hurt State or Any Attack Button + D While Guarding
Blue Bursts act as combo-breakers and pressure disruptors. They can be used while being combo'ed, and while guarding attacks. If the Blue Burst connects, then the opponent will be launched away with great speed.
Blue Bursts are disabled under the following circumstances:
- The character is being thrown
- The character is being hit by an Overdrive The name for Super Moves in the Guilty Gear Series. Overdrives cost 50% tension and perform a variety of functions depending on the character or Instant Kill attack
- The character is stun A special hurt state in which the character is left unable to act for a long time which goes away after the next combo performed on them. Can sometimes have the duration shortened via a sort of mini-game.ned


Unique Blue Bursts
![]() A.B.A
A.B.A
 Damage Received:
0.89Guts Rating:
0Weight Class:
0.98Wakeup Time:
32/21 and ![]() Justice
Justice
 Damage Received:
1.03Guts Rating:
5Weight Class:
1.05Wakeup Time:
25/20 have unique Blue Bursts.
- A.B.A's Blue Burst
 GuardAllStartup17Recovery24Advantage-12 has 2f faster startup and 3f shorter recovery than normal.
 - Justice's Blue Burst
 GuardAllStartup19Recovery27Advantage-15 has 6f more invulnerability than normal.
OTG Burst
If a player uses Blue Burst while in the knocked down state then the Burst will retain the OTG The act of hitting the opponent when they are knocked down. Short for "off the ground" or "on the ground." state. This also applies to ground bounce portion of certain attacks.
OTG Burst presents some major advantages over normal Blue Bursts. Firstly, they cannot be thrown. This is because characters cannot be thrown while in the OTG state. Secondly, they are harder to punish than normal Bursts by retaining this state during the recovery period. This is because the OTG state dramatically reduces how effectively an opposing player can combo, because the burster will be in a state that limits options for punishment.
Gold Burst
Any Attack Button + D While Not In A Hurt State
Gold Bursts GuardAllStartup19Recovery26Advantage-5 act as the offensive counterpart to Blue Burst. They can be used when not in the hitstun, blockstun, or untechable state required by Blue Burst.
If a Gold Burst hits the opponent character, then the user's Tension Gauge will be filled to 100%. Gold burst usually cannot be combo'ed into, but they can be used as combo starters, especially when they land as counter-hits. This is generally not optimal for most characters, however, due to the heavy Proration A method of combo damage reduction. Specific types of proration have specific names, but each type reduces the amount of damage subsequent attacks in the combo will deal by a specific amount. Bursts apply. Compared to Blue Bursts, Gold Bursts possess more invulnerability, and are harder to punish. They will also always refund 30% of the Burst Gauge, unlike their Blue counterparts.

Throws
4H or 6H Within close proximity of an opponent
Throws are proximity based attacks which the opponent cannot guard against.
In order to throw an opponent, a few conditions must be met:
- The players must be in a similar grounded or airborne state.
- To throw a grounded opponent, the attacker must also be grounded.
- To throw an airborne opponent, the attacker must also be airborne.
- The defender must not be in hitstun or blockstun, nor have throw invulnerability.
- The players must be within the throw's activation range of each other.
If all of the conditions are met, then the attacker can hit the opponent with a throw. Throws are active on the first frame after they are input, and disable the opponent's ability to burst during their animation. The range of a throw is specific to each character and their grounded/airborne state. The horizontal range of throws is measured from the edge of the attacker's collision box. The vertical range is measured from the origin of the attacker's collision box, which is at the bottom-center of the box.

Potemkin throwing Axl

Venom throwing Eddie


It is possible to throw an opponent who is in the Staggered state.
Throw Invulnerability
Opponents cannot always be thrown. Below is a list of situations when the opponent cannot be thrown:
- While the opponent is in hitstun + 6 frames after. Basically this means that after an attack strikes the opponent, even if you RC or FRC the move, they will be invulnerable to throws for an additional 6 frames from when they left hitstun.
- While the opponent is in blockstun + 5 frames after blockstun ends.
- While the opponent is knocked down + 9 frames after.
- Ground throws will miss versus airborne opponents and vice versa.
- Some attacks are throw invulnerable, such as Baiken's 6K. Attacks like this are often good for Wakeup pressure because they are immune to reversal throws. Some attacks also discretely count as being in the air, such as Slayer's 6K. These moves can't be ground thrown, but CAN be air thrown!
Throw Invulnerability on Wakeup and Command Throws
Command throws can actually grab you out of your wakeup super if your wakeup super is only strike invulnerable. It seems that the wakeup protection frames may actually count down during the superflash, so even a character like Bridget who should go active with reversal Loop the Loop on frame 6 can get grabbed out of her reversal super.
Priority of Strike vs Throw vs Command Throw
When two strikes hit each other, either a clash happens or both characters get hit, but what happens when throws are added to the mix?
- Throw vs Strike: The throw will always win. This is the reason why wakeup throw works in Guilty Gear. Since throws are instant, a throw can beat an opponent performing a meaty on you!
- Command Throw vs. Strike: The strike will always win.
- Normal Throw vs. Normal Throw: A Throw Break occurs.
- Normal Throw vs. Command Throw: The Command Throw will always win.
- Command Throw vs. Command Throw: Winner is decided randomly.
Throws will also beat jumps and invulnerable moves if input on the same frame. This indicates that throws are likely detected based upon the state of the game in the frame before the throw was input.
Throw Break
4H or 6H Within 1 Frame of Being Thrown
A player can negate being thrown by inputting a throw of their own within 1 frame of being thrown.
When a player breaks a throw, both characters will bounce off of each other, emitting a purple flash, and the attacker will be left at a slight advantage. If both players throw on the same frame, then the two characters will reset to a neutral position, as opposed to one player having advantage. This is known as a Throw Clash.

Venom performing a Throw Break

Throw Clash


Command Throws
Some characters have moves which function similarly to throws, but use a special move input and sometimes have unique effects.
Generally speaking, command throws follow the same rules that normal throws follow. Examples of command throws include ![]() Potemkin's Potemkin Buster
Potemkin's Potemkin Buster Guard176 pixelsStartup3Recovery37Advantage-,
 ![]() Slayer's Blood Sucking Universe
Slayer's Blood Sucking Universe Guard92 pixelsStartup7Recovery29Advantage-, and
 ![]() Robo-Ky's S-KY-Line
Robo-Ky's S-KY-Line Guard70 pixelsStartup7Recovery37Advantage-. The range of a command throw is specific to itself.
Unblockable Strikes
There are some moves which appear to be command throws, but do not follow the rules of a throw. These moves use hitboxes instead of distance checks, and they can sometimes hit opponents who are in hitstun, or in a different airborne/grounded state from the attacker. Some examples of these moves can be found below.
| Character | Move | Special Rules |
|---|---|---|
| Heat KnuckleGuardUnblockable, FD×3Startup14Recovery22Advantage-
|
Can hit airborne opponents from the ground Can hit opponents in hitstun Can be Slashbacked | |
Air Potemkin Buster GuardFDStartup5RecoveryUntil landing+12Advantage- GuardFDStartup5RecoveryUntil landing+12Advantage-
|
Can hit opponents in hitstun Can be FD'ed | |
| OnGuardUnblockableStartup11Recovery20+6 after landingAdvantage- |
Can hit opponenets in hitstun Can be Slashbacked | |
| Force Break OnGuardUnblockableStartup21Recovery35+6 after landingAdvantage-
|
Air Teching
Any Direction + Any Attack Button After Leaving Untechable State
Known in game as Recovery, and by the community asTechs, or Ukemi—Air Teching is the act of pressing an attack button to escape a combo after the untechable period has ended.
+R uses what is known in the FGC as Mash-to-Tech. This means that the player must press an attack button after the untechable time has elapsed, but before they get hit again. The button cannot be "buffered", meaning that the button cannot be pressed or held in advance. Early presses will result in the player character not teching. Late presses will result in the player character getting hit with an invalid combo (also known as a Black-Beat Combo).
Despite being able to input tech with any direction, the character will only move in one of the following directions: forwards, backwards, and neutralthe type of recovery which moves the least from the starting point..
Teching offers the following bonuses in addition to letting the user avoid fake combos:
- Techs are fully invulnerable for 6 frames after leaving hitstun.
- Forward & Neutral tech are Strike invulnerable until frame 16.
- Backwards tech is Strike invulnerable until frame 14.
- Techs can be canceled into other actions from the 10th frame for most characters.
- A tech's remaining invulnerability carries over to the action it was canceled with.
- Teching restores the user's air actions, allowing them to jump or airdash again after being hit.
In order to make teching more consistent and safe, players will usually opt for techniques such as Tech FD and Tech Buttons.

Anji teching after being hit in the air

Non-Standard Air Tech Cancels
Some characters must wait longer to cancel their air techs than others.
Teching has some quirks which can be learned about on the Esoterica page.
Tension
Tension, commonly known by the nickname meter, is the universal resource used by several other mechanics.
- The following cost Tension to use: Faultless Defense, Roman Cancel, Force Break A type of special attack in Guilty Gear that consumes meter, but is not a super. Normally the power of these attacks are between that of Specials and Supers.s, Overdrive The name for Super Moves in the Guilty Gear Series. Overdrives cost 50% tension and perform a variety of functions depending on the characters, and Slashback.
- The following actions generate Tension: Walking/Running/Jumping forwards, Hitting the opponent with Normal Attacks, Using Special Moves, and getting hit.
The amount of Tension a player gains is a function of a few factors. Normally, these are the Tension Gain value for the move/character, the distance between player characters, and the player's Tension Pulse. The Tension cost of a given action costs is specific to that action. The most common costs are 25%, 50%, and ~2%. The color of the Tension Gauge changes as it fills past 25% increments—pictured below. The Tension Gauge cannot be filled past 100%, requiring a player with full Tension to spend meter before they can gain more.

25%

50%

75%

100%
![]() Robo-Ky has a unique Tension Gauge alternative.
Robo-Ky has a unique Tension Gauge alternative.

Robo-Ky's unique Tension alternative
Tension Pulse
Tension Pulse is a mechanic which acts as a modifier on the amount of tension a player gains.
Actions have a base tension gain listed in their frame data, and tension pulse modifies that number. A player's Tension Pulse is indicated by a small pulse effect which ripples through their Tension Gauge. The faster the pulse, the greater their Tension Pulse. Tension Pulse can be increased and decreased by performing certain actions.
| Actions Which Increase Tension Pulse | Actions Which Decrease Tension Pulse |
|---|---|
| Running Forwards | Backdashing |
| Air Dashing Forwards | Air Dashing Backwards |
| Walking Forwards | Walking Backwards |
| Hitting the opponent | Standing Still |
Touching  GuardStartup53 [51]RecoveryAdvantage- GuardStartup53 [51]RecoveryAdvantage-
|
Tension Pulse ranges between -25000 and 25000, but its effects apply in breakpoints. Below is a table of the Tension Gain Modifiers that relate to the breakpoints of Tension Pulse.
| Tension Pulse | Tension Gain |
|---|---|
| ≤ -12500 | 25% |
| -7500 | 50% |
| -3750 | 75% |
| -1250 | 90% |
| Default | 100% |
| 1250 | 125% |
| ≥ 5000 | 150% |
Actions which reduce Tension Pulse also contribute towards Negative Penalty.
Tension Penalty
Some actions reduce tension gain independently of Tension Pulse.
- Faultless Defense reduces Tension gain by 80% for 1 second (59f).
- Roman Cancel, Force Roman Cancel and Force Breaks reduce Tension gain by 80% for 4 seconds (240f).
- Negative Penalty reduces Tension gain by 80% for 10 seconds (600f).
- Exiting Sol's Dragon Install
 GuardStartup19+1RecoveryTotal 20Advantage- by letting the timer run out, or activating Dragon Install 2nd
 GuardStartup63+64RecoveryTotal 127Advantage- reduces Tension gain by 80% for 10 seconds (600f).


Negative Penalty
Negative Penalty punishes players for certain actions by completely emptying their Tension gauge.
As mentioned in the Tension Pulse section, actions which negatively impact the user's Tension Pulse contribute towards Negative Penalty. If the player uses too many of these actions in succession, then Negative penalty will activate.
Roman Cancel
3 Attack Buttons, Except for D, After an Attack Connects
Roman Cancel, known from this point forwards as RC, is a mechanic which allows a player to spend 50% of their max Tension in order to instantly cancel To bypass the remaining time or frames in an action by proceeding directly into another action. their current action.
This means that, once an RC has been input, the player character will instantly end whatever action they are currently performing and return to their default state. This is used for many applications. For instructions on how to use this mechanic to your advantage, reference the starter guide.
Force Roman Cancel
3 Attack Buttons, Except for D, During Valid FRC Window
Known most commonly as FRC—is a variant of RC which only applies to specific moves for specific time windows.
FRCs cost half as much as a normal RC, but require the the user to press the 3 attack buttons within the move's FRC window. This window is specific to each move, and some moves may not have an FRC window at all. The wiki lists the FRC window for each move in the "stats for nerds" section for that move on a character's overview. Furthermore, the frame chart highlights the FRC windows by adding a yellow underline to frame which can be FRC'ed.
FRCs have the added benefit that they do not require the move hit the opponent. FRCs have a blue visual effect, compared to the red effect of a normal RC.
Note, FRC window will not shift or extend due to hitstops; the window will always be static after the move is initiated.

Testament using RC

Testament using FRC


Force Breaks
Force breaks are special moves which cost 25% of the user's max Tension to perform.
Force breaks usually are more powerful than normal special moves, or have unique properties. They are also usually input using the D button and a special move input.
Using a Force Break reduces the user's Tension Gain by 80% for 4 seconds.
Stagger
Stagger is a state in which the afflicted character is left defenseless until it ends, until they escape, or until they are hit by the opposing player.
Certain moves apply the stagger state under varying circumstances. Some moves apply the state on counter hit, and others apply it on any grounded hit. Furthermore, the duration for which the stagger state lasts varies on a case-by-case basis.
It is possible for the attacking player to combo into throws against a staggered opponent.
Slip Recovery
Alternate Between Forwards and Backwards While In The Staggered State
Most commonly known as Stagger Recovery—Slip Recovery is how the defending player escapes the stagger state early.
In the simplest words, a player escapes stagger by mashing the backwards and forwards inputs. Slip recovery can be conceptualized as reducing an invisible counter with one's inputs.
- Backwards inputs decrement the slip counter by 1.
- Forwards inputs decrement the slip counter by 2.
Forwards inputs refers to the directions 6, 3, and 9. Backwards inputs refers to the directions 4, 1, and 7. Forwards and Backwards inputs must be separated by an input that is not of the same directionality as the previous. It is not necessary to perform a neutral input. For example: 64646 and 31313 are both valid inputs. The method the player chooses to mash these directions depends on their personal preferences, but they should ensure that they are hitting as many forwards and backwards directions as possible.
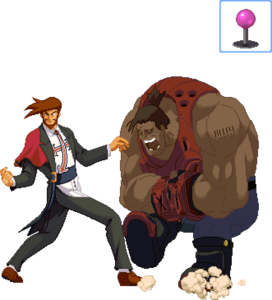
Potemkin in the Staggered state after being hit by 236H

Stun
Also known as Dizzy—Stun is a state in which the afflicted character is rendered defenseless until the state ends, they escape, or they are hit by the opposing player.
There is, conceptually, an invisible stun gauge that fills when a character gets hit. The amount the gauge fills by is determined by plugging in a value specific to each attack into the stun formula. Each character has a unique Stun Resistance stat. When a player is close to being stunned, their character icon in the HUD will flash red. The angels circling a stunned player's head act as a visual indicator of the remaining stun time. Once all of the angels are gone, the player will recover from the stunned state.
The stunned state will end early the next time the stunned player is hit after the hit or combo that inflicts the stun. This means that the attacking player can stun the opponent part-way through their current combo, and then utilize the stun to get a "free combo" after the current combo ends.

Dizzy's Icon on the verge of being stunned

Dizzy in Stunned state


Stun Recovery
Any Direction, other than 2 and 8, And Attack Button, Other Than D
The defending player can speed up the stun timer by inputting directions, and by pressing attack buttons—excluding D.
Hitboxes and Hurtboxes
The game determines when a player gets hit by an attack using invisible boxes called "hitboxes" and "hurtboxes".
The hitboxes are rectangles which defines where an attack can hit the opponent. Hurtboxes define where a character can get hit. On this wiki, those boxes are shown using red and green rectangles. If an attack's hitboxes do not touch the opponent's hurtboxes, then the attack will miss. Hitboxes and hurtboxes do not always match the character's body.
Below are examples of how hitboxes and hurtboxes interact.
In the first example, ![]() Sol uses his 2D
Sol uses his 2D GuardLowStartup7Recovery20Advantage-6 and
 ![]() Ky uses his f.S
Ky uses his f.S GuardMidStartup10Recovery19Advantage-11. Because neither character touches each other's hurtbox (green) with their hitbox (red), their attacks both miss.

Sol and Ky missing each with their attacks

In the second example, ![]() Sol uses his f.S
Sol uses his f.S GuardMidStartup7Recovery24Advantage-11 and successfully hits
 ![]() Ky. This is because his hitbox (red) overlaps Ky's hurtbox (green). Sol's hurtbox is made darker just to help tell the two characters apart.
Ky. This is because his hitbox (red) overlaps Ky's hurtbox (green). Sol's hurtbox is made darker just to help tell the two characters apart.

Sol hits ky

Some moves have either partial or full invulnerability to strikes—attacks which use hitboxes. The way this works is that the character's hurtboxes shrinks or goes away entirely. Remember, attacks must make their hitbox overlap the opponent's hurtboxes in order to hit. Therefore, shrinking or removing a character's hurtbox can make attacks "miss" them. Below are some examples of moves which shrink or remove the user's hurtboxes.

Sol's upper body is invulnerable to strikes
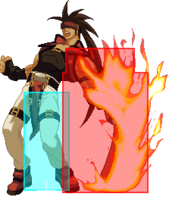
Sol's entire body is invulnerable to strikes

Slayer's feet and shins are invulnerable to strikes


Collision Boxes
Also known as Pushboxes—collision boxes determine where the player character "is" within the space of the game world. These collision boxes are shown as cyan rectangles in hitbox images.
Two characters cannot move through each other normally. This is because their collision boxes "push up against each other. It may sound confusing, but think of it like this: You and your friend cannot walk through each other. Once you get close enough to touch each other, you cannot push through each other. The pushboxes for characters in game are the same way.
Defense
More accurately labeled as Damage Received Modifier—Defense is a stat which modifies how much damage a character receives.
At a simple level, this stat acts as a multiplier on any incoming damage. This means that the lower the number, the lower the damage that character receives.
For example:
![]() Potemkin
Potemkin
 Damage Received:
0.87Guts Rating:
4Weight Class:
0.94Wakeup Time:
24/22 has a Damage Received Modifier of 0.87. ![]() Chipp
Chipp
 Damage Received:
1.3Guts Rating:
4Weight Class:
1Wakeup Time:
30/21 has a Damage Received Modifier of 1.3. This means that Potemkin takes dramatically less damage from the same hit than Chipp does. If a hit has 100 base damage, then that hit would deal 87 damage to Potemkin. Likewise, that same hit would do 130 damage to Chipp. This stat is only one part of the damage equation, though. Other factors, such as Guts and combo scaling, also influence the amount of damage a character receives.
For a full, detailed explanation of Damage Received Modifiers and their precise numbers, check the Damage Data page.
Guts
As a character's health goes down, they also take less damage.
Each character has their own Guts Rating, which is a score from 0 to 5, which determines how much damage is reduced by as their health depletes. The greater the Guts Rating number, the greater the damage reduction Guts provides.
For example:
![]() May
May
 Damage Received:
1.06Guts Rating:
3Weight Class:
1.1Wakeup Time:
25/22 and ![]() Venom
Venom
 Damage Received:
1.06Guts Rating:
1Weight Class:
1Wakeup Time:
21/26 both have the same Damage Received Modifier. As a result, they both take the same amount of damage when their HP is near full. As their health gets lower, May will take less and less damage than Venom does. This is because May has a Guts Rating of 3, whereas Venom has a Guts Rating of 1.
For a full, detailed explanation of Guts and its precise numbers, check the Damage Data page.
For an explanation of the Guts Spike glitch, check the esoterica page.
Guard Bar
The Guard Bar visualizes combo scaling and rewards players for making the opponent block.
The guard bar is a small, pink bar which appears below the player's life bar, and adjacent to their Burst gauge. The Guard Bar starts at its resting value of 0—exactly in the middle of the gauge. The gauge fills towards the outer edges of the screen, and empties towards the center of the screen.
Whenever a player gets hit, their own guard bar depletes. When that player stops getting hit, the guard bar will briefly pause in place, and then reset back to its resting value at the center of the gauge.
Whenever a player blocks an attack, their guard bar fills. Under this circumstance, the guard bar will slowly deplete back to its resting position so long as they do not continue blocking attacks. If that player gets hit, then the first rule takes precedent—the guard bar will reset back to its resting position.
So long as the Guard Bar is filled beyond its resting position, then combo scaling does not apply. As the Guard Bar depletes into the negatives, then the combo will experience increasing scaling. This means that each hit will deal less and less damage as the Guard Bar depletes.
The amount that each move increases and decreases the Guard Bar by is specific to that move. These values are known as GB+ and GB-. A greater number means a greater increase or decrease of the Guard Bar.

the Guard Bar at resting value (0)
Guard Balance and Guard Recovery
Each character has a stat, known as Guard Balance, which modifies the rate at which their Guard Bar fills.
Guard Balance acts as a simple multiplier, meaning that the greater the Guard Balance, the faster that character's Guard Bar fills.
Additionally, each character has the Guard Recovery stat which determines how quickly their Guard Bar empties in a neutral state.
The Guard Recovery state is measured as a function of time. A Guard Recovery of 1/5F means that the Guard Bar drains by 1 for every 5 frames.
| Guard Balances By Character | ||
|---|---|---|
| Characters | Guard Balance | Guard Recovery |
| ×1.25 | 1/6F | |
| 1/6F | ||
| 1/5F | ||
| ×1.125 | 1/5F | |
| ×1.00 | 1/5F | |
| 1/5F | ||
| 1/5F | ||
| 1/5F | ||
| 1/5F | ||
| 1/5F | ||
| 1/5F | ||
| 1/4F | ||
| 1/5F | ||
| 1/5F | ||
| 1/5F | ||
| 1/4F | ||
| 1/5F | ||
| 1/6F | ||
| 1/5F | ||
| 1/5F | ||
| ×0.875 | 1/5F | |
| 1/5F | ||
| 1/5F | ||
| ×0.85 | 1/5F | |
| ×0.8125 | 1/6F | |
Slashback
Any Backwards Direction + S+H
Slashback is a parry An attack or mechanic that allows the defender to brush aside an incoming hit and recover more or less instantly. which dramatically reduces the blockstun When a character successfully blocks an attack while standing or crouching, the defender is forced into a stun animation for a set period of time where they are incapable of acting. This period of time is called blockstun. the user experiences.
Performing Slashback
In order to Slashback (SB) an attack, the user must input SB within 2 frames of the attack connecting. Slashback costs 2% Tension up front to input. In order to succeed, Slashback must be performed with the correct direction as if the player were blocking an attack with standard Guard. Slashback is not available for the first 10 frames after a character's wake up The state and animation a character goes through when they rise from being knocked down. This animation is usually invulnerable for its duration, and usually retains invulnerability to throws for some time after it ends. animation.
If the player succeeds in SB'ing an attack, then window for Slashback will be widened to 6 frames for the next 45 frames of time. Slashbacks disable the user's standard Guard whether they are successful or not. After a successful SB, standard Guard is disabled for 15 frames. After a failed SB, standard Guard is disabled for 30 frames.
Slashback has a number of advanced input techniques. They can be found on the tech page.

A.B.A Slashbacking on the ground

A.B.A Slashbacking in the air


Attack Attributes
Attacks have many properties which can be valuable to learn beyond their basic frame data. Below is a short directory to help find the sections on these properties.
If the data you are looking for cannot be found on this page, please check the Damage Data and Frame Data pages.
The Effects Of Slashback
Slashback sets the blockstun experienced by the user to a flat value—1 frame for airborne blockstun, and 3 frames for grounded blockstun. Additionally, a successful Slashback combines several traits of FD and IB.
- Grants the user a large amount of tension
- Increases Tension Pulse by 1000
- Negates chip damage Damage incurred when blocking an attack. Typically, only Special Attacks and Super Attacks have chip damage, but there are exceptions.
- Prevents the user's Guard Bar from filling
- Allows the user to defend out of a run
A successful air Slashback will eliminate the user's air momentum and restore their air options. Furthermore, slashback can be used to defend against attacks which are otherwise completely unblockable
for example: ![]() Potemkin's Heat KuckleGuardUnblockable, FD×3Startup14Recovery22Advantage-.
Potemkin's Heat KuckleGuardUnblockable, FD×3Startup14Recovery22Advantage-.
This list of upsides makes Slashback incredibly potent. It is limited primarily by the extreme difficulty of performing it, and the punishment for failure. Use to your own risk.
Wakeup Animations
Whenever a character is knocked down, they go through an animation where they stand up. This is known as "wakeup".
Wakeup animations consist of 3 parts:
- Ground Bounce Time (Context-Specific)
- OTG The act of hitting the opponent when they are knocked down. Short for "off the ground" or "on the ground." State (11F)
- Character-Specific Invuln. Wakeup Animation
The duration of the Ground Bounce is determined by a number of factors. These include the move used to knock down, the airborne/grounded state of the victim, and more.
Therefore, Wakeup Time = Ground Bounce + 11 + Invuln. Anim.
| Character | Face Down | Face Up |
|---|---|---|
| 21F | 32F | |
| 21F | 25F | |
| 21F | 25F | |
| 21F | 25F | |
| 23F | 25F | |
| 21F | 30F | |
| 24F | 25F | |
| 22F | 25F | |
| 29F | 25F | |
| 21F | 24F | |
| 25F | 28F | |
| 24F | 25F | |
| 20F | 25F | |
| 21F | 24F | |
| 21F | 23F | |
| 22F | 25F | |
| 23F | 25F | |
| 21F | 25F | |
| 22F | 24F | |
| 21F | 23F | |
| 20F | 26F | |
| 21F | 25F | |
| 23F | 27F | |
| 26F | 21F | |
| 27F | 21F |
Wake-Up Buffer
The game will buffer/repeat certain actions for 1 frame if they are input 1 frame before the character wakes up.
These actions include:
- Normal moves
- Special moves
- Overdrive The name for Super Moves in the Guilty Gear Series. Overdrives cost 50% tension and perform a variety of functions depending on the characters
- Instant Kill attacks
There are also some actions which the game will not buffer on wakeup.
These actions include:
Cross-up Protection
In situations where your character is facing with their back to the opponent the game will accept both 4/6 as a valid input for blocking.
Unforunately it's not without exceptions but the general idea is that:
- Holding 4 will only grant you cross-up protection for 1 frame as it immediately turns you around otherwise.
- Holding 1 will grant you cross-up protection for 9 frames.
- While holding 4 in the air you have infinite cross-up protection as long as your character is facing away from the opponent.
- Performing grounded-FD will immediately turn you around and remove all cross-up protection. The air version will only turn you around the moment it's pressed.
Please note that all the directional inputs are assuming you were holding the direction before you got crossed up.
Taunt and Respect
Assigned to a separate Respect button (![]() ), Taunt and Respect are fluff mechanics with little practical use on most characters. A character can have 1 or 2 of either Taunt or Respect. Respect button is also used to rotate between color sets on character select screen.
), Taunt and Respect are fluff mechanics with little practical use on most characters. A character can have 1 or 2 of either Taunt or Respect. Respect button is also used to rotate between color sets on character select screen.
Taunt
R
Taunt is the more committal option between Taunt and Respect. Taunts cannot be canceled until 62F and grant opponent 10% Tension Gauge. Unlike Respect, taunt can be special cancelled into.
Taunts are not entirley without uses. ![]() Kliff's taunt fires a unique, powerful projectile. Additionally,
Kliff's taunt fires a unique, powerful projectile. Additionally, ![]() Testament has very niche uses for it.
Testament has very niche uses for it.
Taunting after winning a round triggers effect known as "Rakusyo" and gives the opponent 50% Tension at the start of the next round.

Kliff's Taunt is a strong neutral and pressure tool

Dizzy's Taunt is a knowledge check unblockable


Respect
6R
Respect is simple communication tool between players with almost zero practical use. Cancellable from 18F.

Anji's Respect can be used to fake his 3P overhead and perform a low isntead
