m (→Overview) |
|||
| Line 8: | Line 8: | ||
* '''Volcanic Viper ''': Volcanic Viper is a great guard cancel, useful air-to-air, and decent damage filler. | * '''Volcanic Viper ''': Volcanic Viper is a great guard cancel, useful air-to-air, and decent damage filler. | ||
* '''DI Stacking''': When given enough space, Sol can stack Dragon Install and charge to delete opponents with a powered-up Volcanic Viper. | * '''DI Stacking''': When given enough space, Sol can stack Dragon Install and charge to delete opponents with a powered-up Volcanic Viper. | ||
* '''Strong Normals''': Sol has a wide variety of normals for almost every situation, with his incredibly fast abare {{Clr|2|5K|}} and his long disjointed slashes. | |||
|cons= | |cons= | ||
* '''Is in Missing Link''' | * '''Is in Missing Link''' | ||
Revision as of 17:30, 10 December 2021
Daisuke's Vision. The Original Install. Sol has a lot, without much weakness. Using tools like Gunflame, Volcanic Viper, and 66K, Sol can take you to the corner, and keep you there forever. Sure, so can most of the cast, but Sol can do it in 6 ways, and can switch between them on the fly if he gets tired of using the same move over and over again. Besides Millia, can probably abuse the infinite half-health meter the best; Sol can Dragon Install endlessly and add tons of multiplicative damage bonuses on top of himself. Generally speaking, there's nothing Sol can't abuse in this game, as the prior example was just one of many - we haven't even gotten into the glitches Sol can abuse to make himself fly around the screen, attack backwards, and more.
![]() Sol
Sol ![]() Sol is an aggressive slant on the shoto Short for "Shotokan" A character archetype defined by being similar in some way to Ryu from Street Fighter. Shotos usually have a horizontal fireball, an invulnerable reversal, and a forward moving special move. archetype with accessible execution.
Sol is an aggressive slant on the shoto Short for "Shotokan" A character archetype defined by being similar in some way to Ryu from Street Fighter. Shotos usually have a horizontal fireball, an invulnerable reversal, and a forward moving special move. archetype with accessible execution.
- Volcanic Viper : Volcanic Viper is a great guard cancel, useful air-to-air, and decent damage filler.
- DI Stacking: When given enough space, Sol can stack Dragon Install and charge to delete opponents with a powered-up Volcanic Viper.
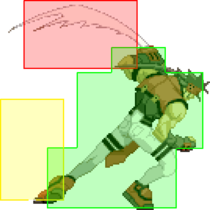
- Strong Normals: Sol has a wide variety of normals for almost every situation, with his incredibly fast abare 5K and his long disjointed slashes.
- Is in Missing Link
| Sol | |
|---|---|
 | |
| Defense | |
| 120%Raw Value: 12 | |
| Jump Startup | |
| 6f | |
| Backdash | |
| 22f | |
| Meter Gain Mod | |
| 120%Raw Value: 12 | |
| Charge Time | |
| 54f | |
| Forward Walk Speed | |
| 100%Raw Value: 768 | |
| Backward Walk Speed | |
| 100%Raw Value: 588 | |
| Dizzy Resistance | |
| 80%Raw Value: 24 | |
| Fastest Attack | |
| Reversals | |
Normals
5P
| Damage | Guard | Startup | Active | Recovery | On-Block | On-Hit | Invuln |
|---|---|---|---|---|---|---|---|
| 7 | Mid | 6 | 8 | 10 | -1 | -2 | none |
Add a description to this move using the |description= field
Describe what the move is used for.
Explain the basics of why the initial purpose of the move is worth knowing or worth doing. Mention downsides that are important to know. If the move is particularly important it might have a spot on the stategy page—an important anti-air will likely be mentioned in the neutral section, or an important combo move will be mentioned in the combo theory.5K
| Damage | Guard | Startup | Active | Recovery | On-Block | On-Hit | Invuln |
|---|---|---|---|---|---|---|---|
| 13,10 | Mid | 4,8 | 19 | 9 | -8 | -9 | none |
c.S
| Damage | Guard | Startup | Active | Recovery | On-Block | On-Hit | Invuln |
|---|---|---|---|---|---|---|---|
| 19 | Mid | 6 | 3 | 21 | -3 | -2 | none |
f.S
| Damage | Guard | Startup | Active | Recovery | On-Block | On-Hit | Invuln |
|---|---|---|---|---|---|---|---|
| 21 | Mid | 6 | 3 | 24 | -7 | -6 | none |
5H
| Damage | Guard | Startup | Active | Recovery | On-Block | On-Hit | Invuln |
|---|---|---|---|---|---|---|---|
| 23,18 | Mid | 4,11 | 4,3 | 22 | -3 | +2 | none |
2P
| Damage | Guard | Startup | Active | Recovery | On-Block | On-Hit | Invuln |
|---|---|---|---|---|---|---|---|
| 7 | Low | 7 | 4 | 11 | 0 | -1 | none |
Add a description to this move using the |description= field
Describe what the move is used for.
Explain the basics of why the initial purpose of the move is worth knowing or worth doing. Mention downsides that are important to know. If the move is particularly important it might have a spot on the stategy page—an important anti-air will likely be mentioned in the neutral section, or an important combo move will be mentioned in the combo theory.2K
| Damage | Guard | Startup | Active | Recovery | On-Block | On-Hit | Invuln |
|---|---|---|---|---|---|---|---|
| 15 | Low | 8 | 4 | 29 | -14 | -22 | none |
2S
| Damage | Guard | Startup | Active | Recovery | On-Block | On-Hit | Invuln |
|---|---|---|---|---|---|---|---|
| 22 | Mid | 8 | 4 | 13 | -2 | +3 | none |
Add a description to this move using the |description= field
Describe what the move is used for.
Explain the basics of why the initial purpose of the move is worth knowing or worth doing. Mention downsides that are important to know. If the move is particularly important it might have a spot on the stategy page—an important anti-air will likely be mentioned in the neutral section, or an important combo move will be mentioned in the combo theory.2H
| Damage | Guard | Startup | Active | Recovery | On-Block | On-Hit | Invuln |
|---|---|---|---|---|---|---|---|
| 28 | Mid | 8 | 8 | 21 | -8 | -3 | none |
j.P
| Damage | Guard | Startup | Active | Recovery | On-Block | On-Hit | Invuln |
|---|---|---|---|---|---|---|---|
| 5 | High/Air | 4 | 8 | 9 | none |
Add a description to this move using the |description= field
Describe what the move is used for.
Explain the basics of why the initial purpose of the move is worth knowing or worth doing. Mention downsides that are important to know. If the move is particularly important it might have a spot on the stategy page—an important anti-air will likely be mentioned in the neutral section, or an important combo move will be mentioned in the combo theory.j.K
| Damage | Guard | Startup | Active | Recovery | On-Block | On-Hit | Invuln |
|---|---|---|---|---|---|---|---|
| 11 | High/Air | 9 | 12 | 11 | none |
Add a description to this move using the |description= field
Describe what the move is used for.
Explain the basics of why the initial purpose of the move is worth knowing or worth doing. Mention downsides that are important to know. If the move is particularly important it might have a spot on the stategy page—an important anti-air will likely be mentioned in the neutral section, or an important combo move will be mentioned in the combo theory.j.S
| Damage | Guard | Startup | Active | Recovery | On-Block | On-Hit | Invuln |
|---|---|---|---|---|---|---|---|
| 14 | High/Air | 9 | 11 | 5 | none |
Add a description to this move using the |description= field
Describe what the move is used for.
Explain the basics of why the initial purpose of the move is worth knowing or worth doing. Mention downsides that are important to know. If the move is particularly important it might have a spot on the stategy page—an important anti-air will likely be mentioned in the neutral section, or an important combo move will be mentioned in the combo theory.j.H
| Damage | Guard | Startup | Active | Recovery | On-Block | On-Hit | Invuln |
|---|---|---|---|---|---|---|---|
| 14 | High/Air | 5 | until landing | N/A | none |
Add a description to this move using the |description= field
Describe what the move is used for.
Explain the basics of why the initial purpose of the move is worth knowing or worth doing. Mention downsides that are important to know. If the move is particularly important it might have a spot on the stategy page—an important anti-air will likely be mentioned in the neutral section, or an important combo move will be mentioned in the combo theory.Specials
Gun Flame
| Version | Damage | Guard | Startup | Active | Recovery | On-Block | On-Hit | Invuln |
|---|---|---|---|---|---|---|---|---|
| Gun Flame S | 9 | Mid | 9 | until contact | 31 | -17 | +1 | none |
Add a description to this move using the |description= field
Describe what the move is used for.
Explain the basics of why the initial purpose of the move is worth knowing or worth doing. Mention downsides that are important to know. If the move is particularly important it might have a spot on the stategy page—an important anti-air will likely be mentioned in the neutral section, or an important combo move will be mentioned in the combo theory.Volcanic Viper
Chargeable
Add a description to this move using the |description= field
Describe what the move is used for.
Explain the basics of why the initial purpose of the move is worth knowing or worth doing. Mention downsides that are important to know. If the move is particularly important it might have a spot on the stategy page—an important anti-air will likely be mentioned in the neutral section, or an important combo move will be mentioned in the combo theory.Riot Stamp
| Damage | Guard | Startup | Active | Recovery | On-Block | On-Hit | Invuln |
|---|---|---|---|---|---|---|---|
| 14 | Mid | minimum 16 | until contact | 34 | -12 | -8 | after hitting wall, 1-8f full |
Bandit Revolver
Dash Kick
Supers
Dragon Install
| Damage | Guard | Startup | Active | Recovery | On-Block | On-Hit | Invuln |
|---|---|---|---|---|---|---|---|
| N/A | N/A | 17+(10)+28 | N/A | 290 After Expiring | N/A | N/A | none |
Add a description to this move using the |description= field
Describe what the move is used for.
Explain the basics of why the initial purpose of the move is worth knowing or worth doing. Mention downsides that are important to know. If the move is particularly important it might have a spot on the stategy page—an important anti-air will likely be mentioned in the neutral section, or an important combo move will be mentioned in the combo theory.


