|
|
| (32 intermediate revisions by 5 users not shown) |
| Line 1: |
Line 1: |
| ==Overview== | | ==Overview== |
| {{Overview/navigation}} | | {{GGACR/CharacterLinks}} |
| <div id="home-content" class="home-grid"> | | <div id="home-content" class="home-grid"> |
| {{card|width=4 | | {{card|width=4 |
| Line 35: |
Line 35: |
| Zappa's forms are in brief: | | Zappa's forms are in brief: |
| <table style="width: 100%;"> | | <table style="width: 100%;"> |
| <tr><td style="text-align: center;">[[File:GGACR_Zappa_Summonless_Icon.png|32x32px]]</td><td>'''Naked''' or '''Summonless''' - This state is his weakest form. Zappa will start the round this way and return to it if he takes damage.</td></tr> | | <tr><td style="text-align: center;">[[File:GGACR_Zappa_Summonless_Icon.png|32x32px]]</td><td>'''Naked''' or '''Summonless''' - Zappa will start the round this way and return to it if he takes damage. Has limited offensive potential compared to the other forms but gives Zappa access to {{clr|1|236P}}, a powerful meterless reversal and counterpoke tool.</td></tr> |
| <tr><td style="text-align: center;">[[File:GGACR_Zappa_Triplets_Icon.png]]</td><td>'''Triplets''' - Grant Zappa a flexible projectile special with 5 different trajectories that curses the opponent on hit, causing random items to harass them. Also gives Zappa augmented normals that can cancel into each other on whiff.</td></tr> | | <tr><td style="text-align: center;">[[File:GGACR_Zappa_Triplets_Icon.png]]</td><td>'''Triplets''' - Grant Zappa a flexible projectile special with 5 different trajectories that curses the opponent on hit, causing random items to harass them. Also gives Zappa augmented normals that can cancel into each other on whiff.</td></tr> |
| <tr><td style="text-align: center;">[[File:GGACR_Zappa_Sword_Icon.png]]</td><td>'''Sword''' - Grants Zappa overwhelming mixup potential while also allowing him to attack from nearly fullscreen.</td></tr> | | <tr><td style="text-align: center;">[[File:GGACR_Zappa_Sword_Icon.png]]</td><td>'''Sword''' - Grants Zappa overwhelming mixup potential while also allowing him to attack from nearly fullscreen.</td></tr> |
| Line 47: |
Line 47: |
| |content= Zappa has a unique resource called Orbs which he gains by hitting enemies with certain moves. | | |content= Zappa has a unique resource called Orbs which he gains by hitting enemies with certain moves. |
| Orbs will be shown as balls of light which float in a circle around Zappa's body. Zappa's special moves will grant Zappa with 1 to 3 orbs if they successfully hit, depending on the move. Zappa will start each round with 0 orbs, and can have a maximum of 8 orbs. When Zappa has 8 orbs, his next summon special will summon Raou who is a unique summon that only lasts 15 seconds. | | Orbs will be shown as balls of light which float in a circle around Zappa's body. Zappa's special moves will grant Zappa with 1 to 3 orbs if they successfully hit, depending on the move. Zappa will start each round with 0 orbs, and can have a maximum of 8 orbs. When Zappa has 8 orbs, his next summon special will summon Raou who is a unique summon that only lasts 15 seconds. |
| | {{(!}} class="wikitable mw-collapsible mw-collapsed stripe" data-expandtext="View list of moves that give Orbs" data-collapsetext="Close list of moves that give Orbs" style="width:100%; max-width: 70ch; text-align: left;" |
| | ! colspan="2" style="background-color: var(--color-surface-2);" {{!}} Orb-granting attacks |
| | {{!}}- |
| | ! Attack |
| | ! Orbs Granted |
| | {{!}}- |
| | {{!}}Hello, Three Centipedes ({{clr|1|236P}}) |
| | (Naked) |
| | {{!}} |
| | *1 Orb (Hit) |
| | |
| | {{!}}- |
| | {{!}}Etiquette Starts Here ({{clr|5|214D}}) |
| | {{!}} |
| | *2 Orbs (Hit) |
| | |
| | {{!}}- |
| | {{!}}{{clr|5|8D}} |
| | (Dog) |
| | {{!}} |
| | *1 Orb (Hit) |
| | |
| | {{!}}- |
| | {{!}}{{clr|5|2D}} |
| | (Dog) |
| | {{!}} |
| | *3 Orbs (Hit) |
| | *1 Orb (Block) |
| | |
| | {{!}}- |
| | {{!}}Please Don't Come Back ({{clr|1|236P}}{{clr|2|K}}{{clr|3|S}}{{clr|4|H|}}{{clr|5|D}}) |
| | (Triplets) |
| | {{!}} |
| | *1 Orb (Any time a ghost hits, up to 3 from {{clr|5|236D|}}) |
| | |
| | {{!}}- |
| | {{!}}This Has Gotta Hurt ({{clr|3|236S}}) |
| | (Sword) |
| | {{!}} |
| | *1 Orb (Hit) |
| | |
| | {{!}}- |
| | {{!}}This Has Gotta Hurt Followup ({{clr|3|236S}}{{clr|4|~H}}) |
| | (Sword) |
| | {{!}} |
| | *3 Orbs (Hit) |
| | |
| | {{!}}- |
| | {{!}}Please Fall ({{clr|4|623H}}) |
| | (Sword) |
| | {{!}} |
| | *2 Orbs (Hit) |
| | |
| | {{!}}- |
| | {{!}}Come Close, and I'll Kill You ({{clr|4|63214H}}) |
| | (Sword) |
| | {{!}} |
| | *2 Orbs (Hit) |
| | |
| | {{!}}- |
| | {{!}}Birth!! ({{clr|4|632146H}}) |
| | {{!}} |
| | *4 Orbs (One for each hit, 4 total) |
| | |
| | {{!)}} |
| }} | | }} |
|
| |
|
| ==Normals and Specials== | | ==Naked Normals and Specials== |
| *Zappa will always have access to his {{Prompt|GGACR|P}} and {{Prompt|GGACR|K}} normals. | | *Zappa will always have access to his {{Prompt|GGACR|P}} and {{Prompt|GGACR|K}} normals. |
| *'''Dog''' overrides Zappa's {{Prompt|GGACR|D}} normals. | | *'''Dog''' overrides Zappa's {{Prompt|GGACR|D}} normals. |
| Line 55: |
Line 120: |
| *'''Sword''' overrides Zappa's {{Prompt|GGACR|S}} and {{Prompt|GGACR|H}} normals. | | *'''Sword''' overrides Zappa's {{Prompt|GGACR|S}} and {{Prompt|GGACR|H}} normals. |
| *'''Raou''' overrides Zappa's {{Prompt|GGACR|S}}, {{Prompt|GGACR|H}} normals and {{clr|5|5D}}. | | *'''Raou''' overrides Zappa's {{Prompt|GGACR|S}}, {{Prompt|GGACR|H}} normals and {{clr|5|5D}}. |
| <div class="movelist-toggles sticky">
| |
| <div id="movelist-toggle-1" class="movelist-toggle-button">[[File:GGACR_Zappa_Summonless_Icon.png|link=|32x32px]] Naked</div>
| |
| <div id="movelist-toggle-2" class="movelist-toggle-button">[[File:GGACR_Zappa_Dog_Icon.png|link=]] Dog</div>
| |
| <div id="movelist-toggle-3" class="movelist-toggle-button">[[File:GGACR_Zappa_Triplets_Icon.png|link=]] Triplets</div>
| |
| <div id="movelist-toggle-4" class="movelist-toggle-button">[[File:GGACR_Zappa_Sword_Icon.png|link=]] Sword</div>
| |
| <div id="movelist-toggle-5" class="movelist-toggle-button">[[File:GGACR_Zappa_Raoh_Icon.png|link=]] Raou</div>
| |
| </div>
| |
| <div id="movelist-1" class="movelist">
| |
| ===<big>{{clr|1|5P}}</big>=== | | ===<big>{{clr|1|5P}}</big>=== |
| | |
| {{GGACR_Move_Card | | {{GGACR_Move_Card |
| |input=5P | | |input=5P |
| Line 72: |
Line 130: |
| |recovery = 6 | | |recovery = 6 |
| }} | | }} |
| Tied with {{clr|1|2P}} for Zappa's fastest normal. | | Tied with {{clr|1|2P}} for Zappa's fastest normal. Decent range and a slight disjoint make this a useful poke or abare tool. |
| *Decent range and good speed make this an acceptable poke.
| | *Being + on block makes it a good tool for tick throws or stagger pressure, especially with Triplets, Sword, or Raou as it gains a self gatling. |
| *Zappa's only normal that is + on block, which can make it good for tick throws and frame traps. | | *The relatively high hitbox make it Zappa's best option for stuffing opponents that approach low in the air such as I-no or Jam. |
| *Gains a self gatling with Triplets, Sword, or Raou that can be useful for stagger pressure.
| |
| *Occasionally useful as an anti-air tool versus characters like I-no or Jam that approach very low in the air. | |
| {{(!}}class="wikitable" style="float: centre;" | | {{(!}}class="wikitable" style="float: centre;" |
| {{!}}+[[/Frame_Data#Gatling Table|Gatling Options]] | | {{!}}+[[/Frame_Data#Gatling Table|Gatling Options]] |
| Line 161: |
Line 217: |
| |startup = 0 | | |startup = 0 |
| |active = 0 | | |active = 0 |
| |inactive2 = 34 | | |inactive2 = 33 |
| |active3 = 3 | | |active3 = 3 |
| |recovery = 0 | | |recovery = 0 |
| Line 206: |
Line 262: |
| One of the weirdest moves in the game: an overhead that's unsafe on hit if it connects early due to only being able to hit with a maximum of 3 out of its 6 hitboxes. Good guard bar plus and high damage if it connects make it a strong tool with Dog but it is generally worthless when naked. | | One of the weirdest moves in the game: an overhead that's unsafe on hit if it connects early due to only being able to hit with a maximum of 3 out of its 6 hitboxes. Good guard bar plus and high damage if it connects make it a strong tool with Dog but it is generally worthless when naked. |
| *The move has two FRC points during the 4th and 6th hitboxes. Since the move can only hit three times these will usually be after the active frames, but if you do the move from further away you can FRC the initial hit (4th hitbox) into an immediate 2K for a 50/50 that leads into a combo if you have dog support. | | *The move has two FRC points during the 4th and 6th hitboxes. Since the move can only hit three times these will usually be after the active frames, but if you do the move from further away you can FRC the initial hit (4th hitbox) into an immediate 2K for a 50/50 that leads into a combo if you have dog support. |
| | *If you do the move from further out so that the last hitbox connects it becomes +2 on block. |
| }} | | }} |
|
| |
|
| Line 465: |
Line 522: |
| |recovery = 15 | | |recovery = 15 |
| }} | | }} |
| Mostly combo filler, but sees some niche use in other cases as well. | | Mostly combo filler, but sees some use as a jump-in as well, especially when dog is out as the jump cancel allows you to do some tricky maneuvers. |
| *Hits higher than {{clr|2|jK}} and further out than {{clr|1|jP}}, making it occasionally useful as an air to air if the enemy is diagonally above you (but generally you should just air throw instead). | | *Hits higher than {{clr|2|jK}} and further out than {{clr|1|jP}}, making it occasionally useful as an air to air if the enemy is diagonally above you (but generally you should just air throw instead). |
| *Sometimes used as a jump-in when you have dog out to cover you.
| |
| {{(!}}class="wikitable" style="float: centre;" | | {{(!}}class="wikitable" style="float: centre;" |
| {{!}}+[[/Frame_Data#Gatling Table|Gatling Options]] | | {{!}}+[[/Frame_Data#Gatling Table|Gatling Options]] |
| Line 517: |
Line 573: |
| }} | | }} |
|
| |
|
| ===<big>Special Moves</big>===
| |
| ----
| |
| ===<big>Hello, Three Centipedes</big>=== | | ===<big>Hello, Three Centipedes</big>=== |
| {{InputBadge|{{clr|1|236P}} with No Summon}} | | {{InputBadge|{{clr|1|236P}} with No Summon}} |
| Line 531: |
Line 585: |
| The major staple of Zappa's gameplan, Centipedes are the most important tool in Zappa's arsenal. It is fully invul until past startup, removes OTG, knocks down, and grants Zappa a summon. | | The major staple of Zappa's gameplan, Centipedes are the most important tool in Zappa's arsenal. It is fully invul until past startup, removes OTG, knocks down, and grants Zappa a summon. |
| *The most common usage is to knock the opponent down with xx > {{clr|5|2D}}, and then dash forward into Centipedes. Afterwards, you can link a {{clr|1|5P}} into a combo based on which summon you've been granted. | | *The most common usage is to knock the opponent down with xx > {{clr|5|2D}}, and then dash forward into Centipedes. Afterwards, you can link a {{clr|1|5P}} into a combo based on which summon you've been granted. |
| *On hit, Zappa will gain a single orb, and a summon based on the timer and your number of orbs. | | *On hit, Zappa will gain a single orb. |
| | *Regardless of if the move hits, is blocked, or whiffs entirely, Zappa is granted a summon based on the timer & number of orbs he possesses. |
|
| |
|
| *If the singles digit on the round's timer is: | | *If the singles digit on the round's timer is: |
| Line 542: |
Line 597: |
| }} | | }} |
|
| |
|
| </div>
| | ==Dog Normals== |
| <div id="movelist-2" class="movelist">
| |
| | |
| ===<big>Normal Moves</big>=== | |
| ----
| |
| :Listed frame data is for the Dog. Data listed in [ ] is for followup version of the move. | | :Listed frame data is for the Dog. Data listed in [ ] is for followup version of the move. |
| :Can cancel first attack into followup version of the move on hit or block | | :Can cancel first attack into followup version of the move on hit or block |
| Line 623: |
Line 674: |
| }} | | }} |
|
| |
|
| </div>
| | ==Triplet Normals and Specials== |
| <div id="movelist-3" class="movelist">
| |
| ===<big>Normal Moves</big>=== | |
| ----
| |
| :{{clr|3|fS}}, {{clr|3|2S}}, {{clr|3|6S}}, and {{clr|4|5H}} have a special property where they can be chained into each other up to a number of times equal to the triplets you currently have behind you (so 1 to 3). Starting with the '''second''' of these attacks in a row you can no longer gatling into any moves that are not in this set (other than {{clr|4|2H}}), but you can still special and jump cancel them throughout. | | :{{clr|3|fS}}, {{clr|3|2S}}, {{clr|3|6S}}, and {{clr|4|5H}} have a special property where they can be chained into each other up to a number of times equal to the triplets you currently have behind you (so 1 to 3). Starting with the '''second''' of these attacks in a row you can no longer gatling into any moves that are not in this set (other than {{clr|4|2H}}), but you can still special and jump cancel them throughout. |
|
| |
|
| Line 758: |
Line 806: |
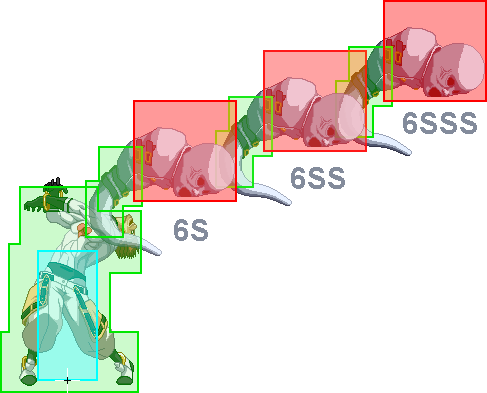
| Fast overhead that is plus on block and does decent damage, but it becomes minus enough to be unsafe even on hit with less than 3 triplets unless you have cover from a curse item. | | Fast overhead that is plus on block and does decent damage, but it becomes minus enough to be unsafe even on hit with less than 3 triplets unless you have cover from a curse item. |
| *Will deal roughly 80 points of damage if all three triplets connect, but does not knock down and generally places the opponent too far away to reset pressure or continue with a combo meterlessly. | | *Will deal roughly 80 points of damage if all three triplets connect, but does not knock down and generally places the opponent too far away to reset pressure or continue with a combo meterlessly. |
| | *If you RC the first or second hit, you'll be able to continue the combo and generally get a knockdown. |
| *You can gatling into this move from {{clr|1|5P}} or {{clr|1|6P}}, which acts as a natural frametrap (7f gap for the former and 3f gap for the latter). | | *You can gatling into this move from {{clr|1|5P}} or {{clr|1|6P}}, which acts as a natural frametrap (7f gap for the former and 3f gap for the latter). |
| | *The third triplet will often whiff if you gatling into this after {{clr|1|6P}} so you may want to RC in this situation. |
| *Its animation and startup time are very similar to {{clr|4|5H}}'s, which can be cancelled into {{clr|3|2S}} as a low, creating a very ambiguous mixup situation. | | *Its animation and startup time are very similar to {{clr|4|5H}}'s, which can be cancelled into {{clr|3|2S}} as a low, creating a very ambiguous mixup situation. |
| *If you RC the first or second hit, you'll be able to continue the combo and generally get a knockdown. The third triplet will often whiff if you do this move after a gatling so in this situation you almost always want to go for this option if you have the meter.
| |
| *You can also special cancel another triplet normal into {{clr|1|236P}}, frc, and then use this move to catch opponents downbacking. The P toss triplet will land just in time to make the move safe on hit or block. | | *You can also special cancel another triplet normal into {{clr|1|236P}}, frc, and then use this move to catch opponents downbacking. The P toss triplet will land just in time to make the move safe on hit or block. |
| *The third triplet will occasionally whiff if the move
| | |
| }} | | }} |
|
| |
|
| Line 798: |
Line 847: |
| ===<big>{{clr|4|2H}}</big>=== | | ===<big>{{clr|4|2H}}</big>=== |
| {{GGACR_Move_Card | | {{GGACR_Move_Card |
| |input=2H,2HH|type=triplets | | |input=2H,2HH,2HHH|type=triplets |
| |description= | | |description= |
| Knockdown and pressure tool that works best after a {{clr|3|c.S}} or other short gatling before {{clr|3|S}} and {{clr|4|H}}.
| | {{#invoke:FrameChart|drawFrameData |
| *It'll put them close to you and do a small amount of damage, less than {{clr|5|2D}}, but it also has frame advantage of block, making Zappa's ghost pressure scarier than it already is. | | |startup = 14 |
| *You can also link a {{clr|3|c.S}} on hit to relaunch if you want to get a kill or just get them off of you. However, note that using {{clr|4|2H}} temporarily disables the ghost you use for longer than simply launching them, since you did just blow it up. | | |active = 9 |
| | |recovery = 14 |
| | }} |
| | {{#invoke:FrameChart|drawFrameData |
| | |startup = 14 |
| | |active = 9 |
| | |recovery = 16 |
| | }} |
| | {{#invoke:FrameChart|drawFrameData |
| | |startup = 14 |
| | |active = 9 |
| | |recovery = 18 |
| | }} |
| | Occasional tool for pressure, knockdowns, or anti-airing. |
| | *The only triplet normal that is plus on block, which means you can use this early in your blockstring to frame trap and have a good chance of restarting pressure (though this is rather costly as you will be down a triplet). |
| | *You can link a {{clr|3|c.S}} on hit if you want to get a kill or curse them. |
| | *While it is air blockable, the hitbox is large and very active, so it can be a good tool to stuff jump-ins if you have the time to get it out. |
| | *Does a small amount of chip damage and cannot clash. |
| [[/Frame_Data#Triplets|Gatling Options]]: {{clr|4|2H}} | | [[/Frame_Data#Triplets|Gatling Options]]: {{clr|4|2H}} |
| ---- | | ---- |
| Works just as well after {{clr|3|f.S}}(1) and {{clr|4|5H}}(1,2), as well as after {{clr|4|2H}}(1).
| | The followup version works best after a {{clr|3|fSS}} or {{clr|4|5HH}} when you would prefer a guaranteed knockdown rather than orbs/curse. |
| *Delaying your explosions can work as a frame trap, but the cost is pretty high since you'll be out of ghosts for a while, You can still link a {{clr|3|c.S}} afterwards, and the knockdown will work from farther out than your standard {{clr|5|2D}} range, so keep this option in your pocket. | | *Delaying your explosions can work as a frame trap, but the cost is pretty high since you'll be out of ghosts for a while. |
| | *You can use {{clr|4|2H 2HH 2HHH}} to try to get a chip kill but generally {{clr|4|jH}} works better for this purpose as it is harder to FD. |
| }} | | }} |
|
| |
|
| ===<big>{{clr|3|j.S}}</big>=== | | ===<big>{{clr|3|j.S}}</big>=== |
| {{GGACR_Move_Card | | {{GGACR_Move_Card |
| |input=j.S,j.SS|type=triplets | | |input=j.S,j.SS,j.SSS|type=triplets |
| |description= | | |description= |
| Good damage filler in aerial combos, since Zappa's air combos generally don't end in knockdown.
| | {{#invoke:FrameChart|drawFrameData |
| *Combos from {{clr|1|j.P}} and {{clr|2|j.K}}, and combos into {{clr|2|j.K}} and {{clr|5|j.D}} for better conversion.
| | |startup = 10 |
| *It can also work as an air to air due to its arc and relatively large hitbox. Note that like all of Zappa's air ghost normals, it is not an overhead.
| | |active = 5 |
| | |recovery = 25 |
| | }} |
| | Good damage filler for air combos, and can work as an air to air due to its arc and relatively large hitbox. |
| | *Note that like all of Zappa's air triplet normals, it is not an overhead. Despite this it's still good for jump-ins as it has a higher attack level than your other options. |
| | *Too many total frames to recover before landing after doing it during a normal jump, so you'll be unable to double jump or airdash afterwards. |
| [[/Frame_Data#Triplets|Gatling Options]]: {{clr|2|j.K}}, {{clr|3|j.S}}, {{clr|3|j.2S}}, {{clr|4|j.H}}, {{clr|5|j.D}} | | [[/Frame_Data#Triplets|Gatling Options]]: {{clr|2|j.K}}, {{clr|3|j.S}}, {{clr|3|j.2S}}, {{clr|4|j.H}}, {{clr|5|j.D}} |
| ---- | | ---- |
| *Air followup versions will not gain the horizontal range like Zappa's grounded ghost normals. | | {{clr|3|j.SS}} and {{clr|3|j.SSS}} lose the {{clr|2|j.K}} and {{clr|5|j.D}} gatlings but can still be useful as jump-ins. |
| *Best for Air to Air and for creating some space, but Zappa generally does not want to spend much time airborne. | | *Unlike Zappa's grounded ghost normals, followup versions will not gain horizontal range and have the same frame data. |
| | *Can come in handy as air to airs if your first {{clr|3|jS}} whiffs. |
| }} | | }} |
|
| |
|
| ===<big>{{clr|3|j.2S}}</big>=== | | ===<big>{{clr|3|j.2S}}</big>=== |
| {{GGACR_Move_Card | | {{GGACR_Move_Card |
| |input=j.2S|type=triplets | | |input=j.2S,j.2SS,j.2SSS|type=triplets |
| |description= | | |description= |
| Same animation as {{clr|3|2S}} in the air, more for space control and hitting people jumping up to intercept you since it's not an overhead. | | {{#invoke:FrameChart|drawFrameData |
| *Can be used as a jump in if properly spaced due to its disjointed nature, but again, Zappa rarely wishes to be airborne, and not being an overhead hampers this move's utility. | | |startup = 7 |
| | |active = 6 |
| | |recovery = 8 |
| | }} |
| | Same animation as {{clr|3|2S}} in the air, not an overhead but can be used in some combos and to lock the opponent down as you jump. |
| | *Can be used as a jump in if properly spaced but the triplet trailing behind Zappa when he moves makes this unfortunately difficult to utilize. |
| *Chains into itself and {{clr|3|j.S}} and {{clr|4|j.H}} on hit, block, and whiff like the rest. | | *Chains into itself and {{clr|3|j.S}} and {{clr|4|j.H}} on hit, block, and whiff like the rest. |
| [[/Frame_Data#Triplets|Gatling Options]]: {{clr|3|j.S}}, {{clr|3|j.2S}}, {{clr|4|j.H}} | | [[/Frame_Data#Triplets|Gatling Options]]: {{clr|3|j.S}}, {{clr|3|j.2S}}, {{clr|4|j.H}} |
| | ---- |
| | Unlike with most triplet normals, the followups have the exact same frame data and gatlings. |
| }} | | }} |
|
| |
|
| Line 854: |
Line 934: |
| }} | | }} |
|
| |
|
| ===<big>Special Moves</big>===
| |
| ----
| |
| ===<big>Please Don't Come Back</big>=== | | ===<big>Please Don't Come Back</big>=== |
| {{InputBadge|{{clr|1|236P}}''' or '''{{clr|2|236K}}''' or '''{{clr|3|236S}}''' or '''{{clr|4|236H}} with Triplets (Air OK)}} | | {{InputBadge|{{clr|1|236P}}''' or '''{{clr|2|236K}}''' or '''{{clr|3|236S}}''' or '''{{clr|4|236H}} with Triplets (Air OK)}} |
| Line 861: |
Line 939: |
| |input=236P,236K/S/H|type=triplets | | |input=236P,236K/S/H|type=triplets |
| |description= | | |description= |
| A versatile move that gives the Triplets the ability to control a grand amount of the screen. Each version launches one of the ghosts near Zappa at a different arc depending on the button, and on hit, the ghost will possess the opponent if one isn't already haunting them.
| | {{#invoke:FrameChart|drawFrameData |
| *Its FRC point at 10~11F circumvents its long recovery, and can be used to extend combos and guarantee a knockdown into another mixup situation. Just make sure a ghost is nearby when being used, or Zappa will simply go into a vulnerable animation without launching a hitbox. Extremely useful. | | |startup = 15 |
| | |isProjectile = true |
| | |recovery = 25 |
| | |frcStart=10 |
| | |frcEnd=11 |
| | }} |
| | {{#invoke:FrameChart|drawFrameData |
| | |startup = 9 |
| | |isProjectile = true |
| | |recovery = 31 |
| | |frcStart=10 |
| | |frcEnd=11 |
| | }} |
| | Commonly referred to as triplet toss or ghost toss, this is a versatile move that gives Triplets the ability to control a grand amount of the screen. Each version launches one of the ghosts near Zappa at a different arc depending on the button, and on hit, the ghost will possess the opponent, causing projectiles to spawn passively for the next 6 seconds. The items chosen are random but one always spawns immediately followed by one every two seconds for six seconds (meaning a total of four projectile spawns per curse). Subsequent hits with triplet toss will reset the timer and return the triplet that was previously attached to the opponent. |
| | |
| | *Its FRC point at 10~11F circumvents its long recovery for safer zoning and can also be used to extend combos or reset pressure. Extremely useful frc, prioritize learning it if you are new to the character. |
| ---- | | ---- |
| {{clr|1|P}} version shoots a ghost straight up off screen, which then homes in on the opponent's horizontal position right over their head. | | {{clr|1|P}} version shoots a ghost straight up off screen, which then homes in on the opponent's horizontal position right over their head. |
| *Great for oki immediately following a sweep, for turtling opponents, and for harrassing characters trying to play keepaway in the air. | | *Great for oki immediately following a sweep, for turtling opponents, and for harassing characters trying to play keepaway in the air. |
| | *The trajectory is locked after the triplet starts falling so the opponent can move out of the way if they dash forwards. |
| ---- | | ---- |
| {{clr|2|K}} version drops a ghost that bounces forward a few times. | | {{clr|2|K}} version drops a ghost that bounces forward a few times. |
| *Great for oki, for covering a jump in (with an FRC), or for landing a ghost OTG if you feel like it. | | *Great for oki, for covering a jump in (with an FRC), or for landing a ghost OTG to curse the opponent if you feel like it. |
| *Will bounce higher based on the height from which you executed the drop. | | *Will bounce higher and thus travel further based on the height from which you executed the drop, at super jump height it goes nearly full screen. |
| | *Good for stopping low profile approaches that can beat the other triplet tosses, though some moves can still go under it as it bounces. |
| | *You can camp in the air with this move versus some characters who lack strong upward hitboxes. |
| ---- | | ---- |
| {{clr|3|S}} version shoots a ghost straight ahead of Zappa, probably the most used version. | | {{clr|3|S}} version shoots a ghost straight ahead of Zappa. |
| *It goes the entirety of the field and zones the opponent completely. | | *It goes the entirety of the field and zones the opponent completely. |
| **Up close, it's great for pressure and as a combo tool when FRC'd. Lasts until it reaches the edge of the screen.
| | *Up close, it's great for pressure resets and as a combo tool when FRC'd. |
| | *Somewhat more risky than the other tosses when used full screen as the triplet will take a very long time to return to you if the opponent avoids it. |
| | *Can be IADed over or low profiled by various moves or Zappa/Faust/Kliff movement. |
| ---- | | ---- |
| {{clr|4|H}} version shoots a ghost at an upwards arc. | | {{clr|4|H}} version shoots a ghost at an upwards arc. |
| *Good for close opponents trying to jump out, or far opponents trying to approach from the air. | | *Good for close opponents trying to jump out, or far opponents trying to approach from the air. |
| | *Doesn't quite reach the ground when it lands so it can be low profiled. |
| | *Unlike the other tosses you can pick it up immediately after it stops being active if it whiffs. |
| }} | | }} |
|
| |
|
| Line 884: |
Line 984: |
| |input=236D|type=triplets | | |input=236D|type=triplets |
| |description= | | |description= |
| *Launches all ghosts Zappa currently has available, in the arcs of the {{clr|2|K}}, {{clr|4|H}}, and {{clr|3|S}} versions of the move, with ascending priority, meaning that with only one ghost, you'll launch only in the {{clr|3|S}} arc.
| | {{#invoke:FrameChart|drawFrameData |
| *Useful if the opponent is in the air, as it has a tendency to connect all three hits and knock down the opponent if they're close enough. | | |startup = 11 |
| *It launches the ghosts more from the position of the last ghost used in a normal chain, meaning that they all are launched closer to the opponent. Its FRC point at 16~17F is later than the other versions, so be sure to learn that since Zappa will be without cover once he uses the move. | | |isProjectile = true |
| | |recovery = 42 |
| | |frcStart=16 |
| | |frcEnd=17 |
| | }} |
| | Launches all ghosts Zappa currently has available, in the arcs of the {{clr|3|S}}, {{clr|4|H}}, and {{clr|2|K}} versions of the move. If you have less than three triplets it will follow that priority (so with one ghost you will only throw an S toss). |
| | *Good combo ender, as it can give you up to 3 orbs and often spawns a pot for a KD if used in an air combo. |
| | *It launches the first triplet from the position of the most recently used triplet's body, meaning that they launch from closer to the opponent. This allows you to finish combos with a curse where the other versions of toss will drop. |
| | *Its FRC point at 16~17F is later than the other versions. |
| }} | | }} |
|
| |
|
| Line 927: |
Line 1,035: |
| #Knocks down opponent on ground hit. Triplet disappears after attack. Triplet disappears for 104F, after which they stay in place for 122F before returning. Collect the triplet by touching them. | | #Knocks down opponent on ground hit. Triplet disappears after attack. Triplet disappears for 104F, after which they stay in place for 122F before returning. Collect the triplet by touching them. |
| #Haunts opponent on hit for 481F. See more [[/Frame_Data#Tripletss|here]]. | | #Haunts opponent on hit for 481F. See more [[/Frame_Data#Tripletss|here]]. |
| </div>
| |
| <div id="movelist-4" class="movelist">
| |
|
| |
|
| ===<big>Normal Moves</big>=== | | ==Sword Normals and Specials== |
| ----
| |
| :Sword normals will push the sword farther away from Zappa with each use. | | :Sword normals will push the sword farther away from Zappa with each use. |
| :This keeps going until the sword is a little farther than half screen away. | | :This keeps going until the sword is a little farther than half screen away. |
| Line 947: |
Line 1,052: |
| |recovery = 14 | | |recovery = 14 |
| }} | | }} |
| Sword Zappa's main punish starter, due to its damage and gatling options. It has the quickest startup of all of Zappa's sword normals, but is probably one of the least used due to the nature of the sword itself. | | Sword Zappa's main punish starter due to its lack of proration and gatling options. It's also useful in up-close pressure as it has a jump cancel that allows it to go into either {{clr|3|j.S}} or one of its low gatling options for a 50/50 mixup. |
| *Forces standing on hit allowing for Zappa's combo game to widen slightly, so keep that in mind. | | |
| | Care must be taken that the sword is in the right position however, as the move is liable to whiff if the sword is lingering out of range. |
| | *Forces standing on hit, allowing for Zappa's combo game to widen slightly. |
| [[/Frame_Data#Sword|Gatling Options]]: {{clr|1|6P}}, {{clr|3|f.S}}, {{clr|3|2S}}, {{clr|4|5H}}, {{clr|4|2H}}, {{clr|4|6H}}, {{clr|5|5D}}, {{clr|5|2D}} | | [[/Frame_Data#Sword|Gatling Options]]: {{clr|1|6P}}, {{clr|3|f.S}}, {{clr|3|2S}}, {{clr|4|5H}}, {{clr|4|2H}}, {{clr|4|6H}}, {{clr|5|5D}}, {{clr|5|2D}} |
| }} | | }} |
| Line 961: |
Line 1,068: |
| |recovery = 19 | | |recovery = 19 |
| }} | | }} |
| A major distance poking tool which will probably see more use as a combo starter than {{clr|3|c.S}} since you'll run your mixup game with the sword from a distance. | | A major distance poking tool. |
| *Pushes the sword forward about 1/8th of the screen, completely laterally, which is good for covering options without committing to raising or dropping the sword's height. | | *Faster, higher attack level, earlier in the gatling table, and less minus on block than {{clr|3|2S}} in exchange for always hitting mid and shorter range. |
| *Although it has good gatling options, it has a high amount of recovery, so be careful. | | *Pushes the sword slightly forward horizontally (about 1/4 as far as {{clr|4|5H}} does). |
| | *Don't neglect using this as a traditional {{clr|3|f.S}} when the sword is on you, the hitbox is fully disjointed and hits low enough to connect vs crouchers. |
| [[/Frame_Data#Sword|Gatling Options]]: {{clr|3|2S}}, {{clr|4|5H}}, {{clr|4|2H}}, {{clr|4|6H}}, {{clr|5|5D}}, {{clr|5|2D}} | | [[/Frame_Data#Sword|Gatling Options]]: {{clr|3|2S}}, {{clr|4|5H}}, {{clr|4|2H}}, {{clr|4|6H}}, {{clr|5|5D}}, {{clr|5|2D}} |
| }} | | }} |
| Line 978: |
Line 1,086: |
| |recovery = 16 | | |recovery = 16 |
| }} | | }} |
| Good damage and two hits can make this a powerful tool for ending combos into Swipe, especially when Zappa is being pushed out too far to continue any combos.
| | Most often used at the end of a ground combo/blockstring to lead into {{clr|4|63214H}}, usually when Zappa is too far for {{clr|4|2H}} to connect. Keep in mind that on block there is a 1f gap between this and {{clr|4|63214H}}, and on IB that gap becomes 5f, which allows various characters to escape, reversal, or counter you if you autopilot the blockstring. |
| *It reaches pretty far in neutral (about a 1/4 of the screen by the second hit), and has surprisingly little recovery, though its active frames still lend to Zappa being vulnerable. | | *Moves the sword forward horizontally a bit less than half the maximum sword distance. |
| | *Can be a good tool to wall out some characters in neutral due to the two active windows and relatively low recovery, but be careful as it leaves you vulnerable to air approaches. |
| | |
| [[/Frame_Data#Sword|Gatling Options]]: {{clr|5|5D}}, {{clr|5|2D}} | | [[/Frame_Data#Sword|Gatling Options]]: {{clr|5|5D}}, {{clr|5|2D}} |
| }} | | }} |
| Line 993: |
Line 1,103: |
| |recovery = 2 | | |recovery = 2 |
| }} | | }} |
| This might be one of the weirdest moves in the game. {{clr|4|6H}} functions as a '''thirteen frame overhead''' during its first active hitbox, but becomes a low late into its active frames. This makes it a terrifying option that can come from nearly of any Zappa's normals, and it special cancels, usually into the swipe for knockdown. Keep in mind, though, that the second hit has too little hitstun to combo out of it, but it is still a good option to use occasionally.
| | Sword's grounded overhead option. The first active window hits either high or mid depending on how quickly it connects, and the second active window hits low. Although it acts as an extremely fast overhead if the sword is positioned close to the ground, its utility as an overhead gets somewhat overshadowed by {{clr|3|j.S}} due to having lower metered reward. Still useful as an overhead sometimes due to gatling out of non-jump cancelable moves such as {{clr|3|f.S}} and {{clr|3|2S}}, and also preferable to {{clr|3|jS}} if you have less than 25% meter. |
|
| |
|
| {{clr|4|6H}} will usually raise the sword a bit before dropping downwards at a 45 degree angle, towards the opponent. Keep this in mind, as if the sword is too high and the opponent is grounded, they may be able to low profile the move and escape your pressure, and it may whiff if used improperly. Its best uses are generally after a {{clr|3|f.S}}, {{clr|3|2S}}, or {{clr|4|2H}}(1), leading to mixup or continuing a combo. | | *Most often used in combos or to attempt to jail an opponent and reset pressure without spending meter (usually after the second hit of {{clr|4|2H}}) |
| | *If the first hit connects too early in its active frames there will be a jumpable gap before the second hit. |
| | *Timing the move so that it hits as meaty as possible on someone's wakeup leaves you + enough to run a mixup and is also fully reversal safe due to the low recovery. |
| }} | | }} |
|
| |
|
| Line 1,007: |
Line 1,119: |
| |recovery = 15 | | |recovery = 15 |
| }} | | }} |
| Zappa's only ranged low, but a ranged low is a blessing for anybody who gets one.
| | Sword's ranged low option and a fantastic poke with surprising range. Mixing this with {{clr|3|jS}} for long range unreactable 50/50 mixups is the core threat of Sword's gameplan. |
| *Will drop the sword's height on use, perfect for comboing into {{clr|4|2H}} and ensuring that your grounded sword combos connect. | | *Moves the sword about three times further forward than {{clr|3|f.S}} and drops its height significantly. |
| *Note that {{clr|3|2S}} does not hit low if the sword is not at its default grounded height. It still has its uses when its not, but opponents who are aware won't need to worry about Zappa's mixup as heavily. | | *Note that {{clr|3|2S}} does not hit low if the sword does not begin the animation at its default grounded height or lower. Because of this attempting to keep the sword fairly low to the ground is crucial if you want to run long range mixups. |
| [[/Frame_Data#Sword|Gatling Options]]: {{clr|4|5H}}, {{clr|4|2H}}, {{clr|4|6H}}, {{clr|5|5D}}, {{clr|5|2D}} | | [[/Frame_Data#Sword|Gatling Options]]: {{clr|4|5H}}, {{clr|4|2H}}, {{clr|4|6H}}, {{clr|5|5D}}, {{clr|5|2D}} |
| }} | | }} |
| Line 1,040: |
Line 1,152: |
| |recovery = 18 | | |recovery = 18 |
| }} | | }} |
| This normal is the defining feature of what propelled Zappa and the sword to the top of the tier list. With proper usage, Zappa gets access to a near ''full screen, 11 frame overhead'', which leads to good damage and knockdown with only 25% meter.
| | Extremely powerful tool which allows Zappa to perform 11 frame instant overheads whenever the sword is in front of the opponent. |
| *Tends to see most of its use after {{clr|4|2H}} due to it being one of Zappa's few jump cancellable sword normals, but on oki, it's just as scary when used in conjunction with {{clr|3|2S}}. | | *Moves the sword a bit more than twice as far forward as {{clr|3|f.S}}, and is just fast enough that you can fit two into a single jump. |
| *It '''will''' put fear into your opponents, so take advantage of it. | | *Requires 25% to meaningfully convert off of but it can also be used by itself or with other air normals as a ranged harassment tool. |
| | *If the opponent is grounded and in front of the sword you can do this or {{clr|3|2S}} raw as an unreactable 50/50 mixup, and in blockstrings you can do a similar mixup off any normal that has both a jump cancel and a low gatling ({{clr|1|2P}}, {{clr|1|5P}}, {{clr|1|6P}}, {{clr|3|c.S}}). |
| | *In combos you can utilize this move in the sequence {{clr|4|2H}} {{clr|3|j.S}} {{clr|4|j.H}} frc {{clr|3|j.S}} {{clr|4|j.H}} (land into ground combo) for a metered extension that adds a solid amount of damage and keeps the opponent on the ground. |
| [[/Frame_Data#Sword|Gatling Options]]: {{clr|2|j.K}}, {{clr|4|j.H}}, {{clr|5|j.D}} | | [[/Frame_Data#Sword|Gatling Options]]: {{clr|2|j.K}}, {{clr|4|j.H}}, {{clr|5|j.D}} |
| }} | | }} |
| Line 1,054: |
Line 1,168: |
| |active = 9 | | |active = 9 |
| |recovery = 15 | | |recovery = 15 |
| | |frcStart = 9 |
| | |frcEnd = 11 |
| }} | | }} |
| Mainly a combo tool and occasional crossup tool. | | Mainly a combo tool and occasional crossup tool. |
| Line 1,141: |
Line 1,257: |
| |input=j.236H|type=sword | | |input=j.236H|type=sword |
| |description= | | |description= |
| Interesting move with a very large hitbox that will track the sword to Zappa's position when used in the air. It does a moderate amount of damage and can be used for some silly combos, but mainly sees use as returning the sword to Zappa while airborne. | | Interesting move with a very large hitbox that will track the sword to Zappa's position when used in the air. |
| *When used, the sword's spin will create a large hitbox that moves towards Zappa. This can catch people trying to get from the sword to you, as it is active during the entirety of Zappa's air time, and it will often knock down on counterhit allowing you to safely land without needing to FRC. | | *When used, the sword's spin will create a large hitbox that moves towards Zappa. This can catch people trying to get from the sword to you, as it is active during the entirety of Zappa's air time, and it will often knock down on counterhit allowing you to safely land without needing to FRC. |
| *The move will propel Zappa up and forward on use, allowing you to cross the screen very quickly if done after an airdash or a dash jump. | | *The move will propel Zappa up and forward on use, allowing you to cross the screen very quickly if done after an airdash or a dash jump. |
| *Depending on the position of the sword as you land this may beat various anti airs, but it's not always consistent. | | *Depending on the position of the sword as you land this may beat various anti airs but it's not very reliable due to the amount of frames where the hitbox is above you. |
| *Does a surprisingly high amount of chip damage, which can occasionally make it a good tool to close out rounds. | | *Does a surprisingly high amount of chip damage, which can occasionally make it a good tool to close out rounds. |
| *While the move is a mid and will not cross up if the opponent blocks low it can still catch people who are unaware or trying to FD. | | *While the move is a mid and will not cross up if the opponent blocks low it can still cross people up if they are blocking high or trying to FD. |
| *The FRC on frames 1 and 2 after landing is important as without it this move can be very unsafe. | | *The FRC on frames 1 and 2 after landing is important as without it this move can be very unsafe. |
| }} | | }} |
|
| |
|
| </div>
| | ==Raou Normals and Specials== |
| <div id="movelist-5" class="movelist">
| |
| | |
| ===<big>Normal Moves</big>=== | |
| ----
| |
| ===<big>{{clr|3|c.S}}</big>=== | | ===<big>{{clr|3|c.S}}</big>=== |
| {{GGACR_Move_Card | | {{GGACR_Move_Card |
| Line 1,289: |
Line 1,401: |
| }} | | }} |
|
| |
|
| ===<big>Special Moves</big>===
| |
| ----
| |
| ===<big>Darkness Anthem</big>=== | | ===<big>Darkness Anthem</big>=== |
| {{InputBadge|{{clr|3|236S}} with Raou (Air OK)}} | | {{InputBadge|{{clr|3|236S}} with Raou (Air OK)}} |
| Line 1,331: |
Line 1,441: |
| *It might be useful to end air combos if it will kill, but otherwise it's not particularly useful. | | *It might be useful to end air combos if it will kill, but otherwise it's not particularly useful. |
| }} | | }} |
|
| |
| ===<big>Overdrives</big>===
| |
| ----
| |
| ===<big>Bellows Malice </big>===
| |
| {{InputBadge|{{clr|3|632146S}} with Raou}}
| |
| {{GGACR_Move_Card
| |
| |input=632146S|type=raoh
| |
| |description=
| |
| A terrifying overdrive which has just as much utility on block as on hit.
| |
| *Bellows Malice hits several times for high amounts of damage, and has a low enough recovery that you can follow it up pretty easily.
| |
| **However, it has a large deadzone in front of Zappa, so instead of a reversal, it's better used from further away, usually around 1/3 to 1/2 screen.
| |
| *Excellent for ending Raou's longer combos if you have the meter.
| |
| *Inversely, on block, this move absolutely tears through opponents. Each hit deals double and a half chip damage, draining opponents' health and cranking their guard bar to flashing if they don't FD, and eating more than half their tension bar if they do.
| |
| *Use Bellows Malice wisely with Raou and he becomes even more dangerous.
| |
| }}
| |
|
| |
| </div>
| |
|
| |
|
| ==Universal Mechanics== | | ==Universal Mechanics== |
| Line 1,354: |
Line 1,447: |
| |input=Ground Throw | | |input=Ground Throw |
| |description= | | |description= |
| Throws the opponent opposite of the direction your threw them in. Wallbounces and usually knocks down. | | Throws the opponent opposite of the direction your threw them in. Wallbounces near the corner or midscreen for some characters, but sometimes exact screen and camera positioning causes irregularities in whether characters wallbounce and if they get knocked down afterwards or not. |
| *You can sometimes followup with OTG summon when naked, or link into various combos dependent on summon if they wallbounce.
| | |
| *Anji, Faust, Testament, Dizzy, Millia, Baiken, Bridget, Jam, Kliff, and May will wallbounce even without hitting a corner if you throw them from midscreen. This allows Raou to combo into orb loops after a throw even outside the corner with 50% meter.
| | The following characters can wallbounce midscreen '''without''' touching the corner, and if they do the throw: |
| | |
| | '''Never''' knocks down: Bridget, Faust, Jam, May, Baiken*, Kliff*, I-no** |
| | |
| | '''Usually''' knocks down: Dizzy, Millia |
| | |
| | '''Always''' knocks down: Anji, Testament |
| | |
| | (asterisks denote how inconsistent the wallbounce is) |
| | |
| | The throw always knocks down if the character does not wallbounce or if they are thrown directly into the corner wall. |
| | |
| | If the throw results in a wallbounce it sometimes allows a combo followup, most notably with Raou as you can 214S RRC into 6H K orb loops for a huge combo. |
| }} | | }} |
|
| |
|
| Line 1,412: |
Line 1,517: |
| *You can combo into it fairly easily, mainly after {{clr|5|2D}}, and dash up with OTG Centipedes afterwards as usual. However, using this as a wakeup option, while more reliable than hoping for normal Centipedes, will only work if the opponent has committed to a lengthy oki option. | | *You can combo into it fairly easily, mainly after {{clr|5|2D}}, and dash up with OTG Centipedes afterwards as usual. However, using this as a wakeup option, while more reliable than hoping for normal Centipedes, will only work if the opponent has committed to a lengthy oki option. |
| *Note that it will also remove Zappa's current summon, including Raou. Use this move wisely. | | *Note that it will also remove Zappa's current summon, including Raou. Use this move wisely. |
| | }} |
| | |
| | ===<big>Bellows Malice </big>=== |
| | {{InputBadge|{{clr|3|632146S}} with Raou}} |
| | {{GGACR_Move_Card |
| | |input=632146S|type=raoh |
| | |description= |
| | A terrifying overdrive which has just as much utility on block as on hit. |
| | *Bellows Malice hits several times for high amounts of damage, and has a low enough recovery that you can follow it up pretty easily. |
| | **However, it has a large deadzone in front of Zappa, so instead of a reversal, it's better used from further away, usually around 1/3 to 1/2 screen. |
| | *Excellent for ending Raou's longer combos if you have the meter. |
| | *Inversely, on block, this move absolutely tears through opponents. Each hit deals double and a half chip damage, draining opponents' health and cranking their guard bar to flashing if they don't FD, and eating more than half their tension bar if they do. |
| | *Use Bellows Malice wisely with Raou and he becomes even more dangerous. |
| }} | | }} |
|
| |
|
| Line 1,420: |
Line 1,538: |
| |input=236236H | | |input=236236H |
| |description= | | |description= |
| Command grab IK with less range than Zappa's regular throw – will only connect at point blank range. | | Command grab IK with less range than Zappa's regular throw – will only connect at point blank range. Oddly a reversal if you happen to be in IK mode accidentally or due to a miscalculation. |
|
| |
|
| Due to its two startup frames after the superflash, your opponent can simply jump out of it on reaction. It's generally better to save your meter, unless you get your opponent dizzied or force {{Character Label|GGACR|A.B.A}} into her {{MiniMoveCard|chara=A.B.A|input=Suka Motion}}.
| | Not usable as a mixup since it's jumpable post-flash, but Zappa has solid stun potential off of {{clr|4|2H}} alone. Not the fastest in terms of prep time but one of the fastest for the move itself. If you gauge your opponent to not be an expert at churning their way out of a stun, Zappa's IK is a solid if nuclear option to punish someone for daring to get counterhit by {{clr|4|2H}}. Like (almost) all Instant Kills, it's also used if you force {{Character Label|GGACR|A.B.A}} into her {{MiniMoveCard|chara=A.B.A|input=Suka Motion}}. |
| }} | | }} |
|
| |
|
| Line 1,432: |
Line 1,550: |
| {{GGACR/Navigation}} | | {{GGACR/Navigation}} |
| {{Overview/SEO|summary=Guilty Gear +R's Zappa switches between four different ghost summons to radically (and randomly) change his playstyle.}} | | {{Overview/SEO|summary=Guilty Gear +R's Zappa switches between four different ghost summons to radically (and randomly) change his playstyle.}} |
| [[Category:Guilty Gear XX Accent Core + R]]
| |


